

This article is part of a series:
GitHub Repository: https://github.com/serverless-guru/real-time-weather
In this article, we are going to learn how to hook up AWS IoT MQTT with a ReactJS frontend. Giving our ReactJS application real-time communication where every device will instantly* be updated when a new message is published to our MQTT topic.
- Overview of AWS IoT
- AWS Setup
- Building the ReactJS app
- Extending the backend
Alright, let’s get into it.
Overview of AWS IoT
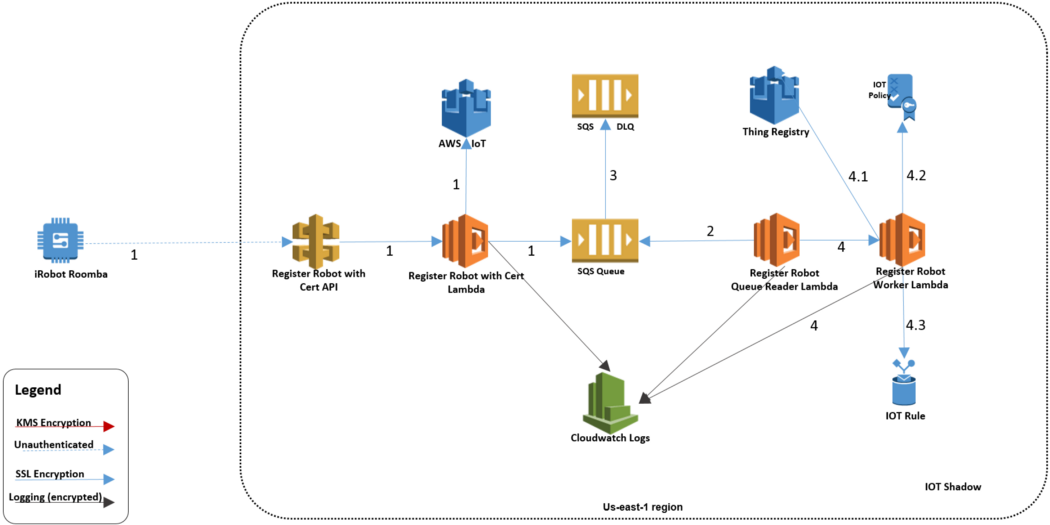
When we hear IoT we may first imagine a smart toaster or a talking coffee pot. However, with the same set of tools companies like Bayer Crop Science are doing real-time crop data analysis or iRobot the creator of Roomba is able to handle real-time data ingestion using a combination of Kinesis and other supporting services seen below.
MQTT with AWS IoT
“MQTT is a machine-to-machine (M2M)/”Internet of Things” connectivity protocol. It was designed as an extremely lightweight publish/subscribe messaging transport.” — Source: MQTT
AWS leverages the MQTT protocol as the primary AWS IoT message broker. This is how that works.
“Devices report their state by publishing messages, in JSON format, on MQTT topics. Each MQTT topic has a hierarchical name that identifies the device whose state is being updated. When a message is published on an MQTT topic, the message is sent to the AWS IoT MQTT message broker, which is responsible for sending all messages published on an MQTT topic to all clients subscribed to that topic.” — Source: How AWS IoT Works
Real-Time communication
AWS IoT gives the developer the ability to take advantage of the MQTT protocol to handle publishing and subscribing to a real-time stream. We will use this solution to achieve real-time communication for our Serverless web applications. So instead of our toaster telling us the weather in Burbank, California using Amazon Polly, we will be using a ReactJS frontend to tell us the weather in Burbank, California! That’s called functionality 😅
AWS Setup
Perfect, with some background out of the way. Let’s detail what we are going to cover in the AWS Setup portion of this tutorial.
- Creating an AWS IoT thing
- Creating a Cognito User Pool
- Creating a Cognito Identity Pool
- Creating AWS IAM role for unauthenticated users
- Connect Cognito Identity Pool to AWS IoT thing
That is a lot of ground to cover. Yet, when we complete those steps we will be ready to build our ReactJS app and begin receiving real-time updates from our AWS IoT MQTT topic.
First, log in to your AWS account and navigate to AWS IoT Core.
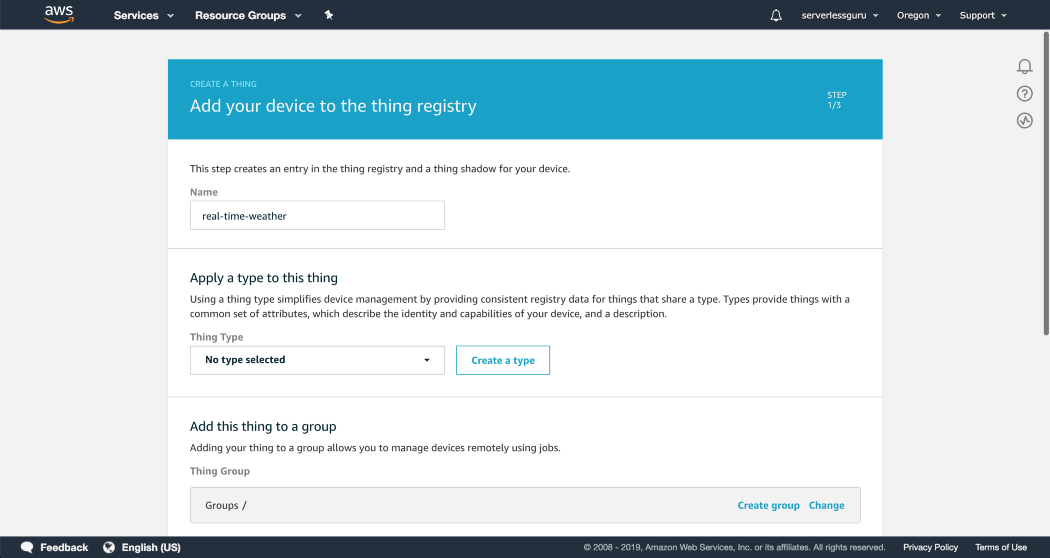
Register an AWS IoT thing
Our AWS IoT thing will be our ReactJS app. Anyone viewing our ReactJS app will be considered a “device”. Click Register a thing.

Name your thing
I’ve named my thing real-time-weather. Throughout the rest of the tutorial, I will reference the name real-time-weather.
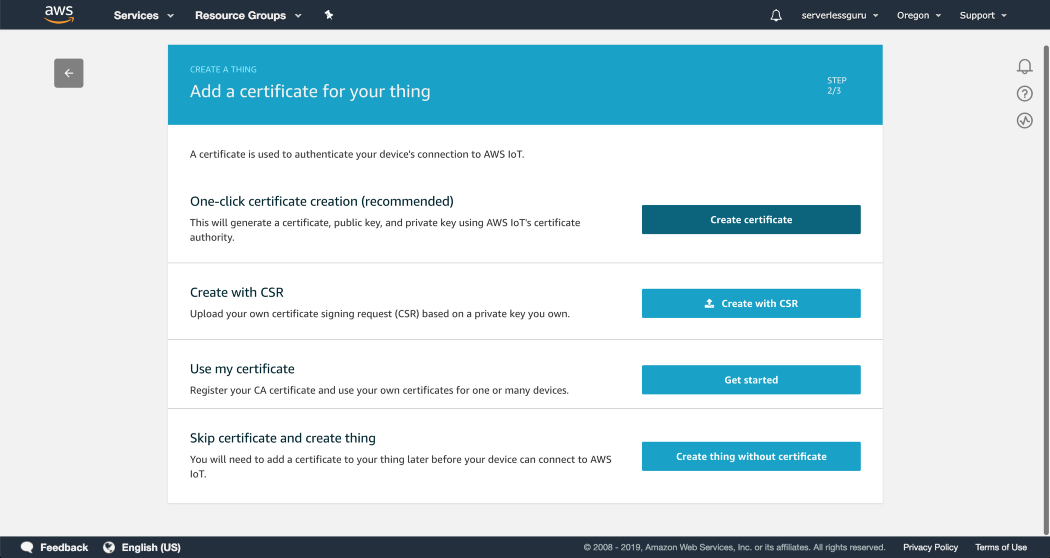
Create a certificate for your thing
We can easily generate an AWS IoT certification using the One-click certificate creation option.
Attach a policy
Now that we have the certificate created we can hit Attach a policy.
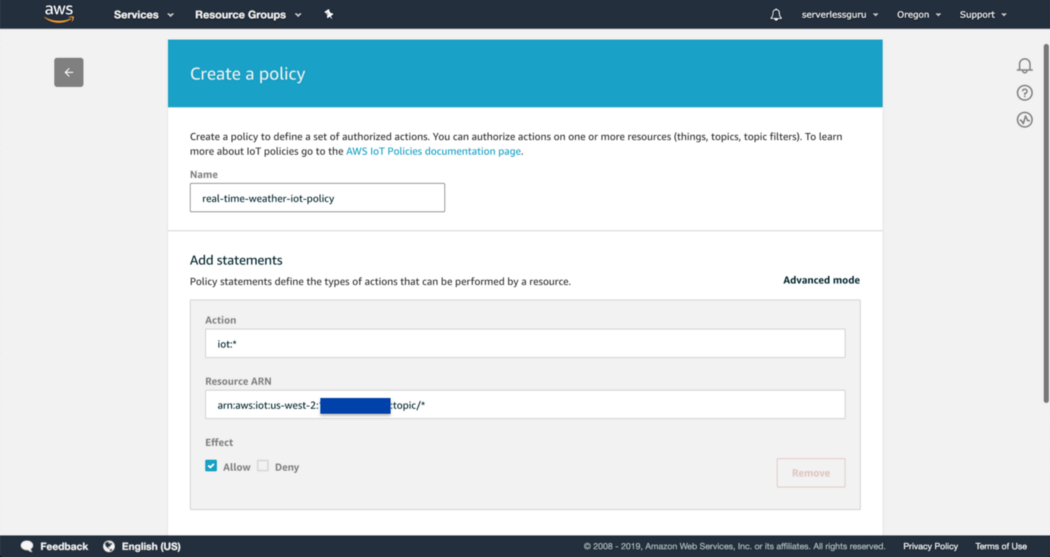
Create a New Policy
Our new certificate doesn’t actually have any policies so we will create a new one. Then in future steps when we connect the Cognito Identity Pool to our AWS IoT thing we will be referencing this new policy.

Copy in the following values
Set the action to iot:*. Then click Save.
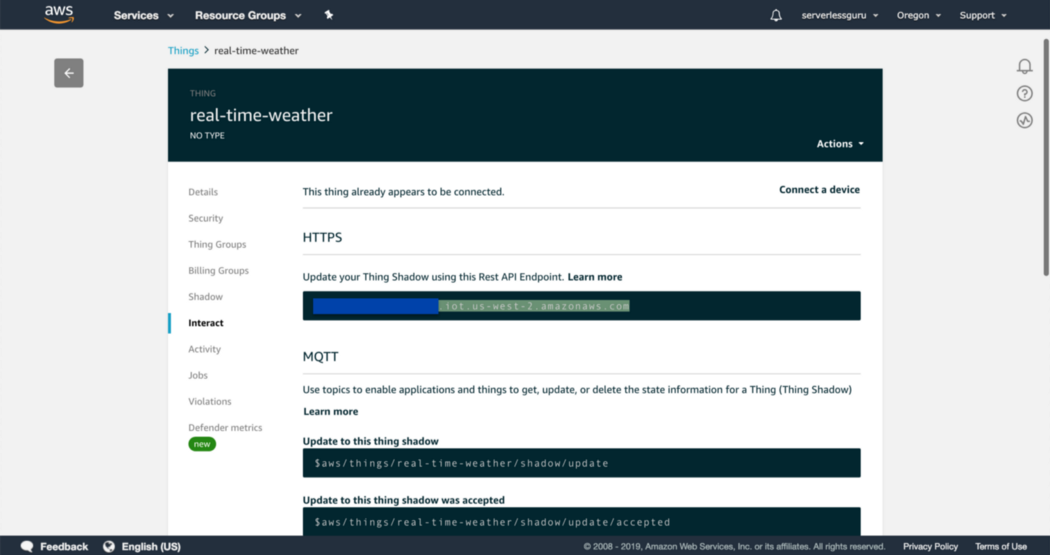
View thing endpoint
Select your thing and click Interact. If you followed the steps above then you should see an HTTPS endpoint listed here. We will use this when setting up the frontend.
Nice work! We now have an AWS IoT thing. 🎉 🎉 Now it’s time to create the authentication resources. Let’s navigate to AWS Cognito.
Create an AWS Cognito User Pool
AWS Cognito is a fully managed authentication service and we will be leveraging this Cognito User Pool to create a way for users to authenticate with our application.
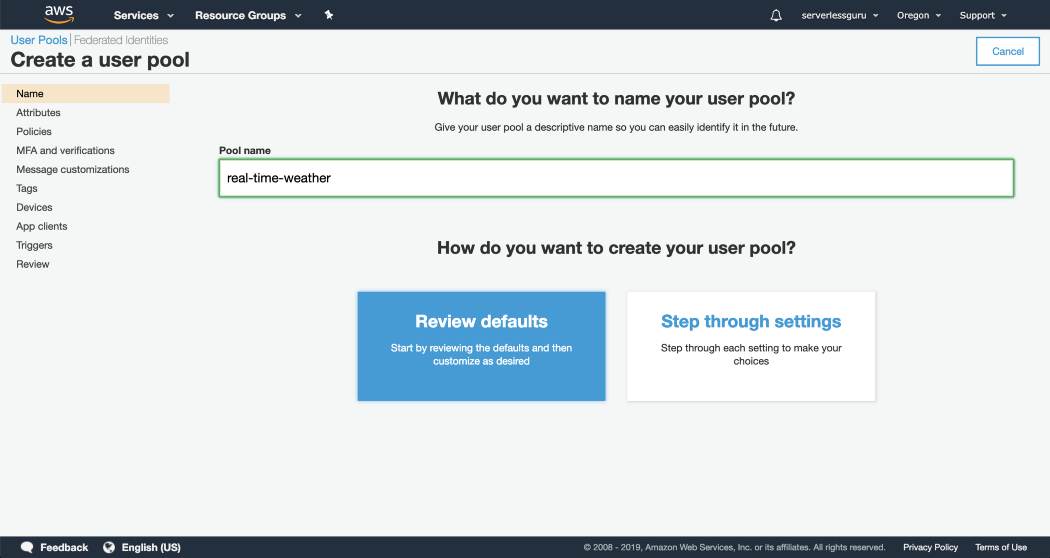
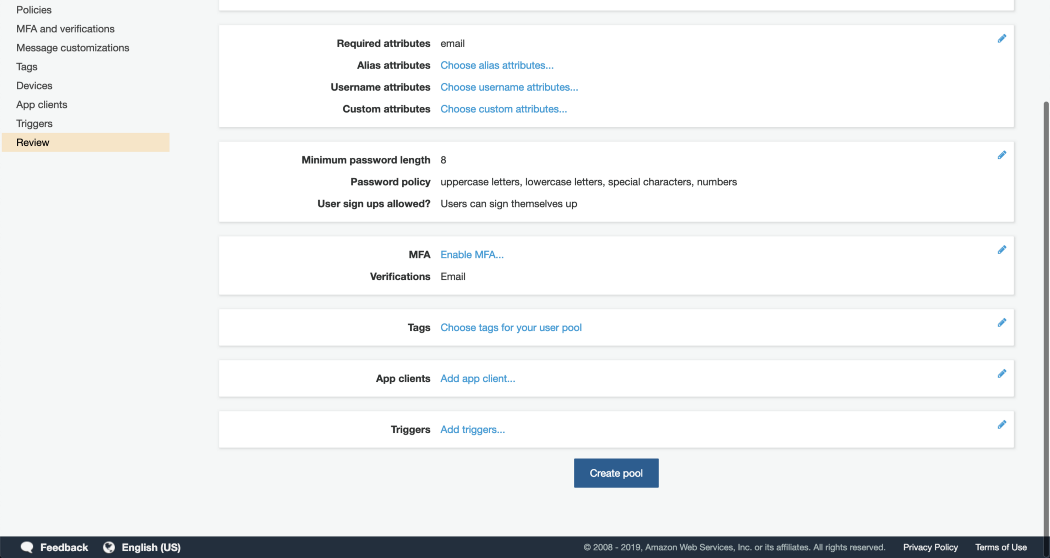
Click Create Pool
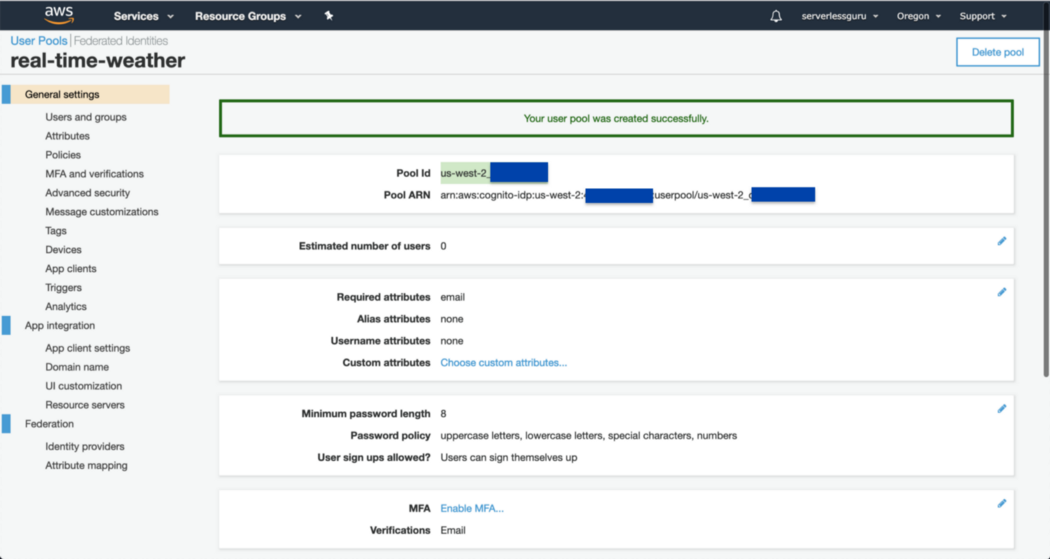
Take note of the Cognito User Pool Id
We will use this later when creating the Cognito Federated Identity and making the connection back to our Cognito User Pool.
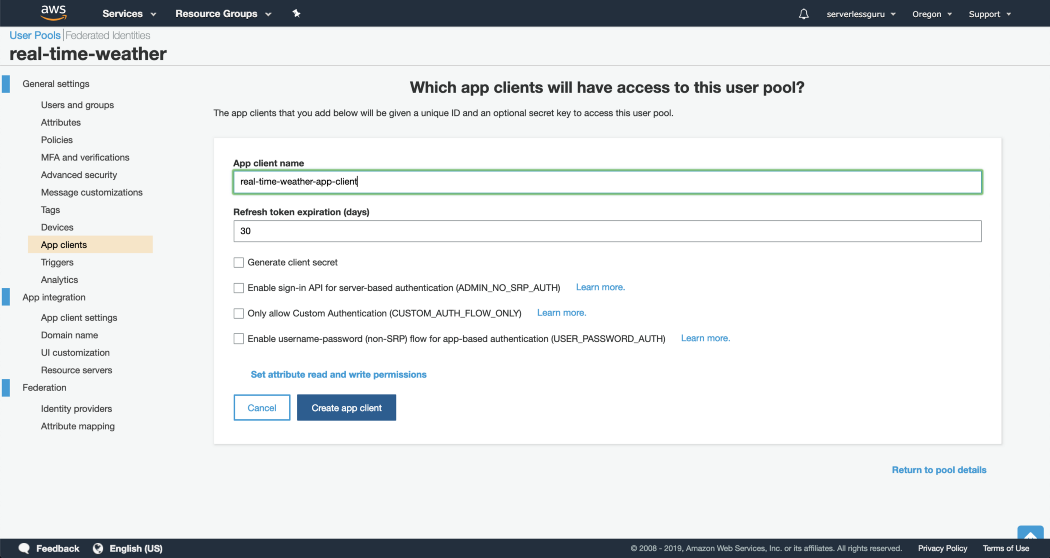
Create App Client
We will use this later when creating the Cognito Federated Identity and making the connection back to our Cognito User Pool.
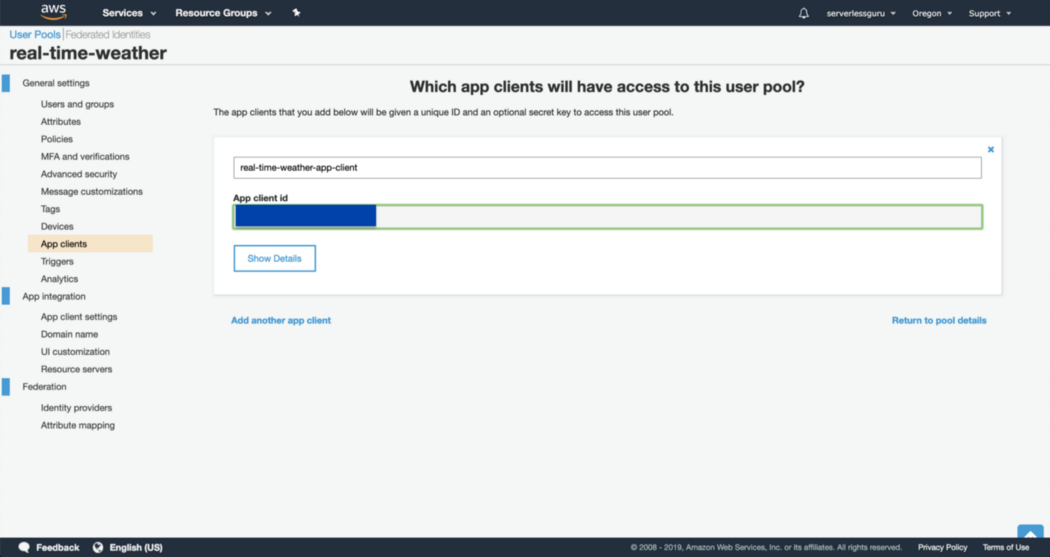
Copy App Client ID
In the next step, we will make the connection between our Cognito User Pool and our Cognito Identity Pool. To do that we need the App Client Id.
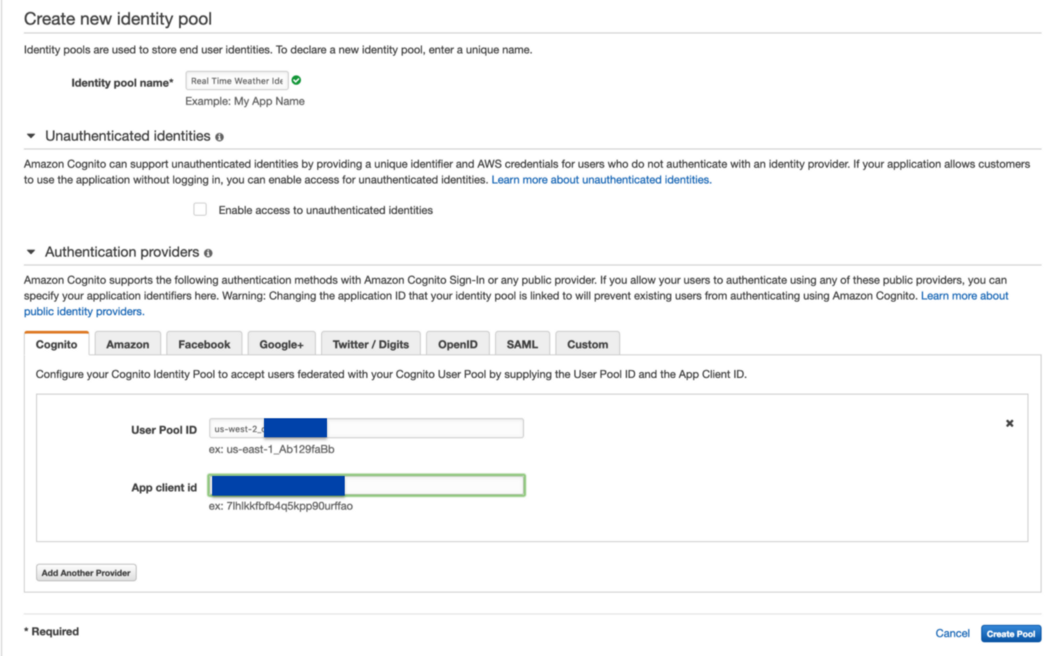
Create Cognito Identity Pool
Notice that we are setting the Authentication Provider equal to our Cognito User Pool values. Once again, this is why you copied the App Client ID and the Cognito User Pool ID in the previous steps.
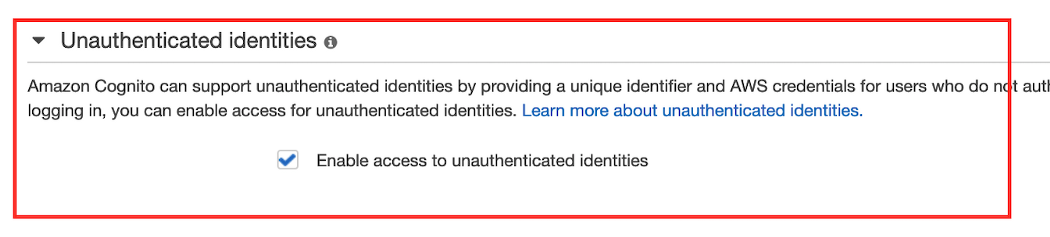
Enable Unauthenticated Identities
You should see a checkmark called, “Enable access to unauthenticated identities”. This will allow us to skip over having to build out the UI required to support users signing in first. Instead, we will generate temporary credentials and access our backend that way. Then hit Create Pool.
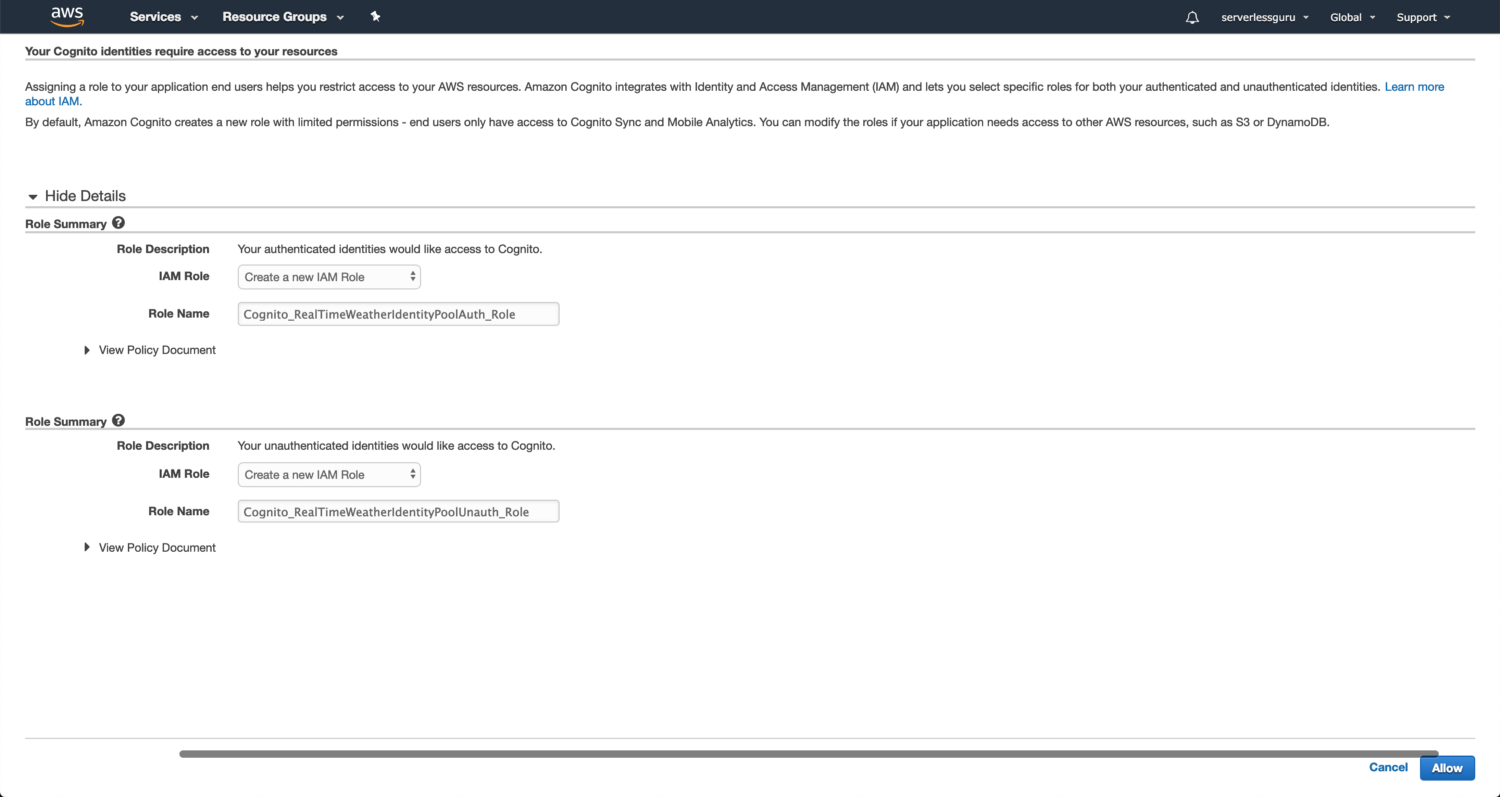
Set Cognito Identity Pool Access
Cognito Identity is creating both an unauthenticated and authenticated IAM role which our users will assume when they log in or browse our web application anonymously. For now, keep the defaults and hit Allow.
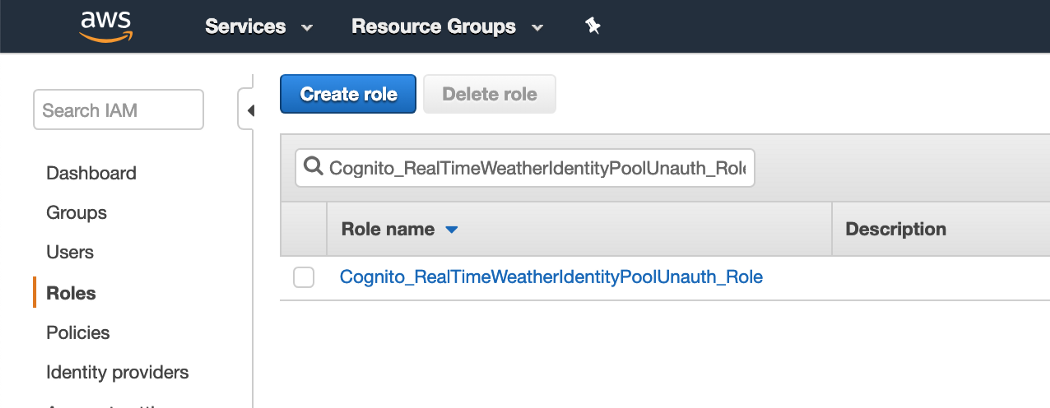
Edit the Unauthenticated IAM Role
We need to add some additional permissions to the Cognito Unauthenticated IAM role. Let’s navigate to AWS IAM and search for Cognito_RealTimeWeatherIdentityPoolUnauth_Role.
Click Edit Policy
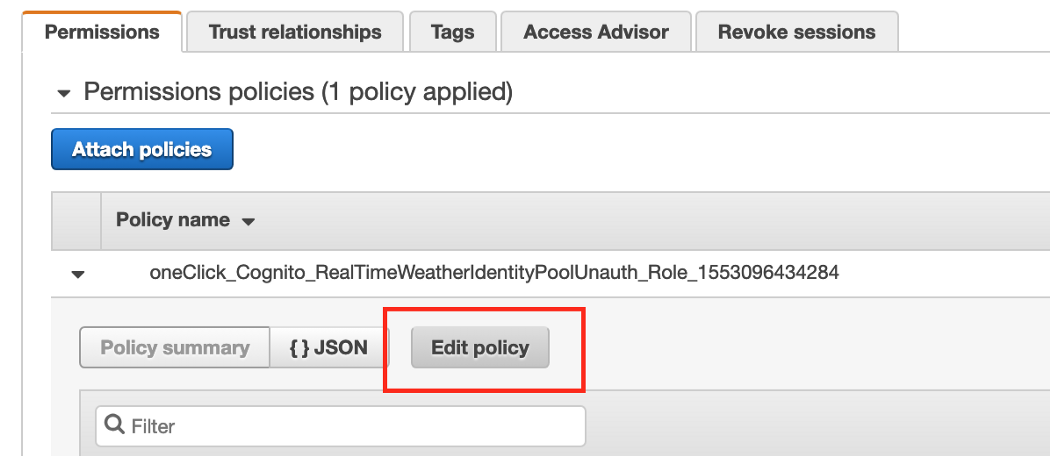
Copy in the following policy. This policy will give the unauthenticated user access to perform any action against any AWS IoT thing we’ve created. This is not ideal for anything past testing/development.
Click Review Policy

Sweet! Now let’s switch back to AWS Cognito. ➡️
Copy the Cognito Identity Id
Now that we have our authentication resources set up we need to copy the Cognito Identity Id and attach that id to our AWS IoT things policy. This will allow users on our ReactJS app to talk to our AWS IoT thing.
Create an AWS IAM User
To make the attachment we need to use AWS CLI. To run this terminal command you will need to have an AWS IAM user with the proper permissions and have the AWS_ACCESS_KEY_ID and AWS_SECRET_ACCESS_KEY_ID locally setup.
If you don’t already have this setup follow our article, Guide to First Serverless Project. This will give you step-by-step instruction to get everything ready including the Serverless Framework installed.
Attach the Cognito Identity ID to the AWS IoT Policy:
This will allow our IoT thing to authenticate with our real-time-weather AWS Cognito User Pool. The command below uses the AWS CLI to make the attachment. Which is why we created an AWS IAM user and set up our local computer to talk to our AWS account.
$: aws iot attach-principal-policy --policy-name 'real-time-weather-iot-policy' --principal 'us-west-2:<identity_pool_id>' --region us-west-2
Awesome, let’s now hook up the frontend!
Building the ReactJS app
We will be using ReactJS with the help of CRA (Create React App) to get this simple project up and running. Let’s jump straight in.
$: npx create-react-app real-time-weather
$: cd real-time-weather
$real-time-weather: yarn start
Now you should see the following screen if everything went according to plan.
Well, that was easy! CRA makes new application development really fast. We are also going to leverage a library created by AWS called AWS Amplify which abstracts the raw AWS SDK making it easier to work with.
For the next couple of sections, use your favorite text editor or IDE. I use VSCode and in the past, I’ve used Atom. Both are relatively lightweight.
Two different options
You have two options when it comes to building out the frontend to communicate with AWS IoT. You can either use aws-iot-device-sdk or you can use AWS Amplify. We are going to use AWS Amplify. If you want to see a side by side difference check out our GitHub repository.
Why are we choosing AWS Amplify
AWS Amplify wraps over the AWS SDK and allows us to do more with less. It’s an abstraction written by AWS and AWS supports it. Let’s take a look at the difference between the two.
AWS Amplify Code
This code will be what we use in our MVP or Minimal Viable Product. You can also take a look at the code, here.
Now that’s a lot to take in, all at once, so let’s move slower.
Install
We will need to import a couple of AWS Amplify libraries. To do that we need to first install AWS Amplify into our ReactJS project.
$real-time-weather: yarn add aws-amplify
Imports
These imports allow us to utilize the AWS Amplify library and also make use of AWSIoTProvider which is how we establish the connection to our IoT device.
Setup Amplify Credentials
We need to connect our Cognito User Pool, AWS region, Cognito Identity Pool, and our Cognito User Pool App Client.
But, wait. Where does the process.env.? variables come from?
Setting up .env.local file
We need to create a .env.local file to store our sensitive credentials these will automatically be picked up by CRA when we run yarn start. This file should already be added to our .gitignoreto ensure we are not uploading any private keys. You can copy these values from the steps we did above.
Setup connection to AWS IoT
We will use this snippet of code at the top of our App.js file to establish a connection with our MQTT PubSub endpoint.
Subscribe to the MQTT topic
With the ability to make a connection to our MQTT PubSub endpoint now available. We need to subscribe to our MQTT topic, called real-time-weather.
This will run anytime something is published to our MQTT PubSub endpoint and then one of three things will take place.
- next — we successfully received a message and inside data is that message
- error — something went wrong when trying to subscribe to the topic
- close — stop subscribing to this topic
ReactJS component code
Finally, we need to add in our super basic ReactJS component code.
Now we’re ready to test this thing.
Testing the full setup 🎉
We need to do a couple of things to test that everything is working together as it should. Let’s cover these steps at a high level:
- Start the ReactJS app
- Publish a message to the MQTT topic
- Validate the ReactJS app received a message
Sweet let’s get going.
Start the ReactJS app
We’ve already done this once before, however, this time CRA will pull in our .env.localfile when the server starts passing in our AWS IoT and AWS Cognito ids.
$real-time-weather: yarn start
Now with the server running, open up the Chrome developer tools by pressing CMD + Option + I or right-clicking in the browser window and selecting Inspect + Console. Once that’s done you should see this.
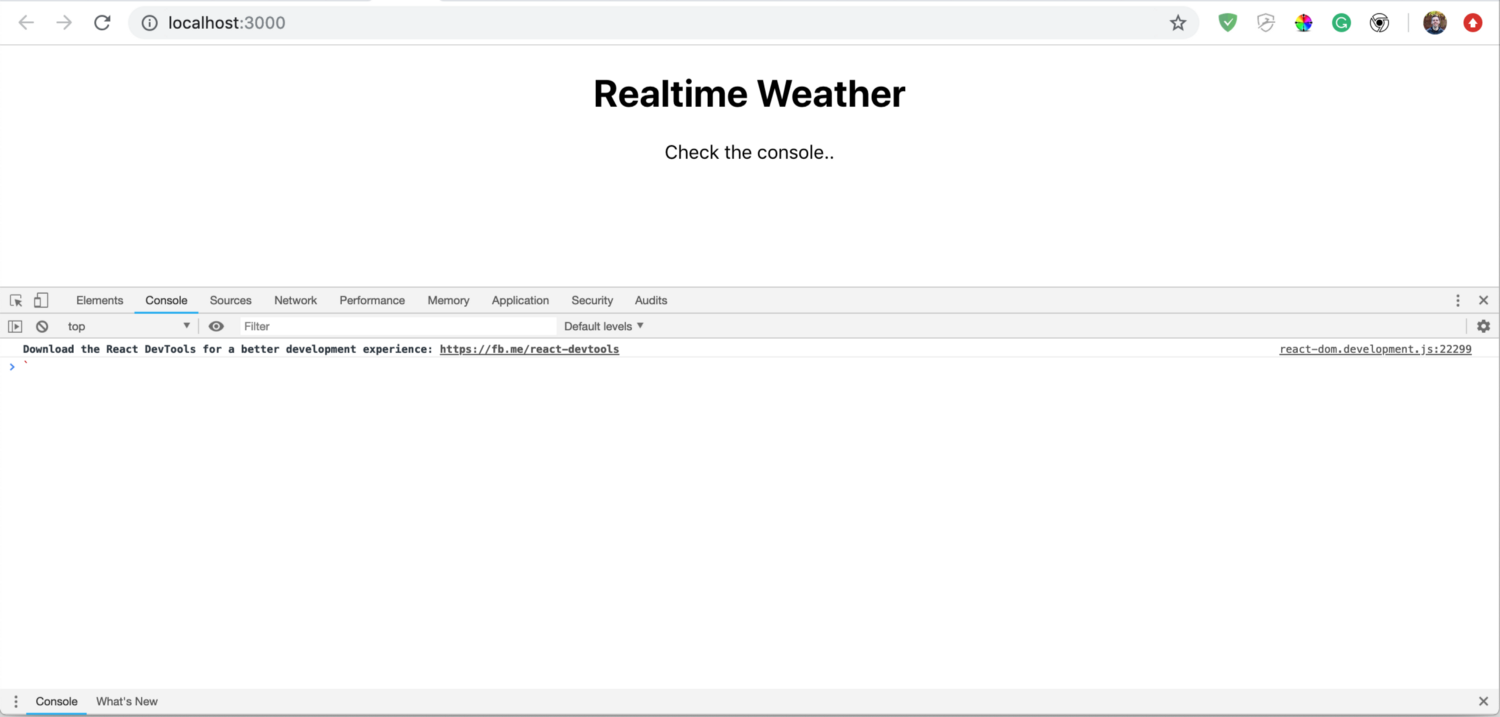
If this loads without any errors on your app then we’re cooking with 🔥 🔥. Because that means our connection to AWS IoT was successful! 🎉
Publish a message to the MQTT topic
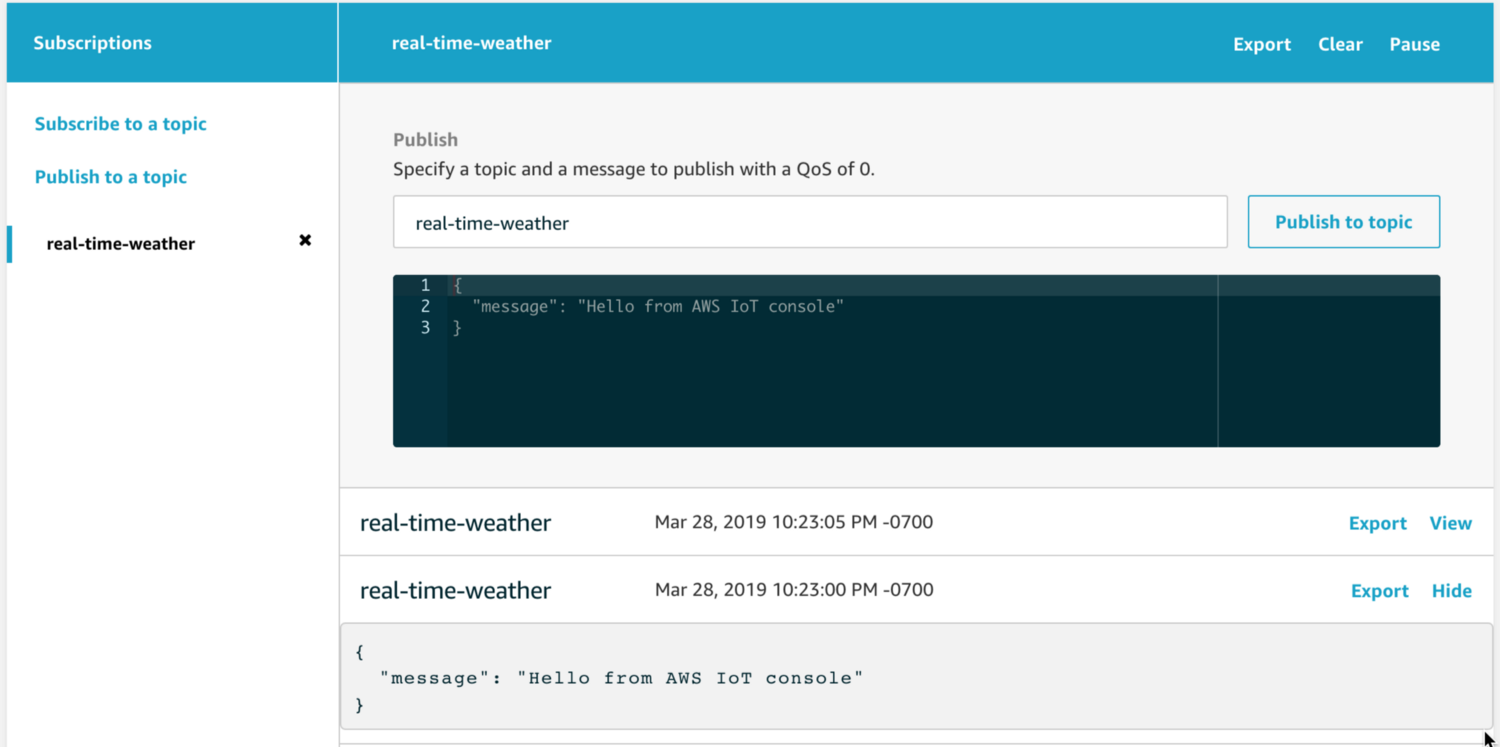
Now that we have the frontend ready to receive messages from the real-time-weather MQTT topic. Let’s publish a message from the console.
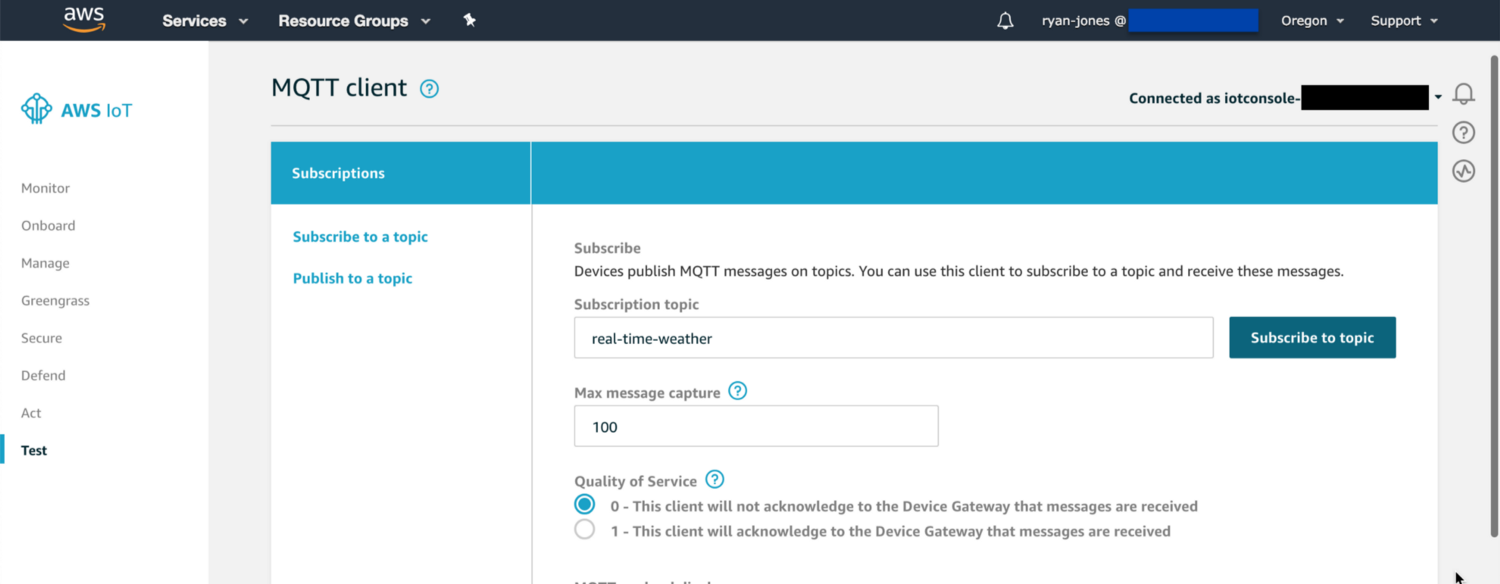
Navigate to the AWS IoT console and select Test. Then type in real-time-weather and hit Subscribe to topic.
Now hit Publish to topic 😄
Validate the ReactJS app received a message
Switch back to the ReactJS app running on localhost:3000 and check the console.
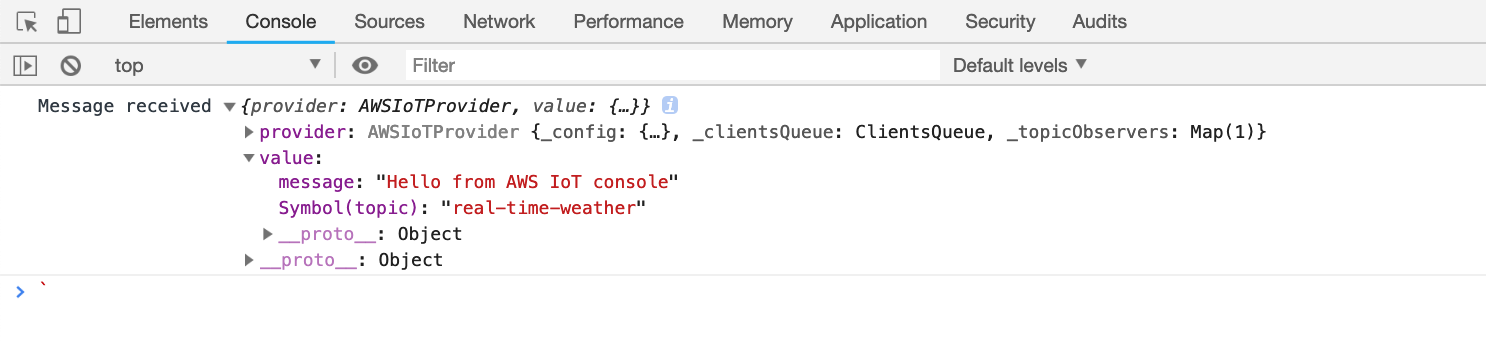
Wow! What we’ve just done is created the foundation to support a real-time application utilizing ReactJS for the frontend and AWS IoT MQTT PubSub in the backend. As new messages are published every client or device will receive those updates instantly*.
Extending the backend
We are going to use the Serverless Framework to create a DynamoDB table, a lambda function, and a Cloudwatch rule which triggers every two minutes. Allowing us to keep our database updated with the latest weather and publish that weather out to all devices.
We will also create an API Gateway REST API which will pull from DynamoDB and return the current weather data to the user when they first visit the ReactJS app.
Coming soon to a theatre near you.. stay tuned.


%20(1).svg)

.svg)


