Let’s build a Serverless REST API for our ReactJS website!
In my last article, Deploy ReactJS App with S3 Static Hosting, we discussed hosting a simple React app on AWS with S3. This works great for simple static pages but what if you want to do something more? How do you host your API on S3? That is what we are discussing today how to integrate an API into our app to get or post information from our own database. We will be using Lambda, DynamoDB, and API gateway. So let’s get started.
Our app will be grabbing cards from our database and showing them to the user. How this works is when a user requests a card from our website, API Gateway, will invoke our Lambda function, that will get the details from our DynamoDB and show the details to the user! Simple enough.
Create an Amazon DynamoDB Table
Log into the AWS Console and use the search bar to navigate to the “DynamoDB” service.
Create a table
Click “Create table”.

Name it “MagicCards”. Enter “CardId” for the Partition key and select “String”.
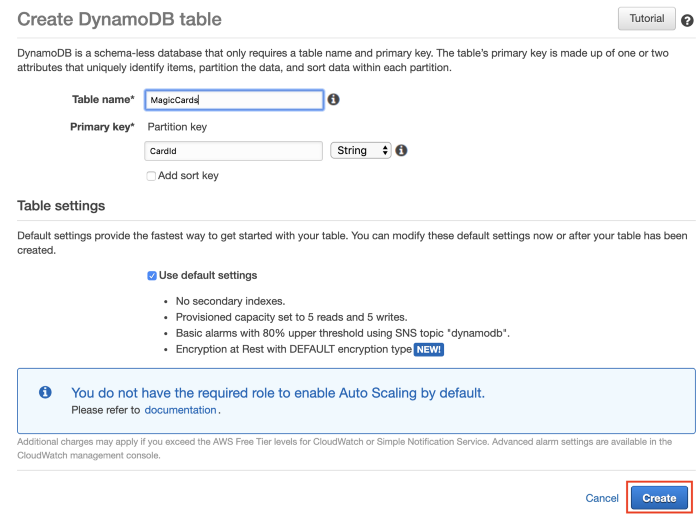
Now we should have something that looks like this.
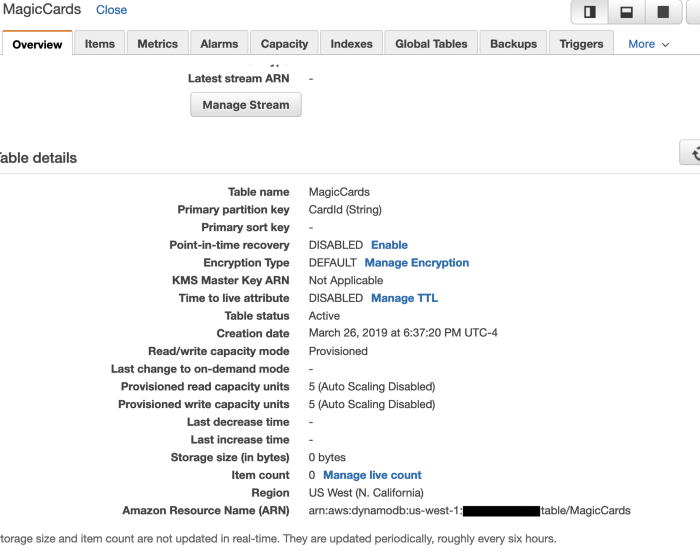
Let’s go to the items tab and select and create an item. Add a value to the CardId. You can even add other fields.

Create an IAM Role
All Lambda functions need an IAM role. It is what allows other AWS services to interact with our function. Search for IAM in the Services menu.

Create a new IAM role
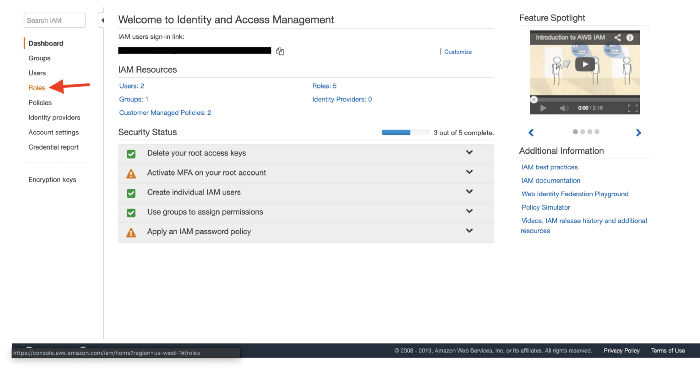
Find Roles on the left-hand side and click “Create a new IAM role”
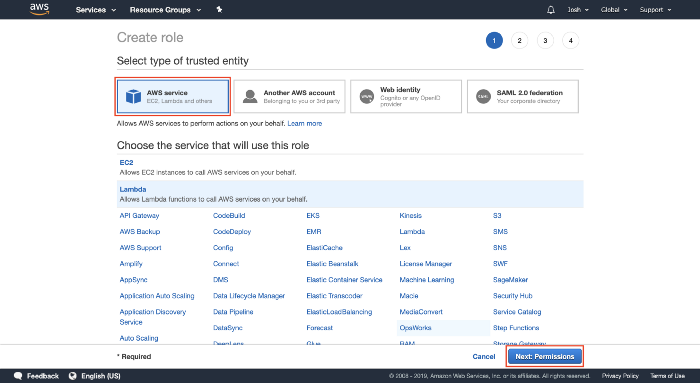
Select Lambda as the main service
Under “Choose the service that will use this role” select Lambda and click “Next: Permissions”.
Set AWS IAM role
Search for “AWSLambdaBasicExecutionRole”, select it, and click “Next: Tags”. Skip any other steps and click “Next: Review”.

Name your role
Name the role whatever you like, I choose “MagicCardsLambda”. Then click “Create Role”.
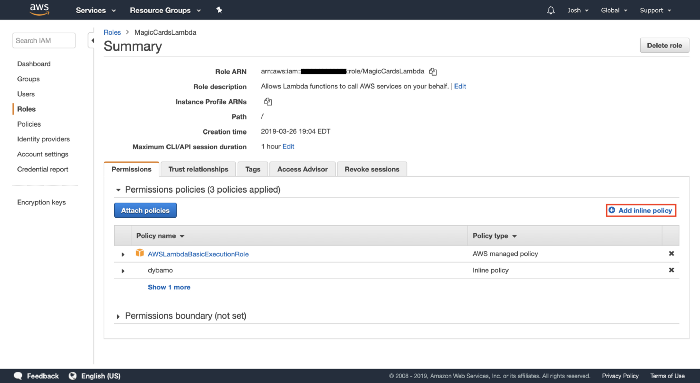
Add inline policy
Click into your new role. On the right side of the permissions tab click, “Add inline policy”.

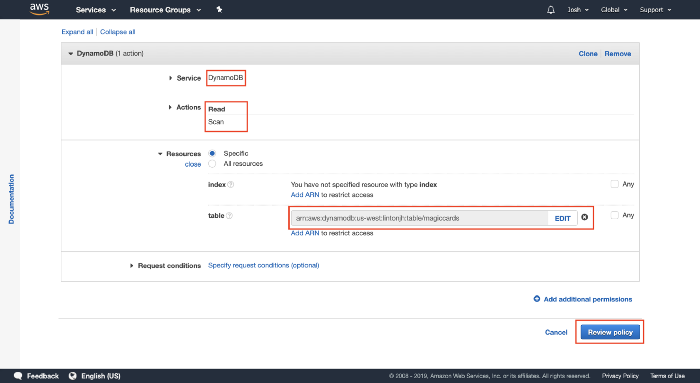
Choose the DynamoDB service
Here we select the service and what actions we want to allow this role to do. So if we select DynamoDB for the service and scan for the Actions it will allow our future Lambda function to be able to scan our database and return all the items inside of it. We could give our role all the actions but that isn’t the best practice.
Under the resources section, select Add ARN. This is where we use the Amazon Resource Name from earlier. Once that is selected click Add and then Review Policy.
Name the policy
Enter a name such as “DynamoDBWrite” and hit “Create policy”
Create a Lambda Function
Use the Services menu to search for the Lambda service.

Create a function
Here we can Author one from scratch, Use a blueprint, or Browse serverless app repository. Let’s choose “Select author one from scratch”. Enter “GetMagicCard” or whatever name you want. Use the latest Runtime currently, it is Node.js 8.10. For Execution role, select Use an existing role. This is where our IAM role comes up, go ahead and select that.
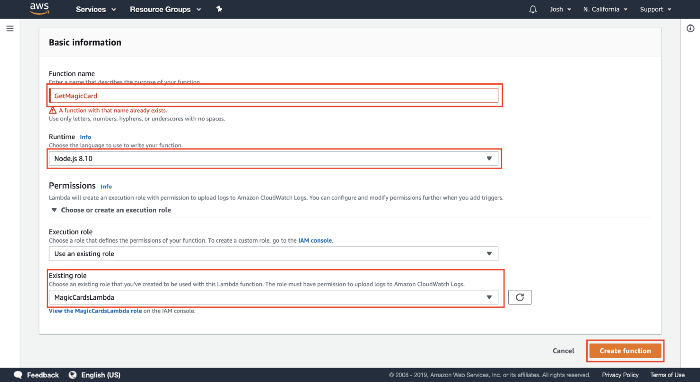
Create the function
Click Create Function and scroll down to “Function code”, this is where we place the code for our lambda function.
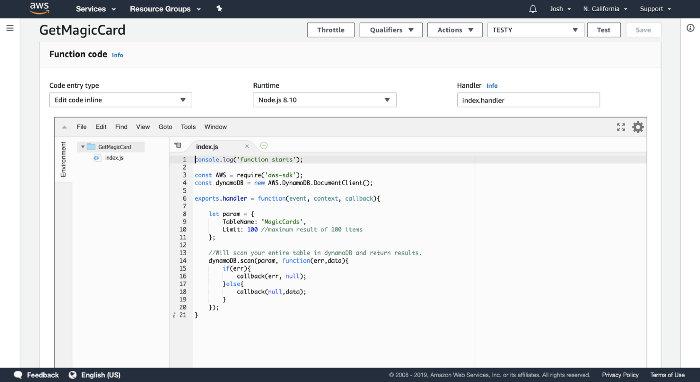
Copy the following code
Use the code below for some sample code then click “Save”.
Create a REST API
Now we are on the final part, creating a REST API with API Gateway. Under Services once again navigate to “API Gateway”.

Select NEW API
Amazon API Gateway is an AWS service for creating, publishing, maintaining, monitoring, and securing REST and WebSocket APIs at any scale. API developers can create APIs that access AWS or other web services as well as data stored in the AWS Cloud.
Name your API
I called my API, “Magic Cards”. Leave the “Endpoint Type” as “Regional”. Then hit “Create API”! 🎉

Name your API
I called my API, “Magic Cards”. Leave the “Endpoint Type” as “Regional”. Then hit “Create API”! 🎉
Create a Method
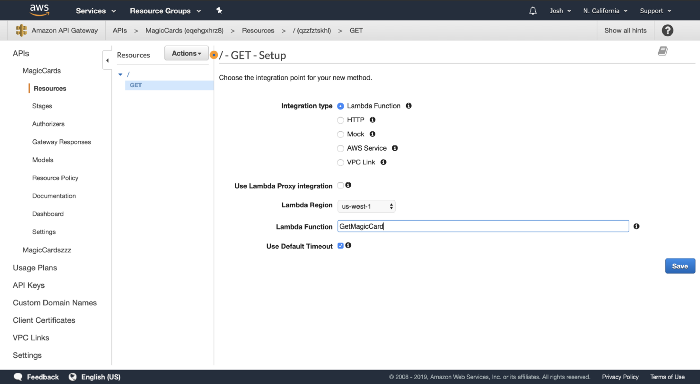
Let’s create a method. We can access our API and it will fire our new Lambda function. Click action > Create Method. Under the new drop-down select Get. Here we can select Lambda Function for our Integration type, us-west-1 for Lambda region, For Lambda Function select the name you chose for your function and hit save!
Create our URL. We are almost done with our API!
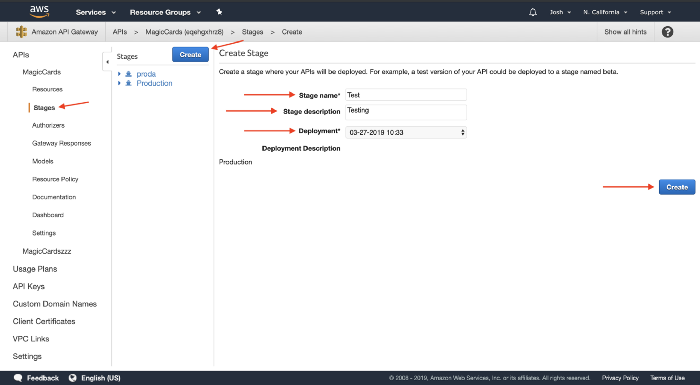
Now that we have our Get setup go ahead and select Stages on the left side. Here we can create a stage where our APIs are deployed. You can create a test version and a production version. Create a test name and description. Select your deployment and Create.
Grab our URL. We are done!
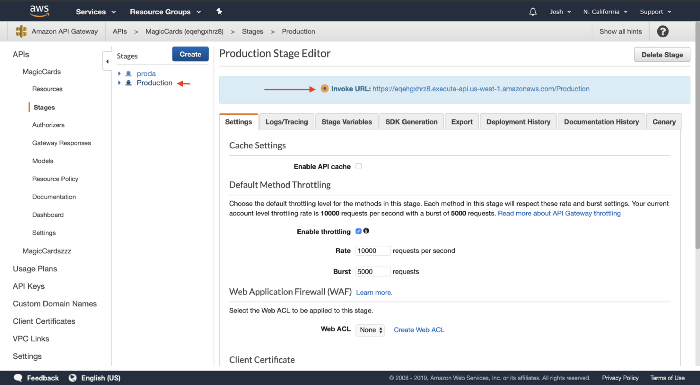
Click our stage and URL is Right there. All we need to do from here is just call this URL in our ReactJS app and we are set up. To test it first thought I’d suggest clicking the link and making sure you get a valid response.
Connecting API to ReactJS App
now what we are going to do is take our Invoke URL and add that to our React App.
Copy the following code
This is a pretty basic example from the React website on how to add a fetch API to your React App. We hitting our API and setting the response to our state. Then below in our render function, we are rendering out the results.
Test locally
To test we can run npm run start and we should see our website pop up with data coming from our DynamoDB table 🔥

Congrats 🎉
We did a lot here to move our App into AWS. We created a DynamoDB table and entered some items. Then we created a Lambda function that when triggered will scan our table and return the results. Lastly, we created an API endpoint with API Gateway that invoked our Lambda function and showed our results on the front end. These are some great building blocks that you can branch out of and do a lot more with. I encourage you to see what else you can build and share your results here by commenting on the article. Also, be on the lookout for this to be a video. Thanks for reading!


%20(1).svg)

.svg)




.webp)