- What are Serverless Components?
- Why use Serverless Components?
- What are the benefits of Serverless Components?
- How to use Serverless Components?
- Serverless Framework vs Serverless Components (coming soon)
This article is part of a series of related articles which dive into serverless components, we hope you enjoy.
In this article we will look at how to use the serverless website component released by Serverless Inc..
A simple website — Walk through tutorial
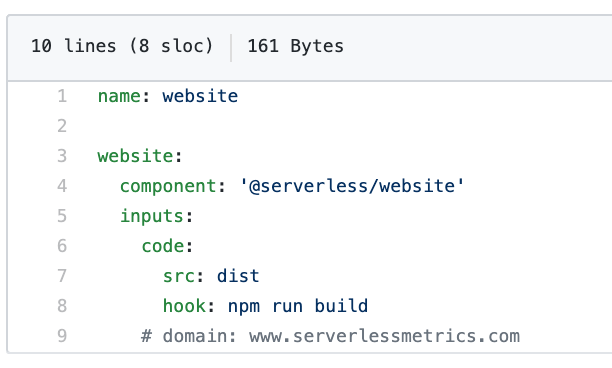
To kick this article off, we are going to take a look at the Serverless Inc. serverless website component example.

- Line 1: we name our stack
- Line 3: we specify our logical name
- Line 4: we specify what component we are trying to use
- Line 5: we specify our inputs these are the dynamic values that get passed into the @serverless/website component
- Line 6–7: we specify the code property this will allow us to direct the @serverless/website component to a specific output folder where our website files live after being built
- Line 8: we specify a hook this is a way to execute a terminal command. In the case above, the command will build the website files using npm run build
- Line 9: we have the option to specify a domain which needs to already exist inside your AWS account under Route53. However, if it does exist this one line will connect your website to the domain and create an SSL so your website has HTTPS.
Hopefully it’s clear to understand how much time was saved in a couple of lines of code. On line 9, we are saving a couple of hours and potentially even more if we had any bugs pop up or lacked some knowledge for how this connection works.
Here is what the serverless website component structure looks like.

If you’re familiar with ReactJS development or web development in general then these files shown above should be straight forward. The src folder has our ReactJS files and everything else is straight forward.
Walk through tutorial
Now that we have an idea for how the serverless website component is structured, let’s walk through the commands.
Install the Serverless CLI
$~: npm install -g serverless
Create a new project using the website template
$~: serverless create --template-url https://github.com/serverless/components/tree/master/templates/website
Install dependencies
$~: cd website
$website: npm install
Create a .env file
$website: touch .env
Add your ACCESS_KEY, SECRET_ACCESS_KEY, and REGION
AWS_ACCESS_KEY_ID=XXXXXXXXXXXXXXXXXXXXXX
AWS_SECRET_ACCESS_KEY=XXXXXXXXXXXXXx
AWS_REGION=us-west-2
Deploy to AWS
$website: serverless
Success 🎉

Checkout the live site

Watch for live updates
Let’s update the ReactJS code and use the --watch command to see what happens.
$website: serverless --watch
The serverless website component is now listening for changes.

Now let’s modify the App.js file and save it.

Our update was deployed.

Now if you we view our updated site, you can see the message says “a website to sell state-of-the-art toasters” 🍞

Tear down
$website: serverless remove
After running the remove command.

Review
In less than a few minutes, we were able to leverage a pre-built serverless component to get a website up and able to be accessed without having to know any minor details.
In less than 20 seconds, we were able to deploy a website to AWS and view the live website without having to know “how” our website files were getting pushed up.
In less than 10 seconds, we were able to see our updates automatically reflected on the live website thanks to serverless --watch.
In less than 2 seconds, we were able to tear down our website.
Thanks to leveraging the serverless website component. The only manual steps we had to do was adding our AWS credentials to a .env file. Something which I’m sure will be streamlined in the future to leverage the ~/.aws/credentials file automatically.


%20(1).svg)

.svg)


.webp)