

Introduction
Generative AI has become very popular in the last year, thanks to OpenAI’s ChatGPT platform. ChatGPT is a large language model that has been trained with general purpose knowledge. Humans can interact with the model in a conversational way.
Think of a GenAI chatbot like simply talking to a virtual friend. The virtual friend’s brain is implanted with huge amounts of data. This virtual friend uses that data to “think” and “speak” like an actual human being.
Of course, GenAI is a lot more complicated than that and a chatbot is just one of the many use cases. Check out this holiday chatbot (hurry before Santa drives away 😂) built by Serverless Guru and the webinar where we discussed how it was built.
I wanted to build a chatbot for a while now, however, I was lost seeing all the new technology stacks out there and I did not know where or how to get started.
Thanks to the community for their software contributions aimed at helping us easily and more conveniently develop applications that incorporate GenAI as a tool.
The primary purpose of this post is to share what I learned as I dabble with shiny new tech! Hopefully, this is helpful. 😊
We will walk through how to set up your local development environment so you can run the code on your machine, how to grant permissions to invoke Bedrock models from your local app, and a code walkthrough to help understand the basics of the technology stack.
Tech Stack
We will use the Foundational Models (FM) available in Amazon Bedrock.
- Amazon Bedrock provides access to foundational models from top AI companies and Amazon. There is a playground environment in the Bedrock console to let you experiment with the models. Bedrock is serverless so it is a fully managed service which means no infrastructure to manage!
- Don’t forget that there is a cost associated with using Bedrock!
Serverless Guru recently hosted a webinar on Building Your First Serverless API with Langchain Webinar so I was motivated to checkout LangChain.
- LangChain is a framework that helps standardize and streamline the process of integrating language models into applications. LangChain acts as the abstraction layer to simplify interactions with different models.
I do not know UI development and that’s how I stumbled upon Streamlit.
- Streamlit lets you build web applications easily using Python code. You can create pages, buttons, charts, and more with simple Python commands.
ChittyBot
This will be a very simple chatbot named ChittyBot that can carry a conversation with a human.
- ChittyBot will run locally and will only reach out to the internet when using Bedrock.
- Your local environment should have a valid AWS connection established.
The following diagram illustrates how the different tools used to build ChittyBot interact with one another.
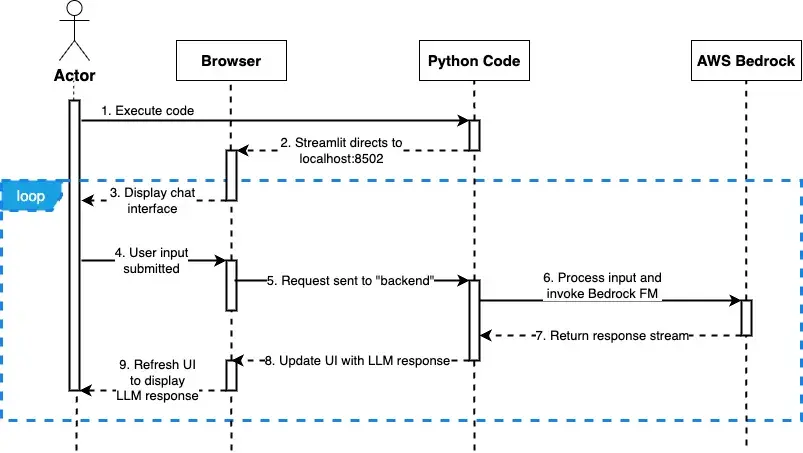
- Developer runs Python code via Streamlit
- Browser opens and goes to: http://localhost:8501/
- User sees the chat interface
- User submits a message through the web UI
- Python code executes and processes user message
- Bedrock model is invoked
- Bedrock response is streamed back
- Python code updates the UI with LLM response
Setup
Dev Environment
1. I used a Python 3.11 environment. You can use virtual environments like 'conda' or 'venv'. Install the following dependencies in your Python environment:
• 'pip install streamlit'
• 'pip install langchain'
• 'pip install python-dotenv'
• 'pip install boto3>=1.33.13'
2. In your project folder, create a '.env' file and add the following key/value pairs. Ensure the values provided match your AWS credentials.
3. If you are using VS Code and need to debug or step through code, create a debug configuration with the following details:
AWS Credentials
The following are required before we can successfully invoke a Bedrock model:
- Ensure you have requested access to the models
- IAM role granted with permissions to invoke specific Bedrock models
- Add a trust policy to allow our IAM user to assume the IAM role
1. If you do not have an IAM role yet, create one and add the following policies. We will assume this role with our AWS identity to invoke Bedrock models. Model IDs can be found in the AWS Docs.
2. Add a trust policy to the role you just created to allow your user to assume that role.
3. Add an entry for the IAM role to your '~/.aws/config' file. LangChain uses 'boto3' to connect to AWS and will pick up this configuration to assume the correct IAM role.
Skipping this step will result in the following IAM error:
Code Walkthrough
ChittyBot will be a context-aware chatbot, which means that it will remember previous messages within the chat session.
The complete code can be found in this Github repository.
Setup AWS Environment Variables
Loads the AWS environment variables from '.env' file which allows us to specify the credentials or profile to use for authentication.
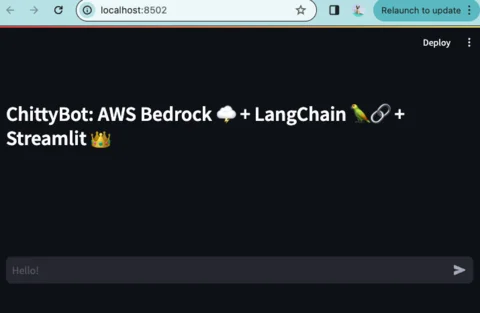
Page Header
The following Streamlit code displays provided text with header formatting. And yes, it can support emoji icons!!
The result in the browser is:

Streamlit Session
Think of a Streamlit session as a chat session. The context and conversation are preserved within a chat session.
Streamlit allows us to access the 'session_state' object which persists throughout a chat session.
In the following lines of code, we initialize the following objects when a chat session starts:
- messages list to store the chat messages so context/memory is preserved
- BedrockChat object from LangChain to use it for invoking Bedrock models
Streamlit UI
Whenever we interact with the web interface, like when we submit a message or write a response back, the entire page is reloaded or refreshed. The python code reruns from top to bottom.
In order to display the complete chat conversation in the browser, we need to loop through the messages list (chat history) that’s stored in our session.
- A chat session consists of 2 main roles: user and assistant. The role determines how the message container will look (which default icon to display alongside the message)
- with st.chat_message(["user" or "assistant"]) creates a message container and displays the appropriate default icon based on who wrote the message (user or AI)

- st.markdown ”flushes” the output to the web interface making it visible in the browser
User Input
- st.chat_input("<placeholder text>") adds an input text box where a human can enter messages to send to the LLM. We can add a placeholder text which appears in the text area.

- Notice the use of the walrus operator :=. This lets us assign the input value to the variable 'prompt' and at the same time ensure that a value exists (not None/Null).
- We create a HumanMessage object which serves as our container for the human’s message. The 'content' property stores the message and we add a new property called 'role' so we can assign the value as “user”. This is important when looping through the chat session history in order to display the correct icon in the message container.
- We add the 'HumanMessage' object to the messages list which persists throughout our chat session
Invoke Bedrock Model with Streaming
Now that the user has submitted a message, we are ready to invoke a model.
- Calling the 'stream' method of the 'BedrockChat' object sends the entire chat history (which already includes the user’s new message) as input to the Bedrock LLM Model
- Because ChittyBot is a conversational and context-aware chatbot, it needs a “memory” of what it talked about with the human user. The list of messages we pass as input to the Bedrock model serves as its memory.
- We enabled streaming when we initialized the 'BedrockChat' object so the response will be a stream
Streaming Bedrock Response
While Bedrock is streaming the response back to our code, we want to also stream that response out to the web interface to provide an interactive user experience.
- We create a chat message container for the assistant/AI.
- 'st.empty()' simply starts an empty message container for the assistant:

- We iterate through the stream and start displaying the chunks from the LLM response as they roll in. Instead of waiting for the full response to be returned, we want to display it as it’s streamed back to give that interactive user experience.
- We need to add the LLM’s response message to our chat history so we create an 'AIMessage' object. The response is stored in the 'content' property and we add a new property called “role” which is needed for displaying the correct icon when displaying the conversation upon page load.
- Finally, we simply reload/refresh the assistant message container with the complete LLM response to signal that it is finished writing.
Running the Chat Bot Application Locally
Now that we have the code, we can execute it locally.
To run the application, execute the following command:
You will see the following message in your terminal when the app is started. Log or print messages will also be visible in the terminal as you interact with the web/chat interface. This will take control of your terminal prompt.
To stop the application, simply type 'CTRL + C'.
Notice that a Network URL is also provided. This allows other devices within your local network to access the chat application as well.
A browser window/tab will open and display the web interface.
If a browser page isn’t opened, you can navigate to the Local URL: http://localhost:8502 manually.
Conclusion
In this blog post, we learned the basics to get started with building a context-aware conversational chatbot with memory using LangChain, Streamlit, and Amazon Bedrock.
We discussed how to set up your local development environment to allow coding and testing locally. Developing locally eliminates the noise of having to deal with cloud infrastructure or deployment so you can focus on learning the GenAI tools and frameworks. This might also provide some cost savings. The only thing that incurs cost for this project is the usage of Bedrock LLMs.
We also talked about how to set up IAM permissions and how to configure credentials locally to allow us to use Bedrock LLM models.
We ended with a deep dive into the code to understand how the different components fit together to build ChittyBot.
I hope this post can give you a starter or beginner knowledge to use tools like Amazon Bedrock, LangChain and Streamlit to incorporate GenAI capabilities into your applications.
Need to Contact Serverless Guru?
Thank you so much for hanging out. We hope this simple blog post can help you get started on working with GenAI related things.
We would love to hear your thoughts, comments and feedback. Let us know if you wish to see similar content or if you’d like to see us take ChittyBot to the next level (ex., using DynamoDB as its memory for longer conversations, deploying to AWS ecosystem, or implementing RAG, etc.)
Connect with us using the contact form at the bottom of this page or drop us an email at contact@serverlessguru.com.
Join our Discord Server to collaborate and engage in interesting and fun conversations! 😃
We strive to respond promptly and look forward to engaging in meaningful conversations with you!


%20(1).svg)

.svg)


.webp)