Introduction
CloudGTO is a platform that helps developers reduce the amount of time required to move from zero to MVP (Minimum Viable Product) by providing most of the infrastructure as code templates, some application code, monitoring, authorization, least privilege IAM permissions for the various services, and so much more. All you need to do is fill out a few forms to customize your serverless application and download ready-to-deploy project files in minutes. No need to take hours or days writing out line after line of code when you can already jump-start your development by leveraging battle-tested templates imbued with best practices pulled from many years of experience in the industry and the Serverless Open-Source Community.
What to expect from this article
In this article, we will do the following:
- Look at the core features of CloudGTO
- Build a simple inventory microservice REST API with an existing Blueprint
- Deploy the API to AWS
- Test the API Gateway Endpoints
Prerequisites
If you wish to follow along, you must have the following:
- An AWS Account and a user with administrative privileges to deploy Amazon API Gateway, CloudWatch, X-ray, Lambda, S3, Cognito, DynamoDB
- Serverless Framework (version 3 is recommended)
- AWS CLI installed and setup on your local computer with the Access Key Id and Secret Access Key of your IAM user with Admin privilege
- A CloudGTO account which you can sign up for here
Some CloudGTO concepts
Services
Services are groups of resources deployed together as a CloudGTO project. They are independent of each other and could easily be microservices. In our case, we will be deploying an inventory microservice REST API as a CloudGTO Service
Use-cases
Use-cases are typical architectures that most applications or microservices use. The platform currently supports REST APIs but other use-cases such as GraphQL APIs, Serverless Event Streaming, Serverless Data Processing, Serverless Machine Learning, and others are on the roadmap.
Blueprints
There are many ways of building REST APIs and that is where Blueprints come into play. In the case of our inventory microservices REST API, we will be building the REST API with a Single Lambda Per Route Blueprint. This is the industry-recommended approach because each Lambda function will perform a single action and can be allocated the least amount of privileges enough for that action.
Resources
Resources are mostly synonymous with the various AWS Services. This is where you would provide a few inputs to customize the various resources that will be deployed. By default, the platform already provides four Lambda functions for CRUD functionality based on the Use-case and Blueprint that we intend to use. The Blueprint also has an Amazon Cognito User Pool and Amazon DynamoDB for persistent storage by default.
CloudGTO currently supports the following AWS Services:
- Amazon Cognito
- Amazon DynamoDB
- AWS Lambda
- Amazon SQS
- Amazon SNS
- Amazon RDS
- Amazon VPC
- Amazon S3
Each resource is configured differently so the form fields are different. There are also fields to provide additional configurations based on the relationships between the various services. For example, each Lambda function will require specific CRUD permissions to interact with the Amazon DynamoDB table where we will store the inventory items.
Routes
This is where you can add routes for your REST API. The wizard proposes from one to four routes depending on the Blueprint that you chose on the Service Definition page. For a Single Lambda per Router Blueprint, that we will be using, we will be provided with 4 routes for each CRUD Lambda function.
Building the Inventory Microservice API
Imagine you are a Serverless Developer and you have been given the task of building a REST API for a Serverless Inventory microservice on AWS. I would like you to first think about your typical workflow — I imagine you would have to look up your private code base for code snippets and manually create the files and folders for the project at a minimum. If Authentication is a requirement but you aren’t too familiar with Amazon Cognito, you would have to do some research which could run anywhere from a few hours to a few days or weeks.
Amongst other requirements, you need to follow best practices and create single Lambda functions per purpose, which in this case would be a single function to map each API Gateway route with the least privilege IAM permissions to perform CRUD operation on your data store.
The inventory microservice would receive a lot of transactions and requires a NoSQL database that is fully managed and can scale linearly to handle the load from users especially when there are sales events like Black Friday. So it's obvious that we would be using Amazon DynamoDB because it can handle millions of requests per second and automatically scale to accommodate increases in traffic or data volume. Now, let’s model our data.
Our Data Model
The reasoning behind the data model and table design is not important for this demonstration so we will assume that whatever we are given to work with will serve the application. So we will simply state the entities and their relationships, access patterns, and primary key structure which we would use to build the microservice.
Entities and Relationships
We will use the following entities:
- Product: This entity represents a product in the warehouse
- Inventory: This entity represents the current inventory information for a product.
The relationships between the entities are as follows:
- One 'Product' can have multiple 'Inventories' (one-to-many relationship)
- One 'inventory' can be associated with only one 'product' (one-to-one relationship)
Data Access Patterns
We will need to be able to perform the following access patterns:
Details:
1. Create an inventory item
• Primary Key: Partition key= PK and Sort Key = SK
• Create: Create an inventory item with a unique combination of PK and SK.
2. Retrieve all inventory items for a given product:
• Primary Key: Partition Key = PK
• Query: Query all inventory items matching the PK
3. Retrieve a single inventory item by ID:
• Primary Key: Partition key= PK and Sort Key = SK
• Get: Retrieve a single inventory item matching the PK and SK
4. Delete a single inventory item:
• Primary Key: Partition key= PK and Sort Key = SK
• Delete: Delete a single inventory item matching the PK and SK
Primary Key
We will use the generic name “PK” for the partition key which will be the product entity and the generic name “SK” for the secondary key which will be our inventory item entity.
Primary key:
Partition key: PK (string)
Sort key: SK (string)
Attributes:
- productName (string)
- category (string)
- price (number)
- Quantity (number)
- updatedAt
- createdAt
Building the REST API for the Inventory Microservice
Step 1: Service Creation
After you log into your CloudGTO account, click on the “BUILD SERVICE” button to start the process which will take you to the Service Definition page.

CloudGTO provides you with a few Wizard pages starting with the Service Definition where we will provide some basic information about the project we are building.
The most important fields on this page are the Service Name field which we will fill with the name 'inventory-ms' and the Blueprint. We will select the “Single Lambda Per Route Blueprint” so we can have single-purpose Lambda functions with least privilege permissions. We will leave the default AWS Region which is 'us-east-1'.
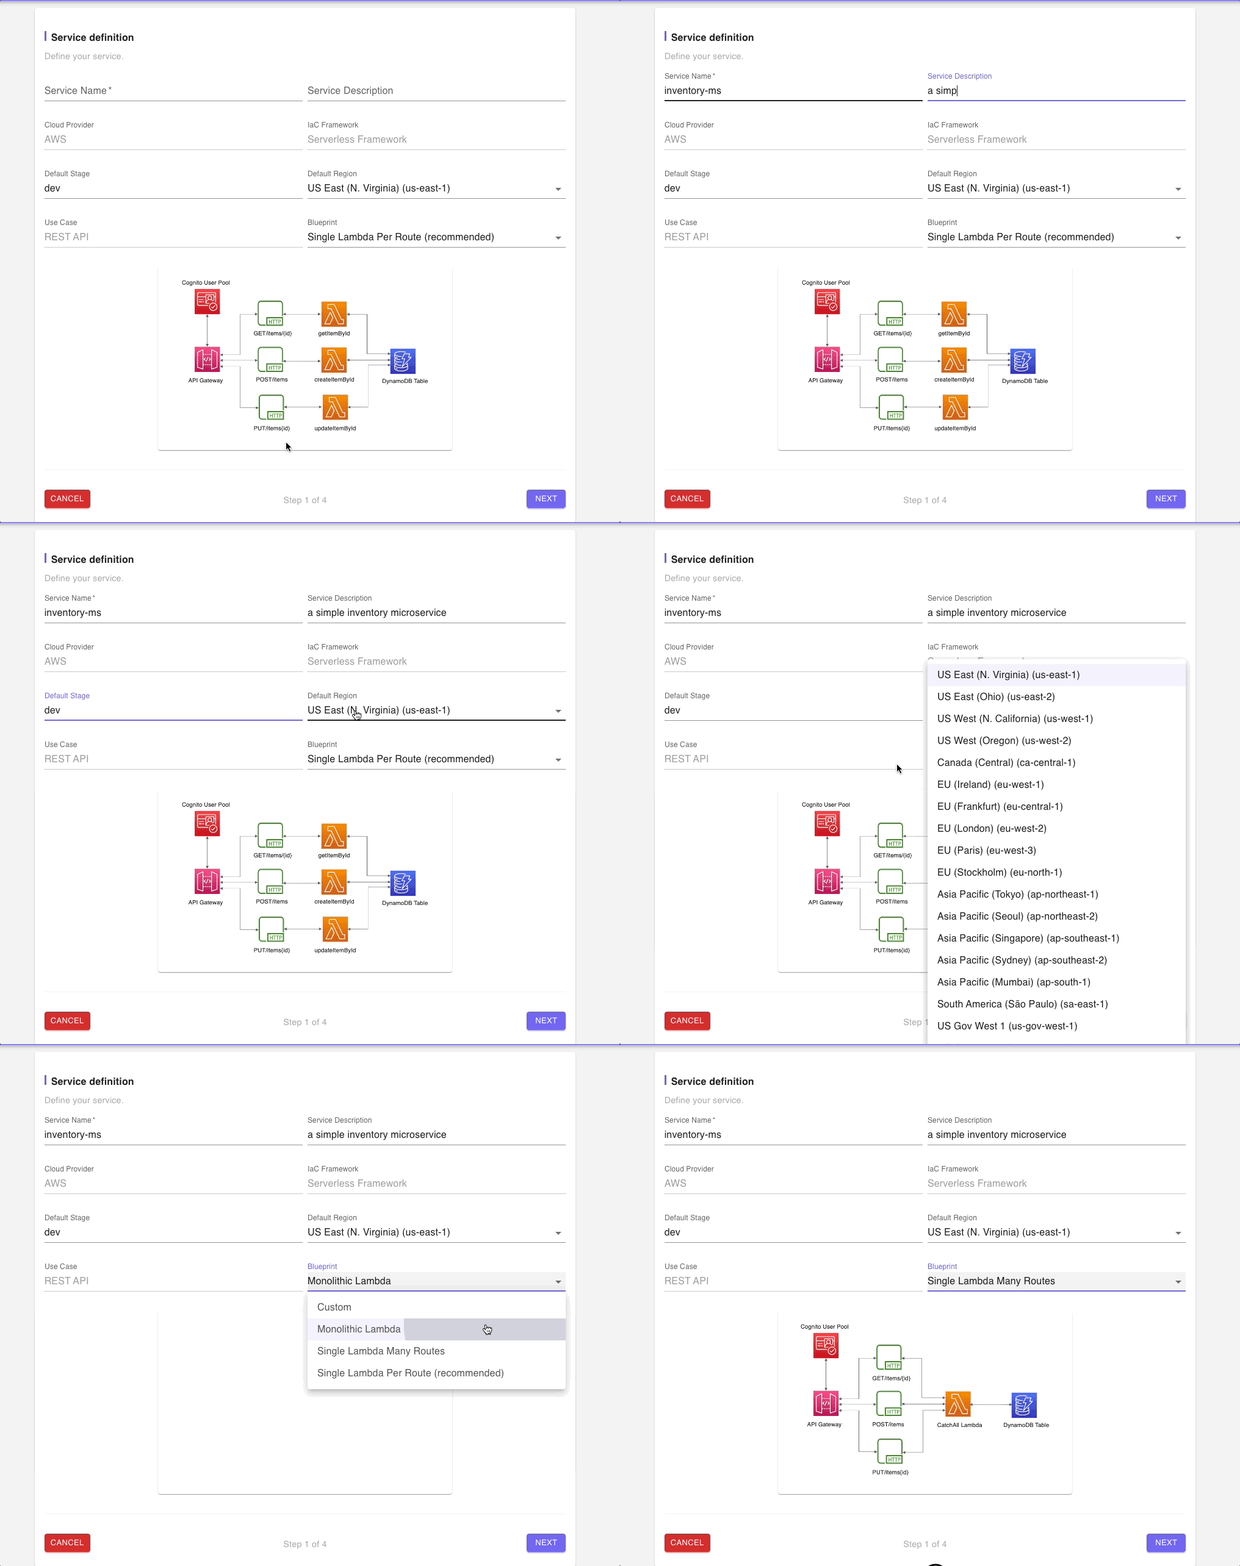
Click on NEXT
Step 2: Add Resources
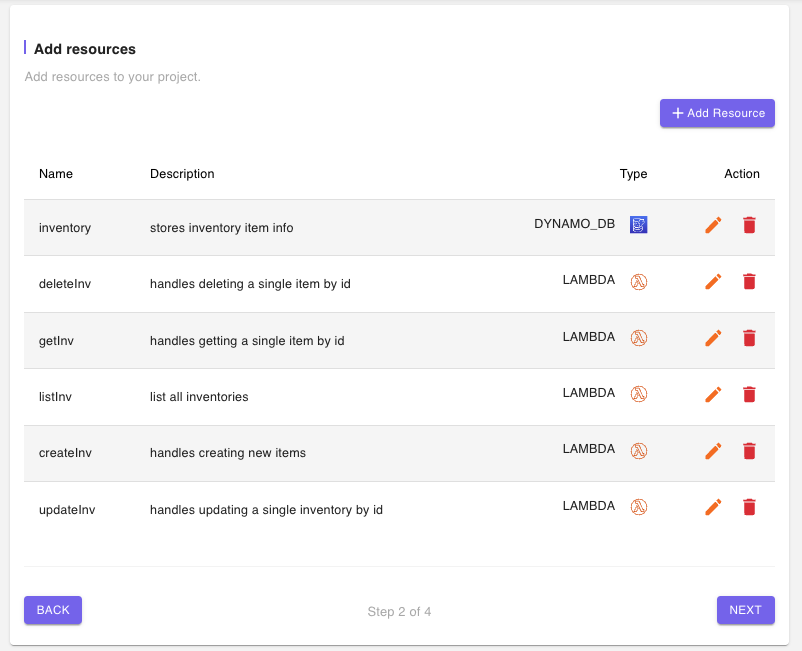
By default, our Single Lambda Per Route Blueprint, provides us with an Amazon Cognito User Pool, a DynamoDB table, and four CRUD operation Lambda functions.
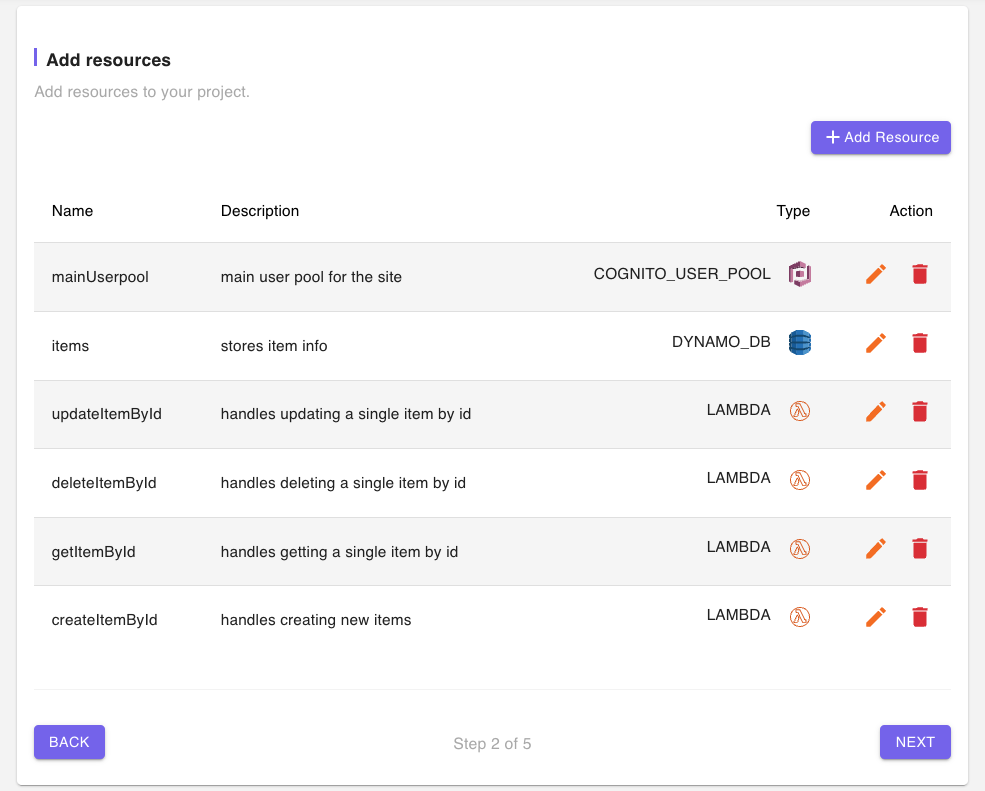
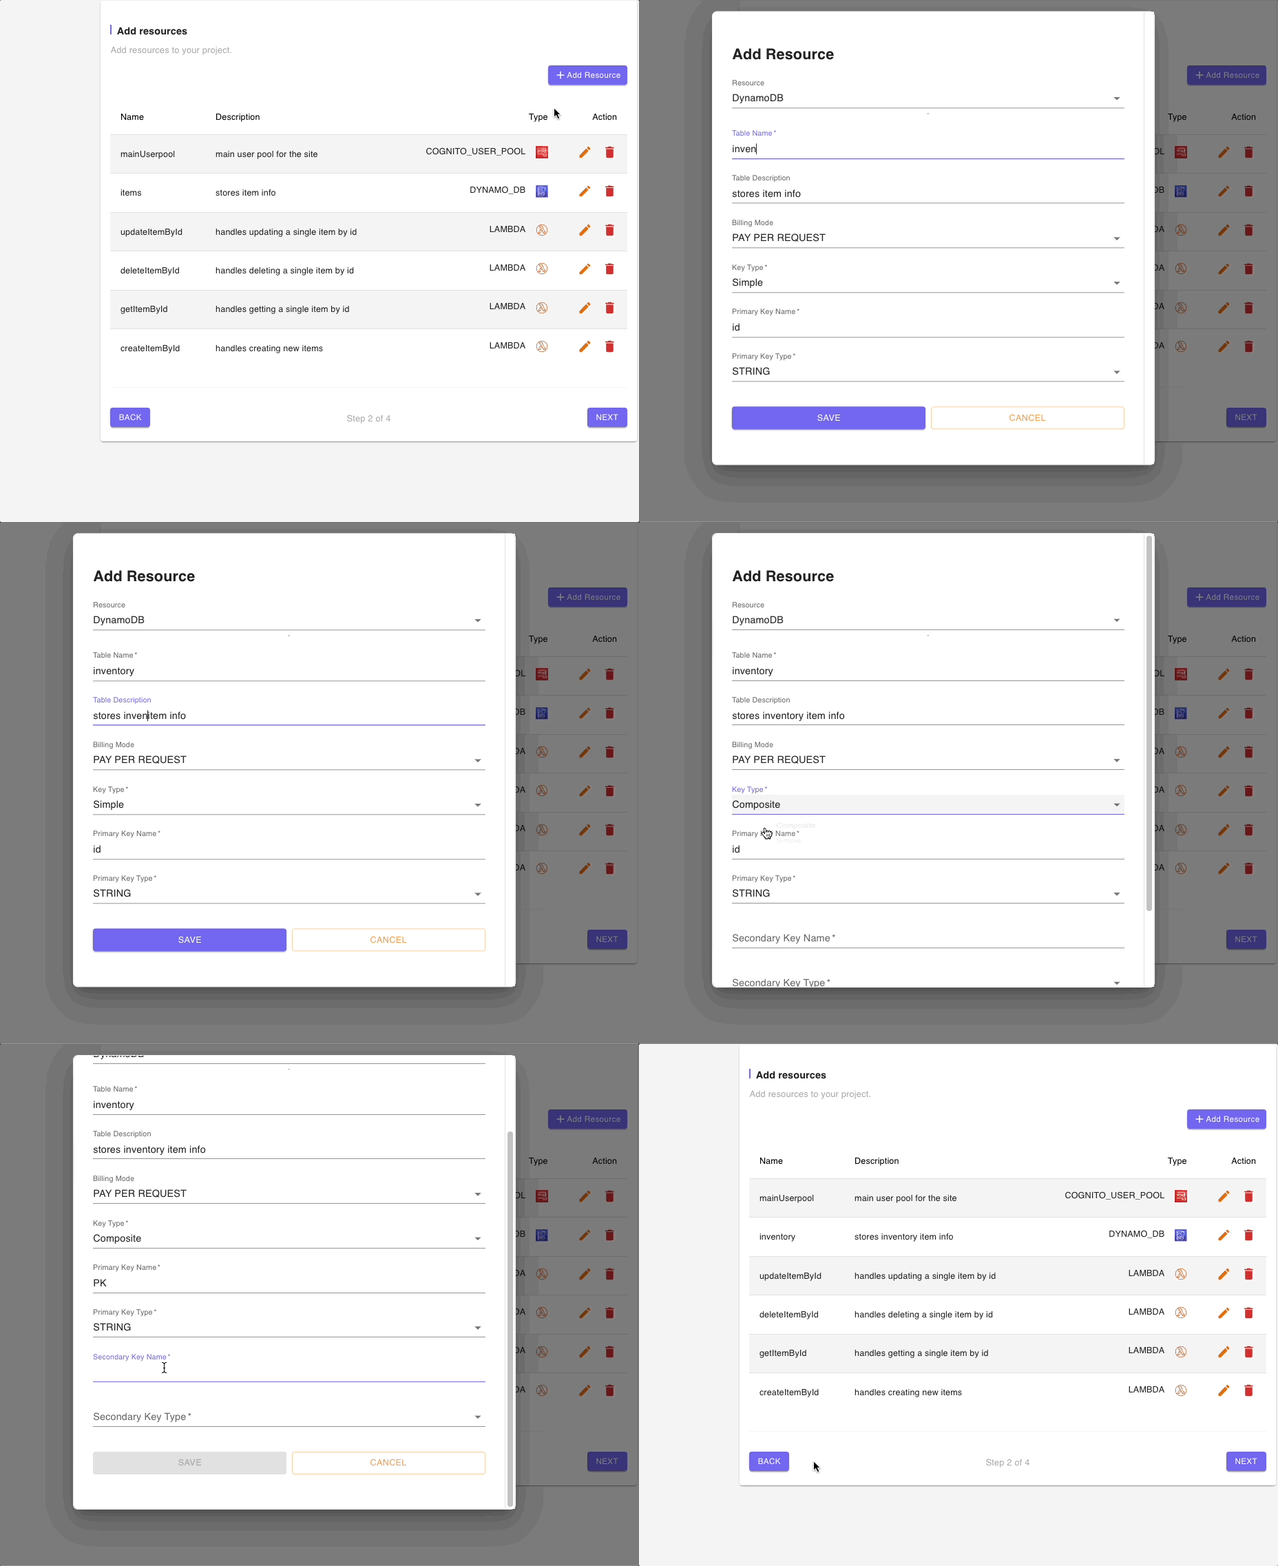
We will delete the default Cognito User Pool and modify the DynamoDB table and Lambda function names to reflect our Inventory microservice.
We would also demonstrate the possibility of extending the current Blueprint by adding a 5th Lambda function to list all inventories for a product called 'listInvs'
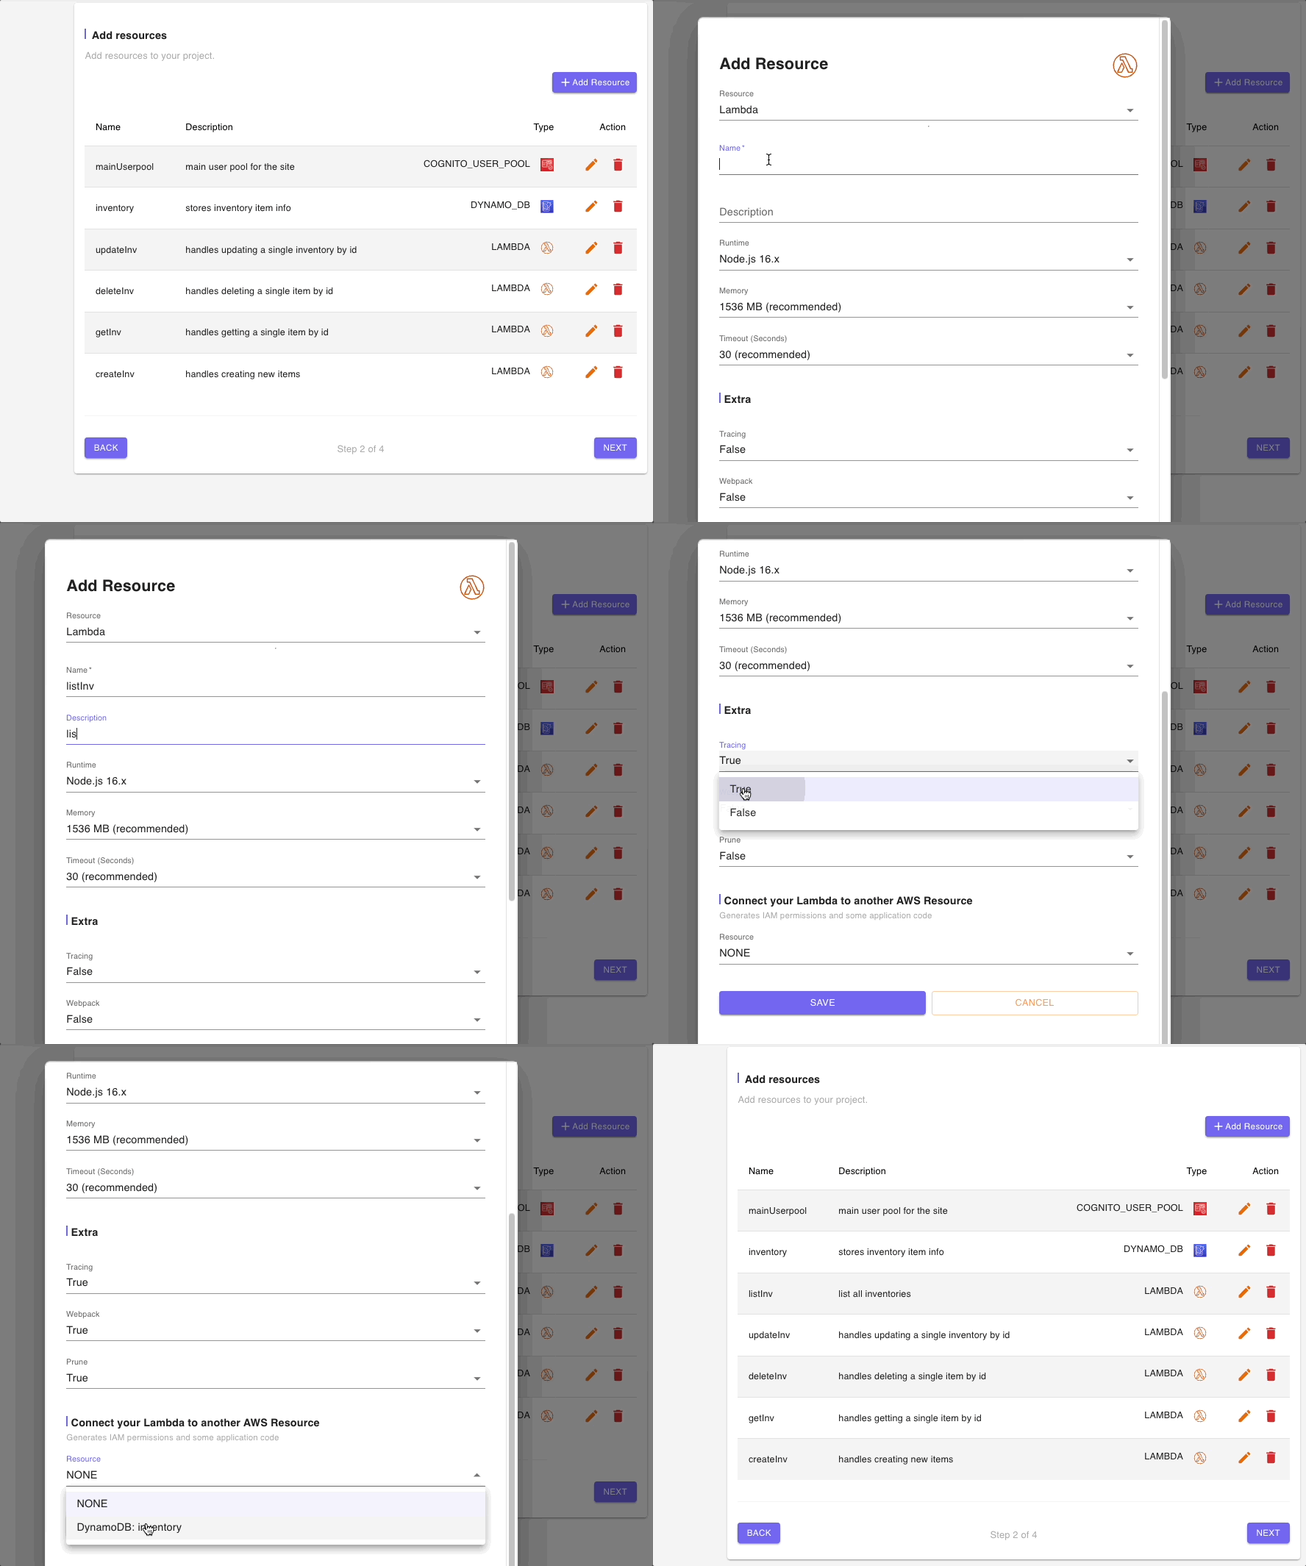
The final result will look like this
Step 3: Add Routes
The Single Lambda Per Route Blueprint also proposes four routes for the default CRUD Lambda functions.
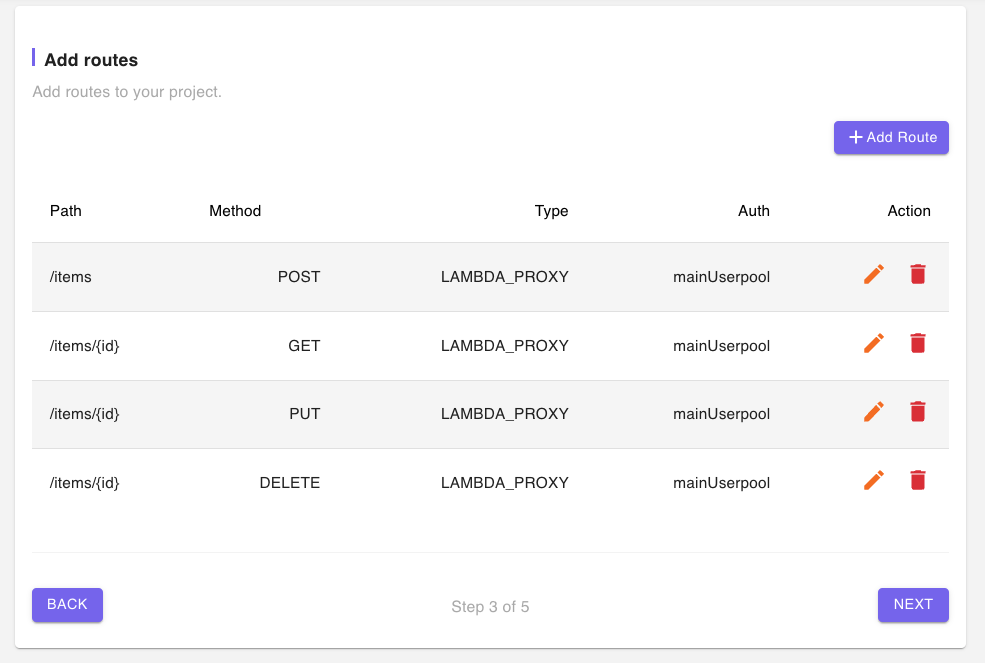
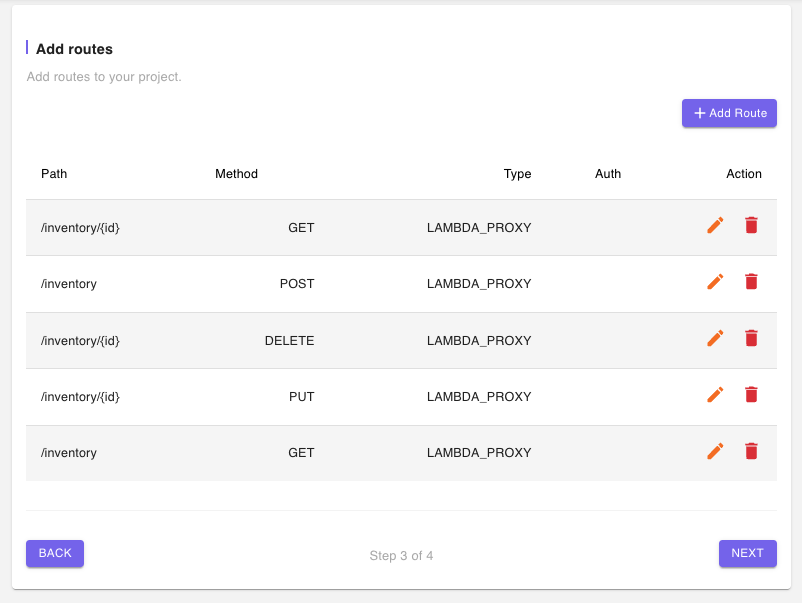
As in the previous step, we would modify the API Gateway Resource names of the paths to reflect our inventory data model and also add a 5th API Gateway route name to the '/inventory' path, and a 'GET' method for our 'listInv' Lambda function.

The final page would look like this;
Step 4: Summary
As the name implies, this page shows a summary of all the information provided in the previous 3 steps showing the Service Definition, Resources, and Routes.
The second half of the page is the Deployment Notes with a few steps required to deploy the project to your AWS account.
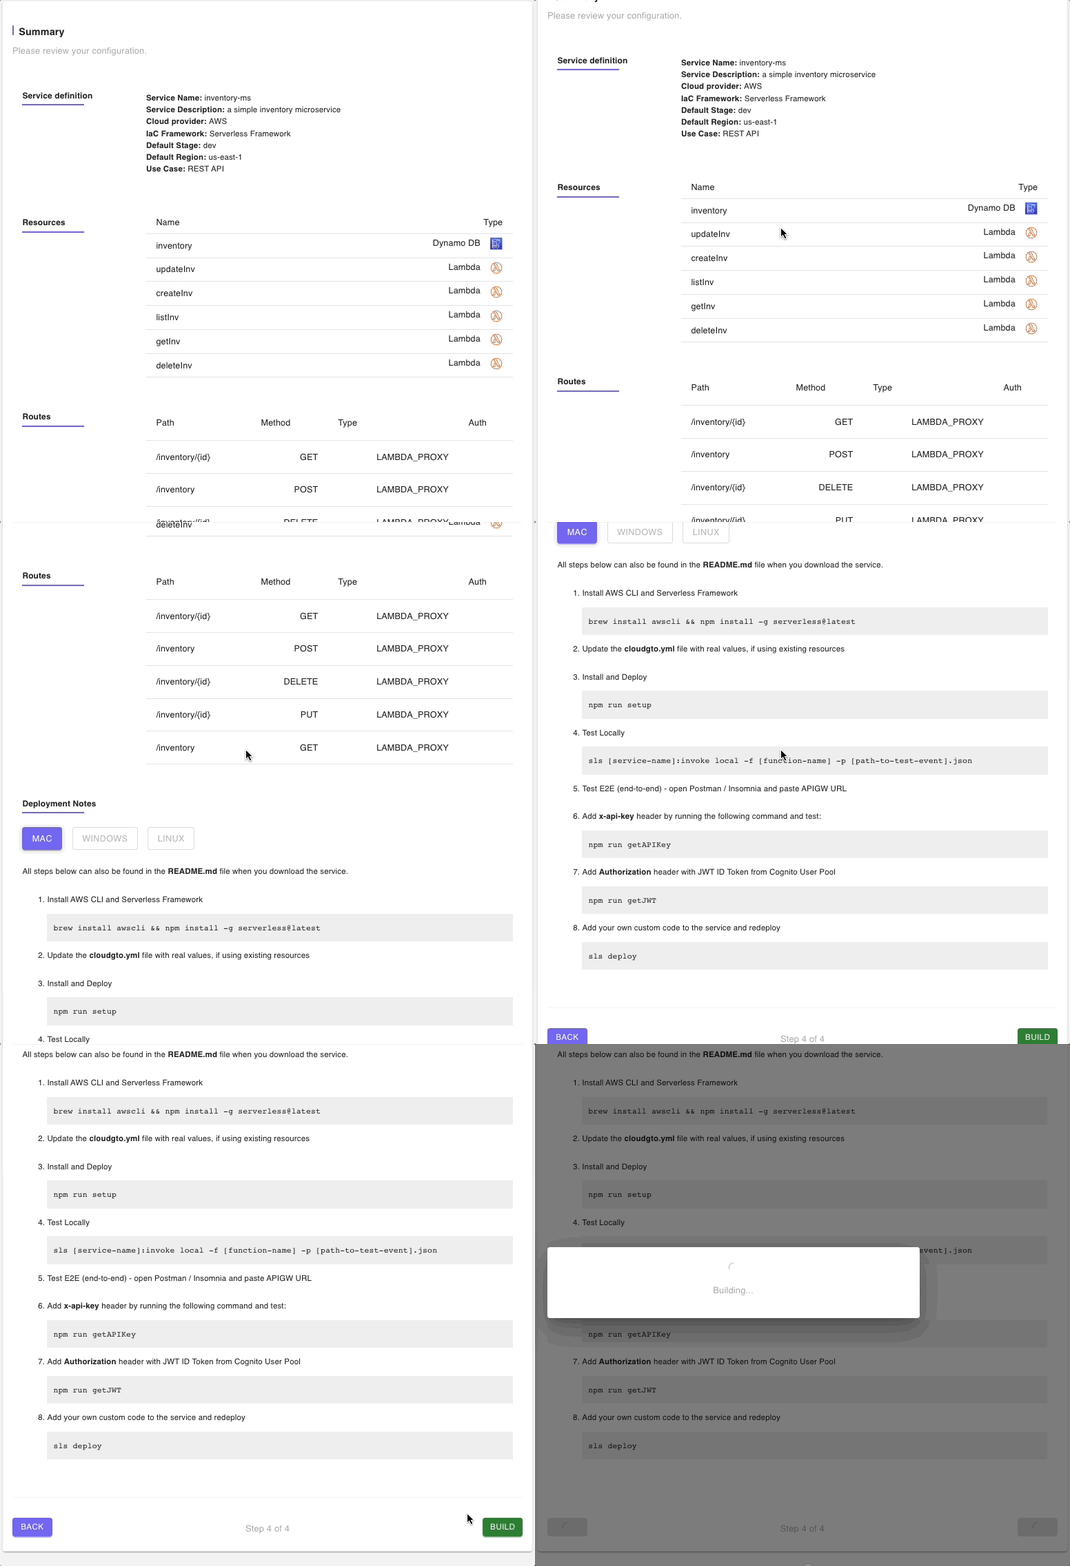
We are ok will all of the information provided in the Summary, so we will click on the “Build” button to generate all of the IaC files and some application code for our inventory microservice
Step 5: Download the project
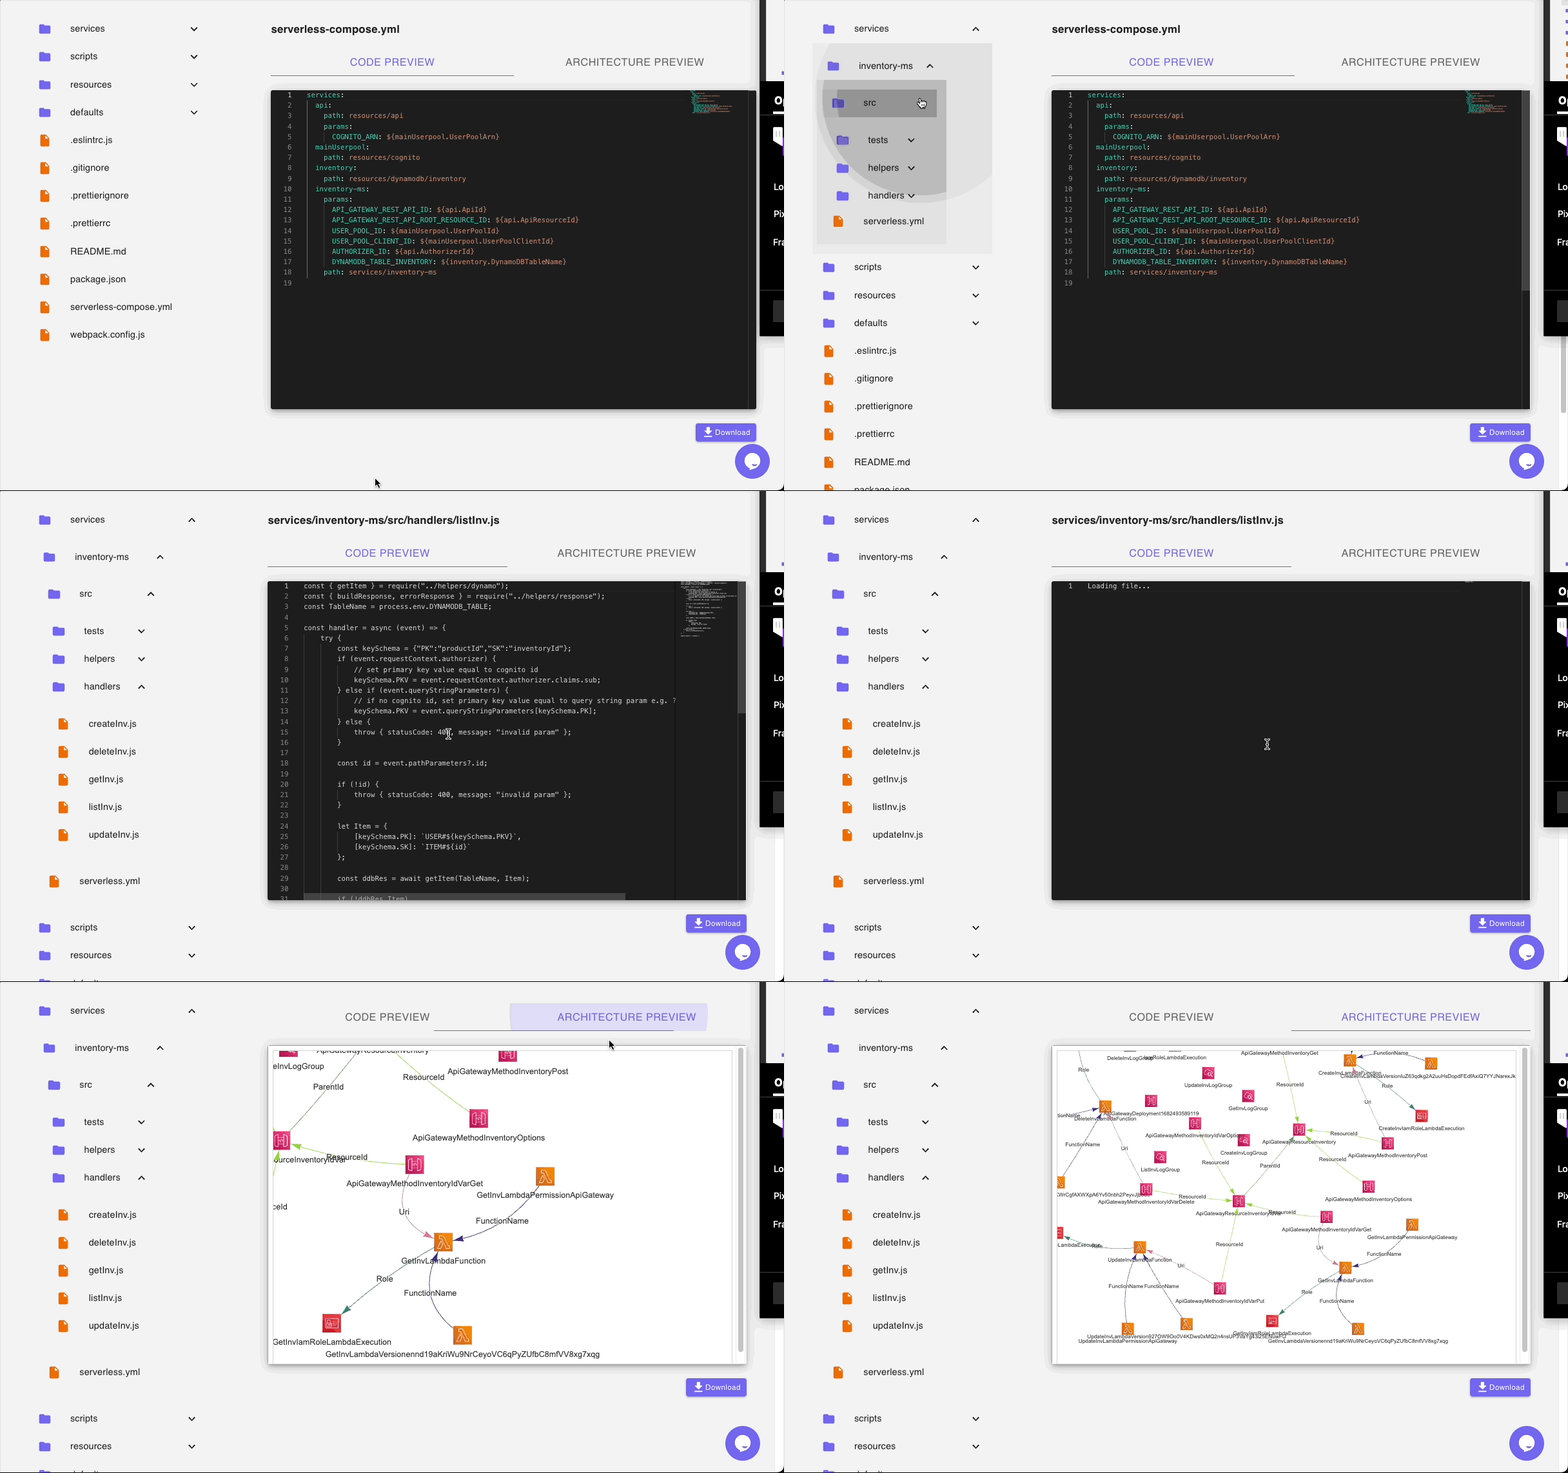
The Build step takes a few seconds after which we would have a preview of the folder structure and files that have been generated by the platform. The folder structure depends on the Use Case and Blueprint we chose in Step 1 on the Service Definition page.
We will explore all files in our text editor but first, we need to click on the download button to download the project zip file to our local environment.
Step 6: Further development
CloudGTO Blueprints be deployed directly to AWS without any further development. All you have to do is execute the 'npm run setup' script. In our case, we added an additional Lambda resource, 'listInv.js', and a corresponding API Gateway route so we need to do some further development before deploying our project to AWS.
We will open up the project directory in the VSCode code. Our handlers are found in the 'inventor-ms' which is at './services/inventory-ms/src/handlers'
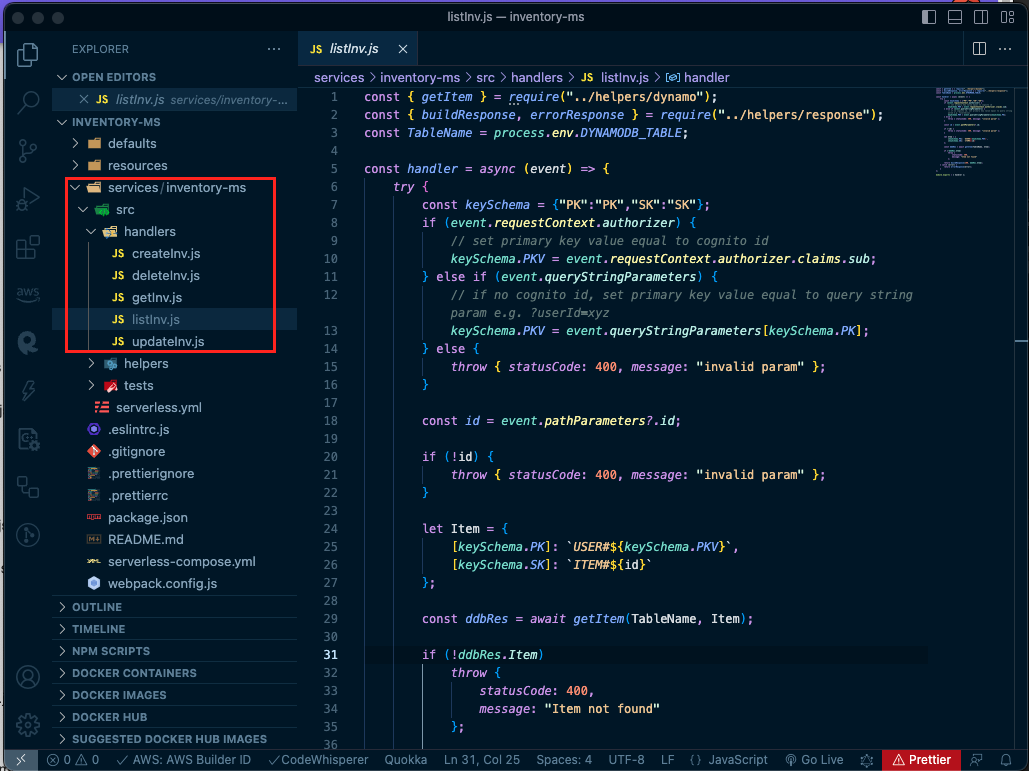
Our 'listInv.js' handler already has some boilerplate code that we must modify in order to be able to list all the inventory items for products from our inventory-ms API. CloudGTO also provides helper functions for DynamoDB API operations and HTTP responses found in './services/inventory-ms/src/helpers'.
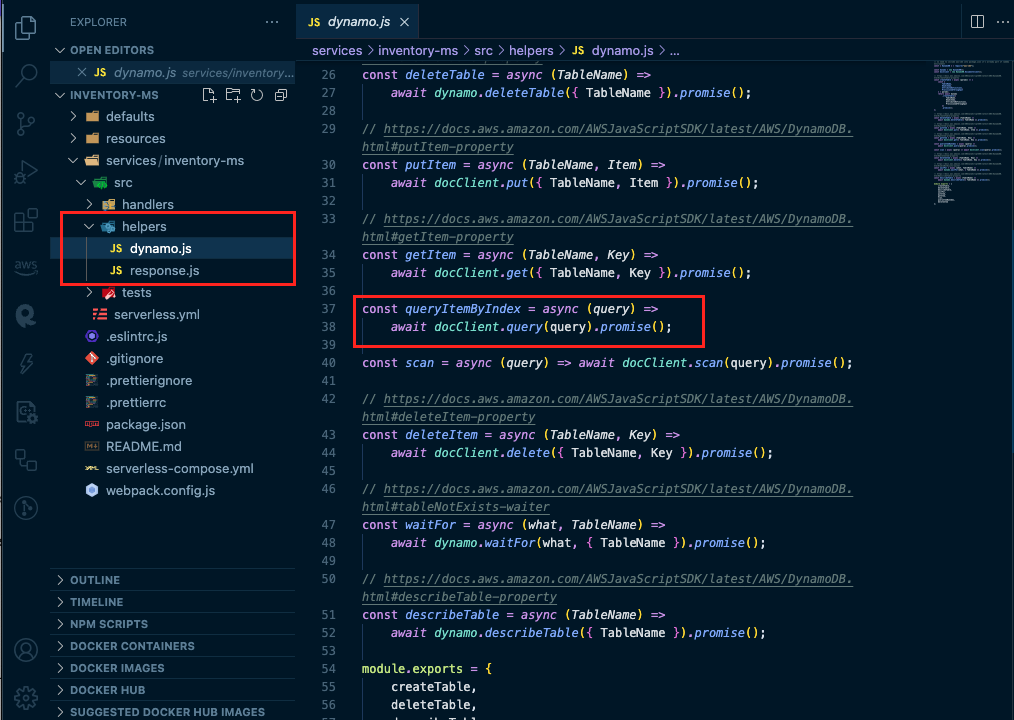
Our final 'listItems.js' file now looks like this
const { queryItemByIndex } = require('../helpers/dynamo')
const { buildResponse, errorResponse } = require('../helpers/response')
const TableName = process.env.DYNAMODB_TABLE

const handler = async (event) => {
	try {
		const keySchema = { PK: 'PK', SK: 'SK' }
		if (event.requestContext.authorizer) {
			// set primary key value equal to cognito id
			keySchema.PKV = event.requestContext.authorizer.claims.sub
		} else if (event.queryStringParameters) {
			// if no cognito id, set primary key value equal to query string param e.g. ?userId=xyz
			keySchema.PKV = event.queryStringParameters[keySchema.PK]
		} else {
			throw { statusCode: 400, message: 'invalid param' }
		}

		const params = {
			TableName,
			[keySchema.PK]: `PRODUCT#${keySchema.PKV}`,
			KeyConditionExpression: `#${keySchema.PK} = :${keySchema.PK}`,
			ExpressionAttributeNames: {
				[`#${keySchema.PK}`]: keySchema[keySchema.PK]
			},
			ExpressionAttributeValues: {
				[`:${keySchema.PK}`]: `PRODUCT#${keySchema.PKV}`
			}
		}

		const ddbRes = await queryItemByIndex(params)

		if (!ddbRes.Items)
			throw {
				statusCode: 400,
				message: `No inventory items found not found`
			}

		return buildResponse(200, ddbRes.Item)
	} catch (error) {
		return errorResponse(error)
	}
}

module.exports = { handler }
We are now ready to deploy our API to AWS.
Step 7: Deployment
The project README.md file provides the required commands for us to deploy our project to AWS. As mentioned in the prerequisites for this tutorial you must already have the AWS CLI and Serverless Framework installed on your local computer.
To deploy the project, we will use the VSCode terminal to run the 'npm run setup' script which actually executes 'npm install' to install all the package dependencies and 'sls deploy' to deploy the project using Serverless Framework.
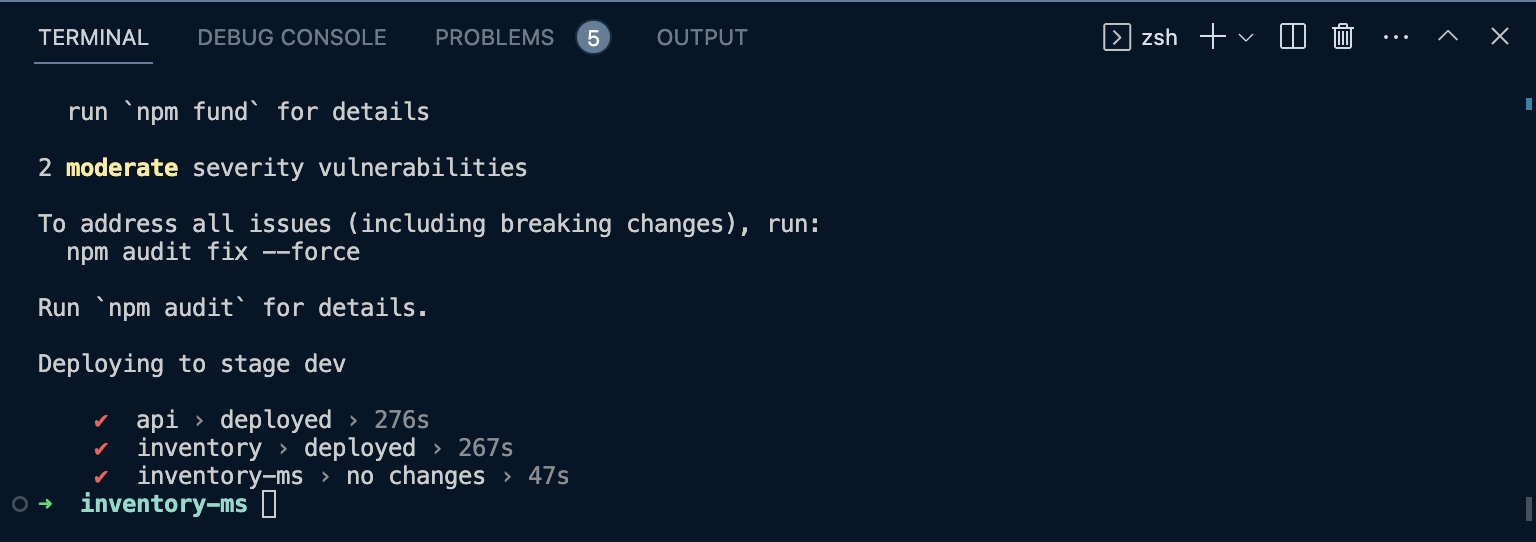
Heading over to the AWS Console, we can see the resources have been deployed successfully. In CloudFormation, we can see all the stacks for our project were successfully deployed

We have our Amazon DynamoDB Table
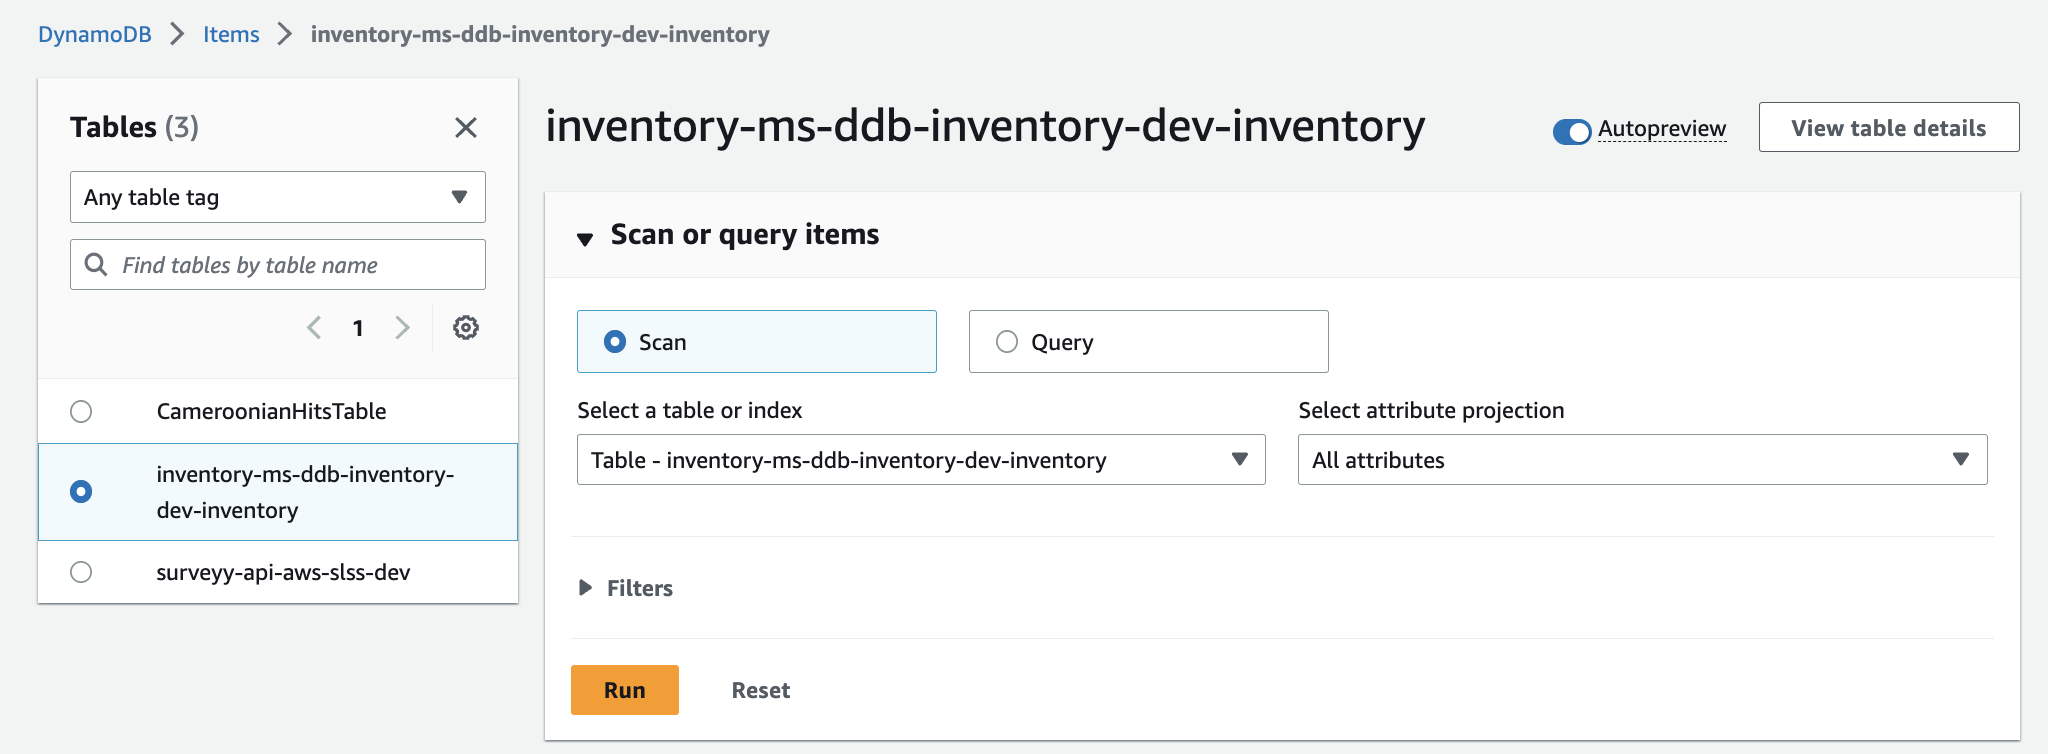
We have our Lambda Functions

And finally, we have an API Gateway endpoint that requires an API Key. We must use extract and use in Postman to test our API Endpoints.

Step 8: End-to-end tests with Postman
Since our API requires an API Key, we will need to pass those in our request Headers for each API call. Fortunately for us, there are helper scripts in the README.md file that can help us obtain it easily without having to log into the AWS Console.
First we will execute the 'npm run getAPIKey' script to get our API key
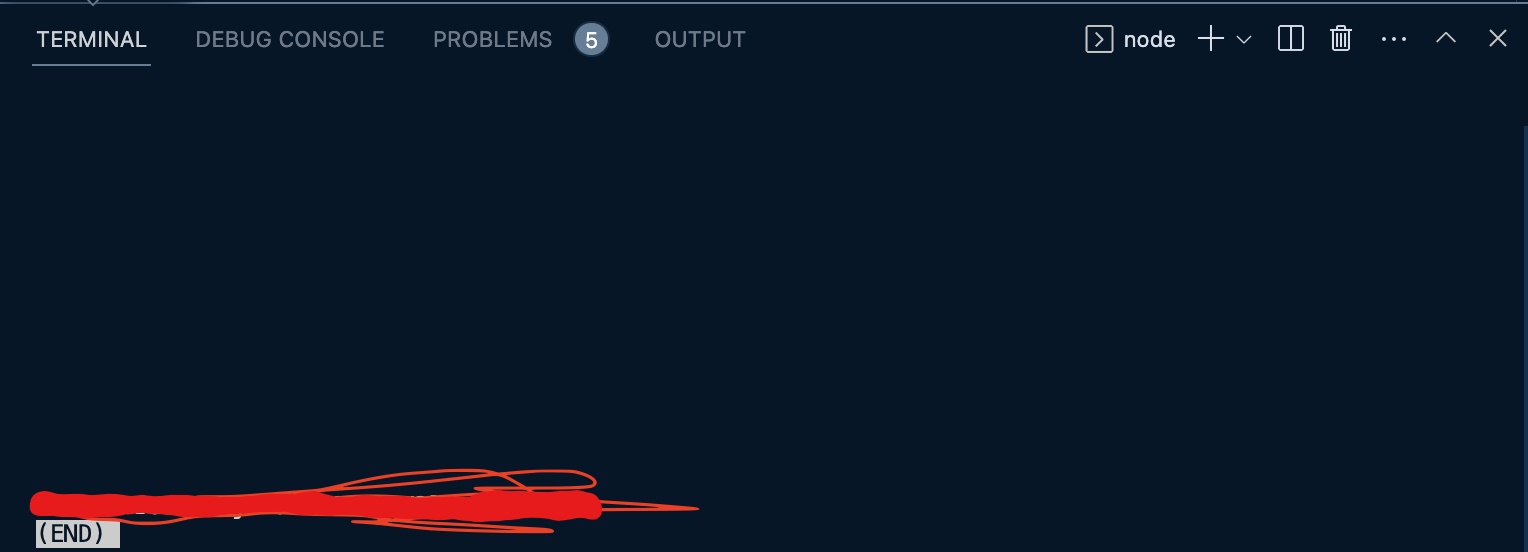
Now we are ready to begin the end-to-end test in Postman. For demonstrative purposes, we are going to do the following tests:
- Create inventory items
- Get an Inventory item
- List all the inventory for a product
- Delete an inventory item
We will create a collection in Postman and add the API Key in the Authorization tab. so it can be easily inherited by each endpoint in the collection.
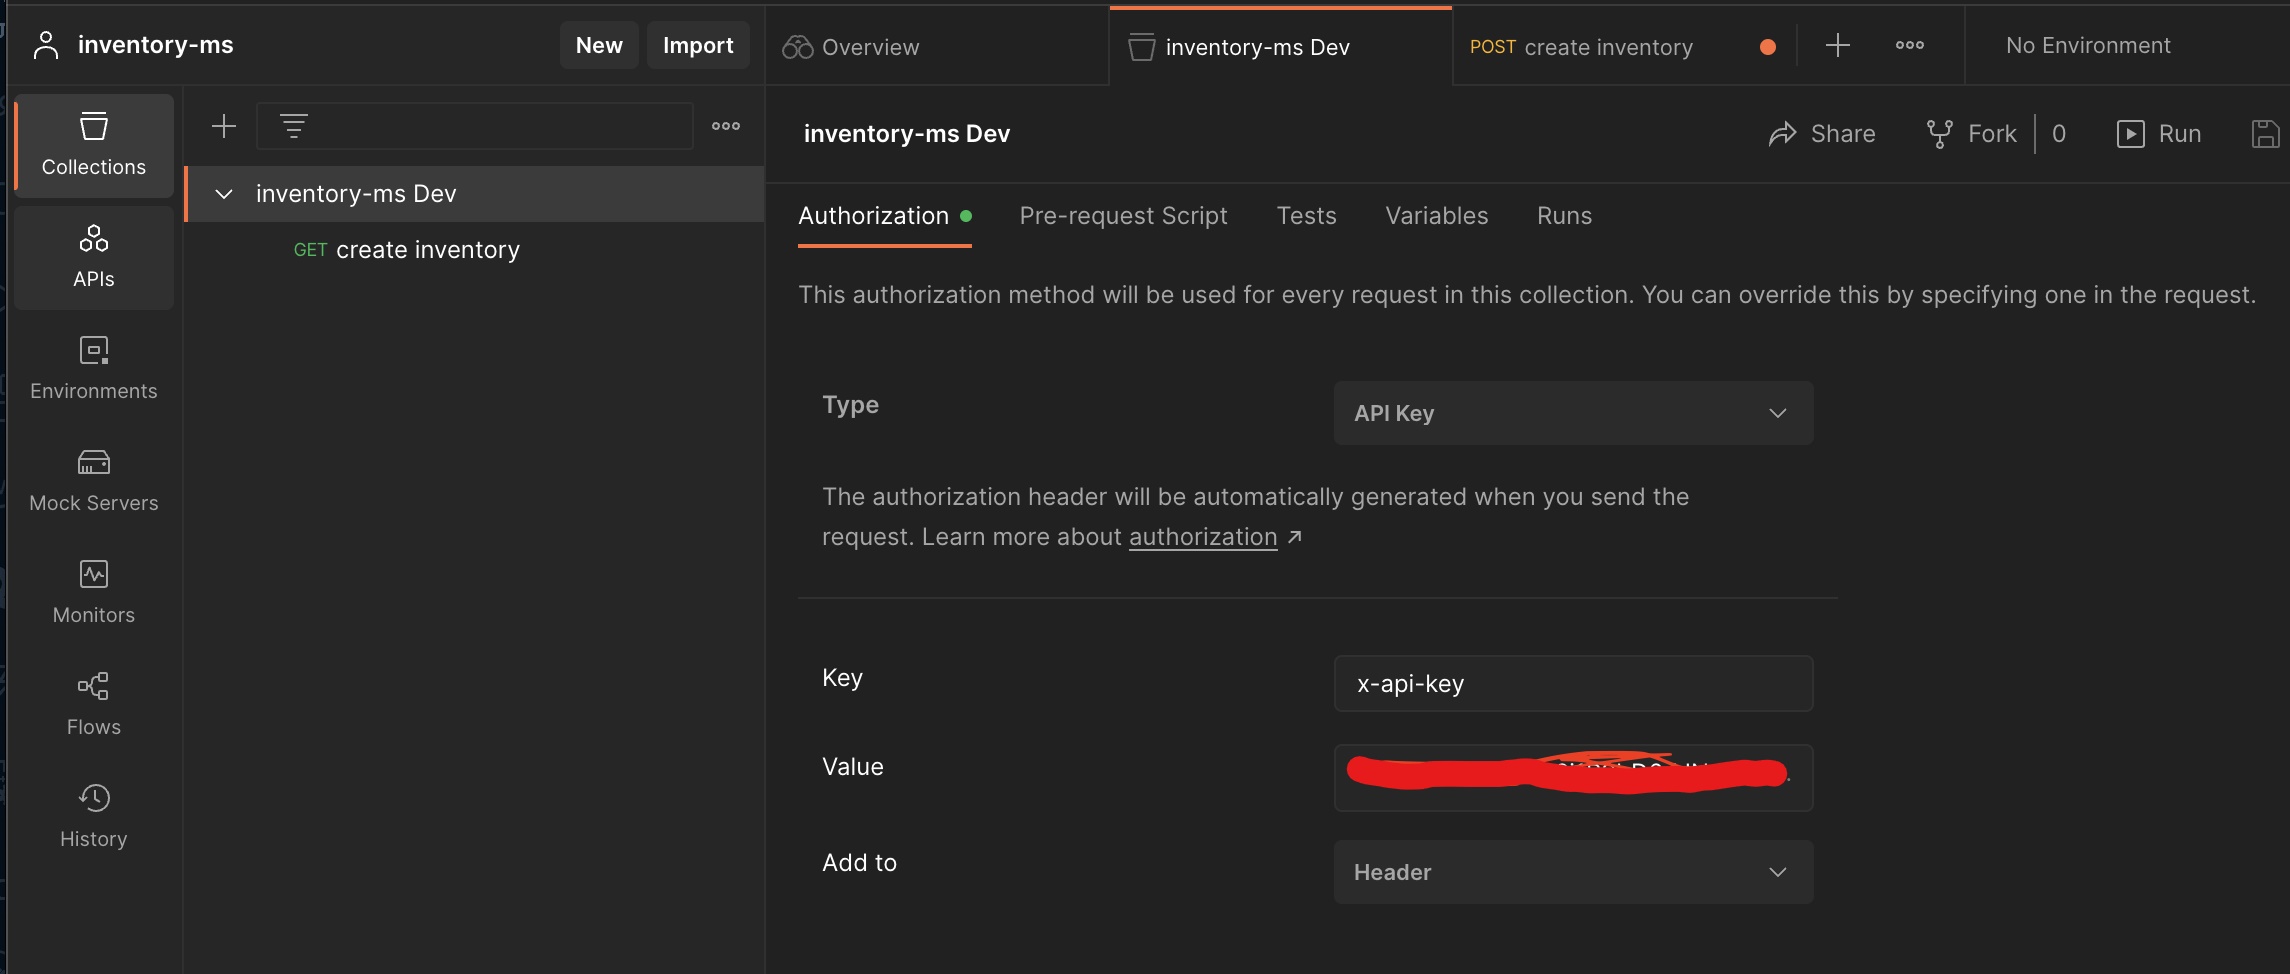
Creating Inventory items
We will use the 'https://vi5f3frnnb.execute-api.us-east-1.amazonaws.com/dev/inventory?PK=63-1724448](<https://vi5f3frnnb.execute-api.us-east-1.amazonaws.com/dev/inventory?PK=63-1724448' endpoint to create inventory items. Note that we are passing the PK as a query string parameter
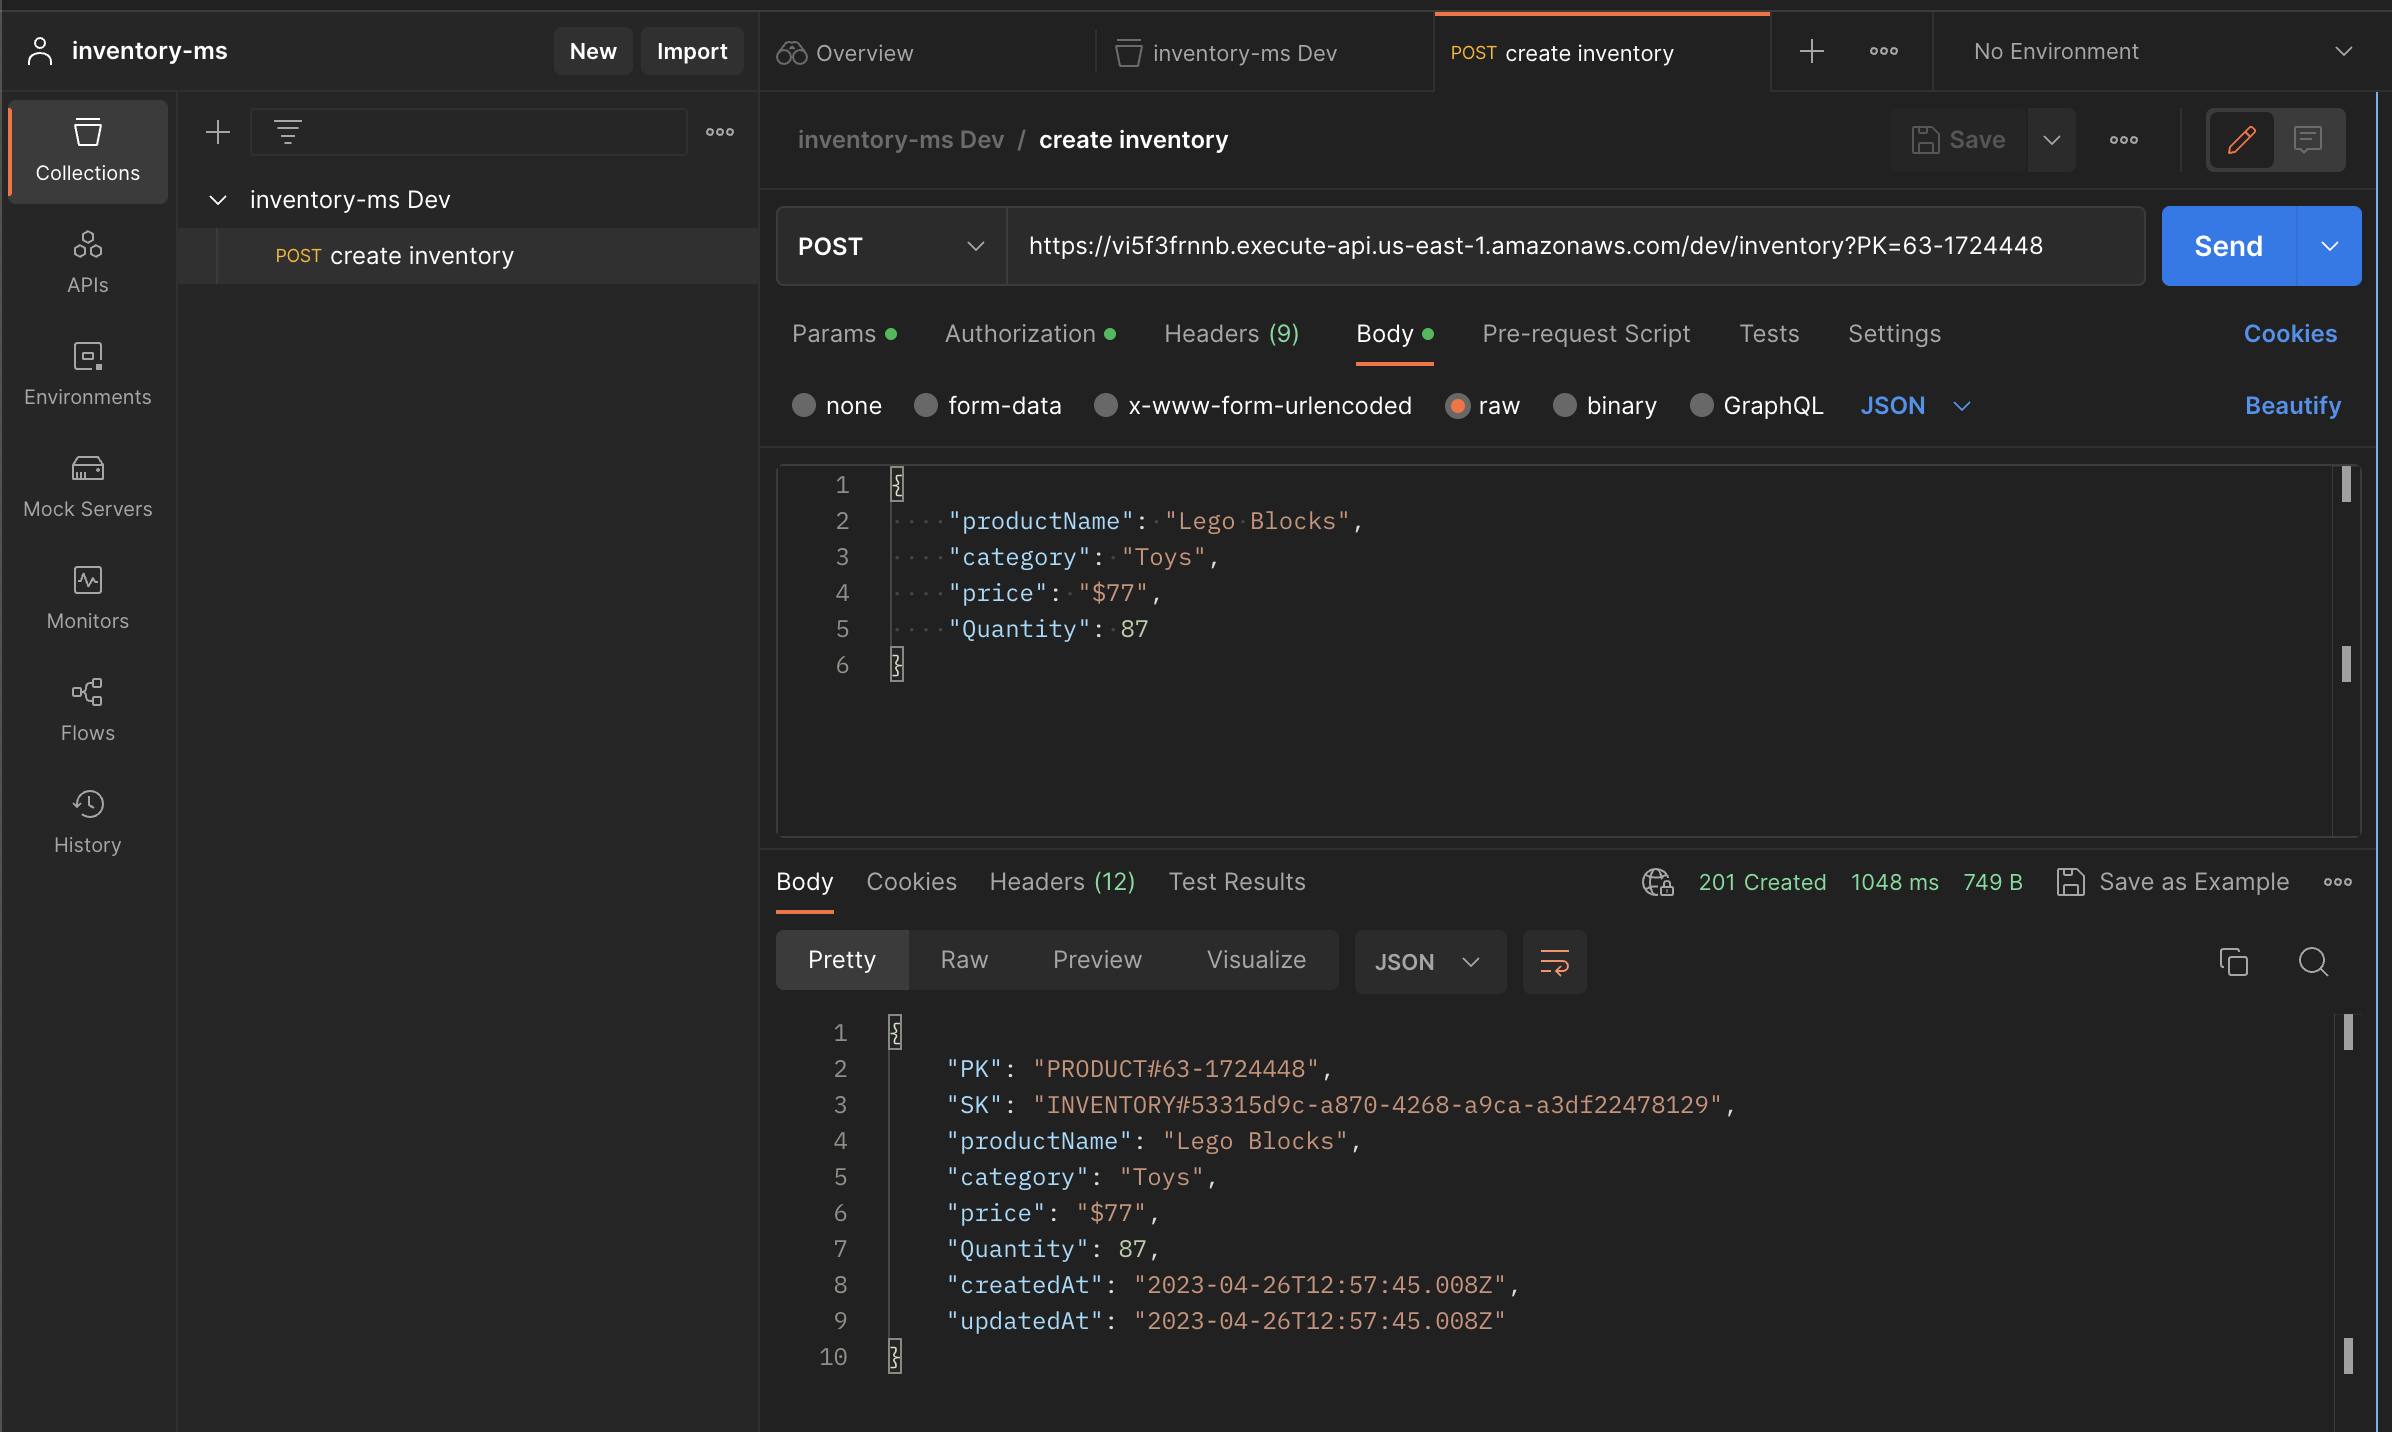
As you can see from the results, we have a 'Status 201 Created' response and a return JSON object of the item created in our DynamoDB table
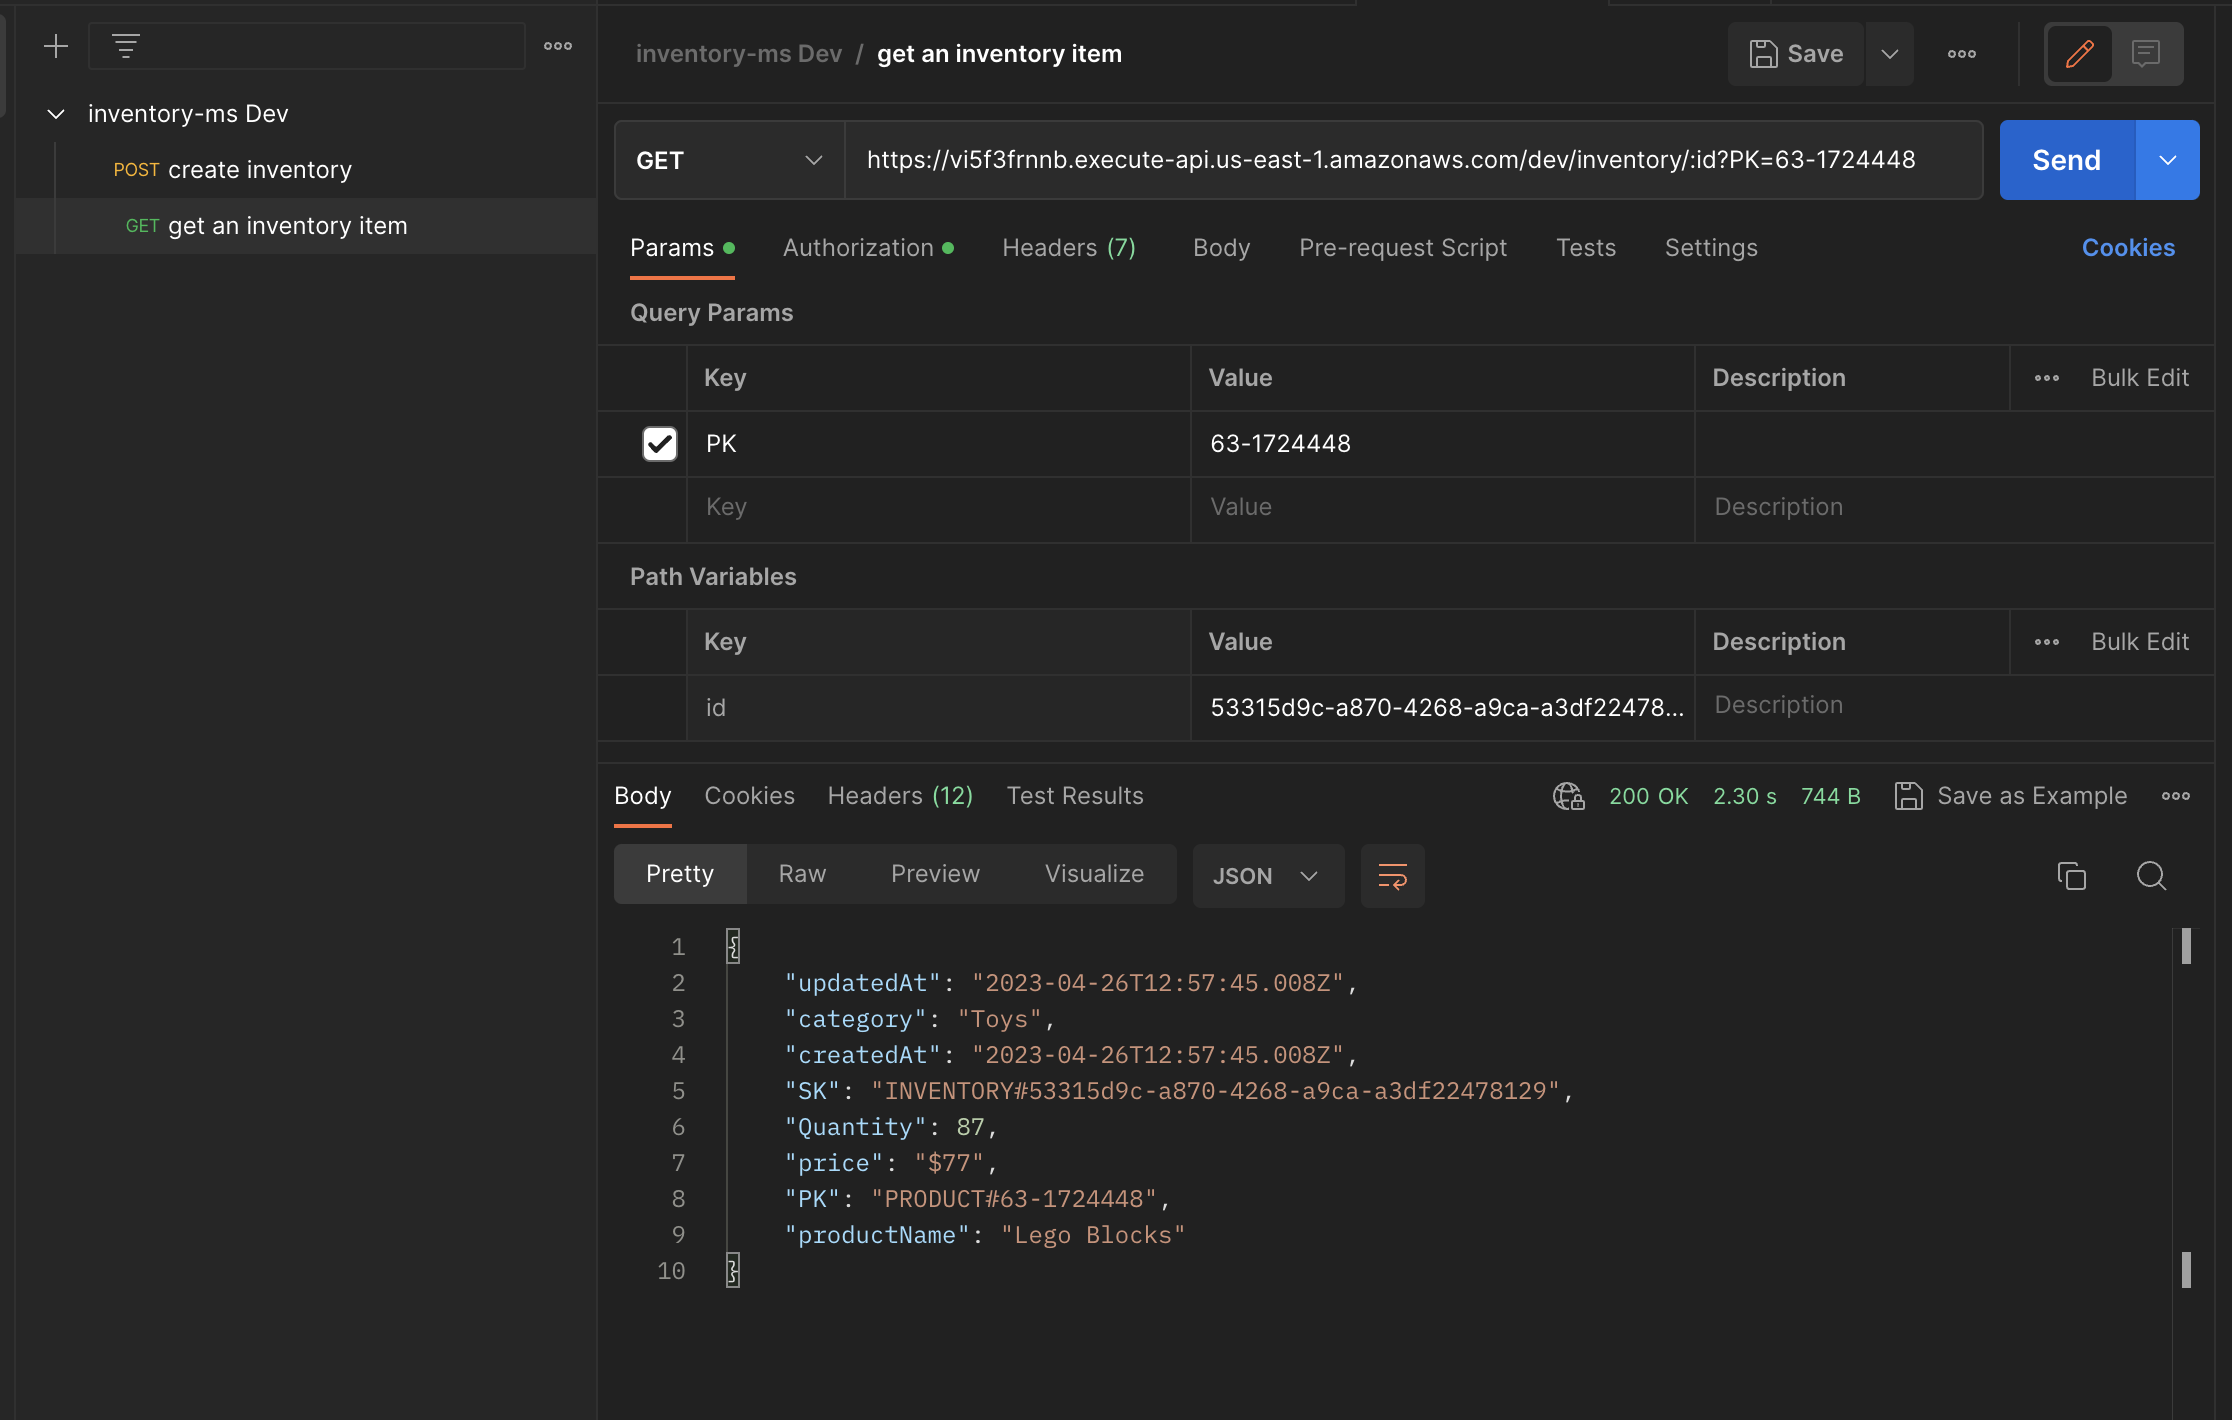
Get an inventory item
We will use the 'https://vi5f3frnnb.execute-api.us-east-1.amazonaws.com/dev/inventory/](<https://vi5f3frnnb.execute-api.us-east-1.amazonaws.com/dev/inventory/:>){id}' endpoint with a 'GET' method to get an inventory item while passing the inventory id as a path parameter.
We will simply try to get the inventory item we created in the previous step.
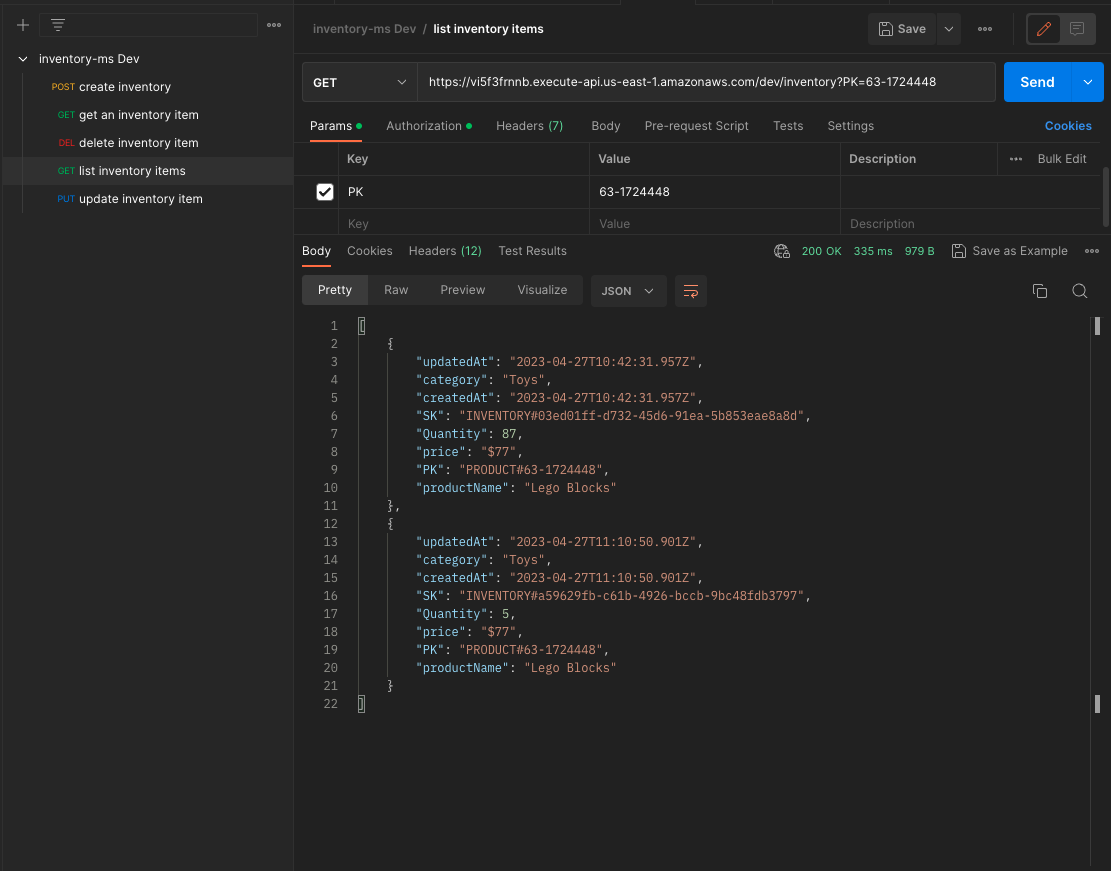
List all inventory items
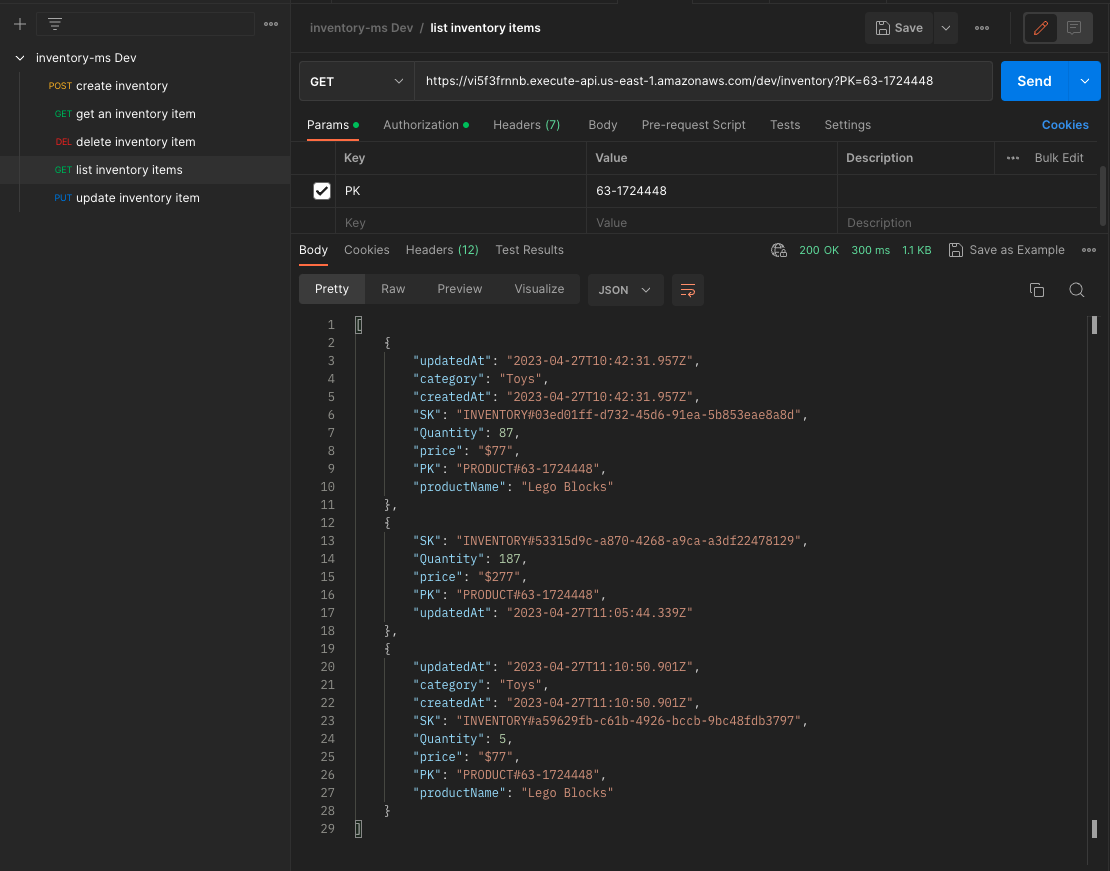
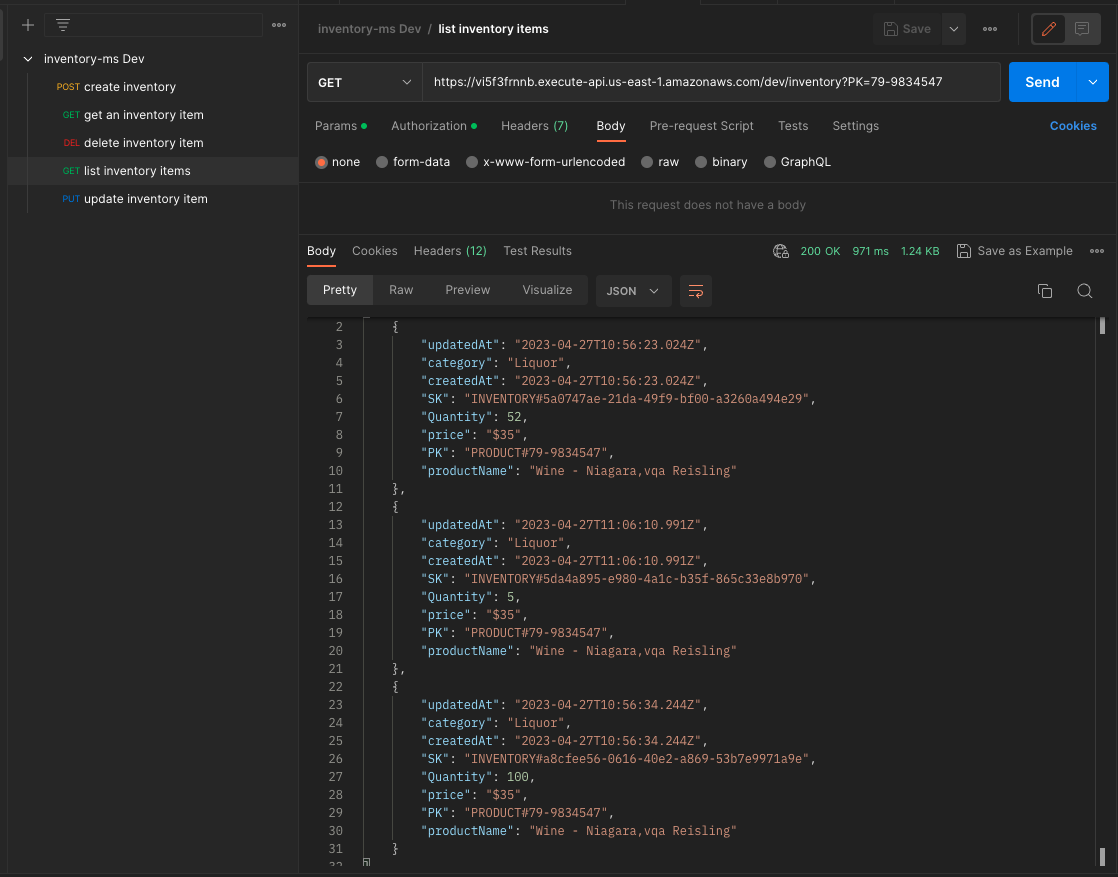
We will use the 'https://vi5f3frnnb.execute-api.us-east-1.amazonaws.com/dev/inventory>](<https://vi5f3frnnb.execute-api.us-east-1.amazonaws.com/dev/inventory' endpoint to list all the inventories for a particular product.
Delete an inventory item
We will use the 'https://vi5f3frnnb.execute-api.us-east-1.amazonaws.com/dev/inventory/](<https://vi5f3frnnb.execute-api.us-east-1.amazonaws.com/dev/inventory/:>){id}' endpoint to delete an inventory item for a particular product.
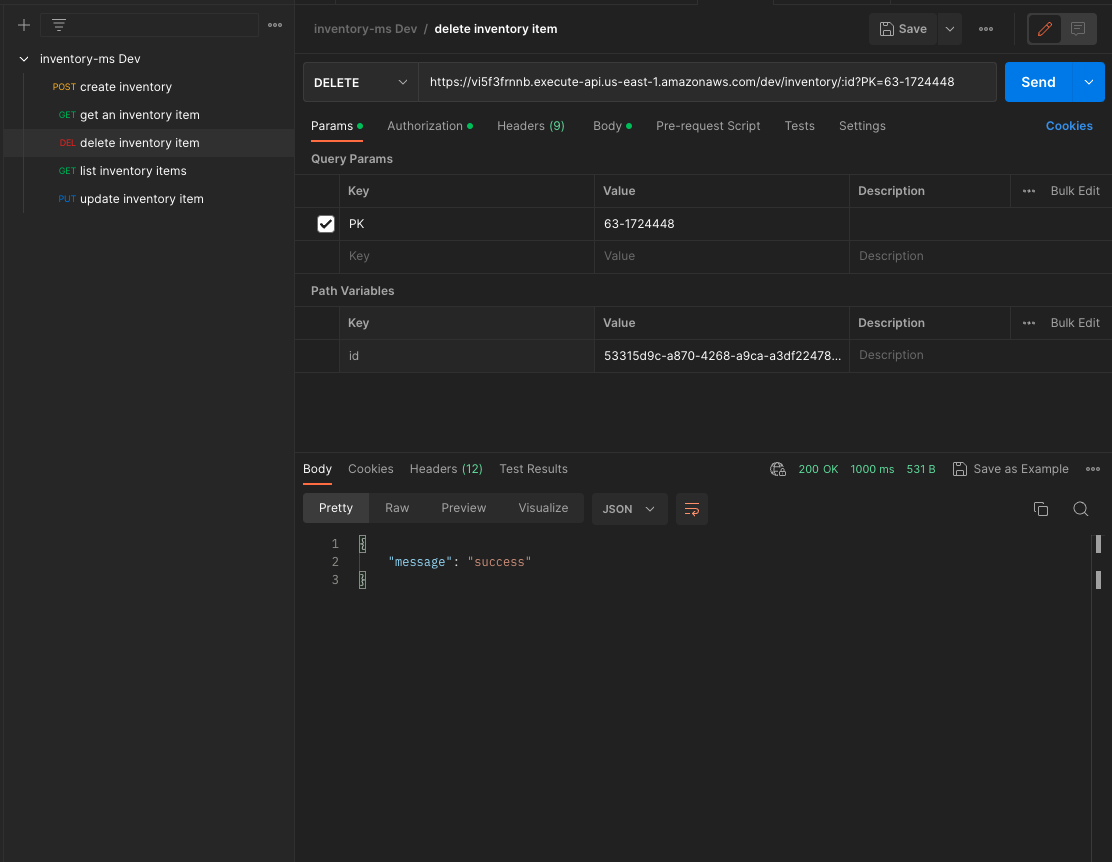
If we list all inventories for the Lego Blocks product, we see that we only have 2 inventory items because one of them has been successfully deleted.
Conclusion
In this post, we looked at the core features of CloudGTO, a platform that helps you build and deploy Serverless best-practice templates in minutes, and we demonstrated how you can quickly build an inventory microservice REST API and deploy it on AWS. Just like with any software development project, our inventory microservice is still in progress and there are so many other features that could be added before it is ready to be shipped. But CloudGTO helps you get there a lot faster.
CloudGTO is currently in public beta so you can try it out for free by visiting cloudgto.com where you can sign up for the beta program and gain access to the platform. As always with any beta access program, your feedback would be used in making the application work best for you so you stand a chance of getting your feedback taken into consideration before the platform has more users.


%20(1).svg)

.svg)


.webp)