Introduction
Raise your hand if you're already having trouble connecting to a remote database running in a Private Subnet. In almost every company, you will probably need to speak with the SysAdmin, share your SSH key to be inserted inside the bastion host machine, granting to you the permission to have the tunnel working and connect directly from your machine.
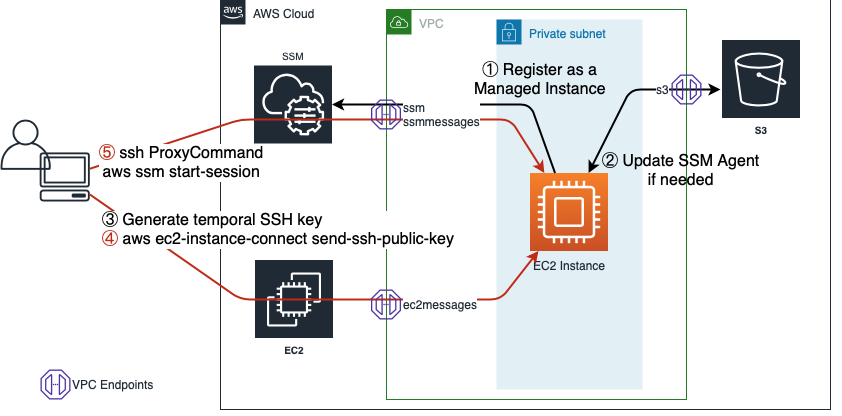
This article will help you to get rid of this problematic implementation and demonstrates how to have access over SSH in an EC2 Bastion instance having no previous SSH key installed on it, no ports opened and even no public IP address configured, using the AWS Systems Manager Agent.
Resources
Considering that you already have your Database and Private Subnet created, here is what we are going to use:
EC2 Instance
An EC2 instance using Amazon Linux as AMI. The Amazon Linux already came with the AWS SSM Client installed on it and we are going to need it. You should use another AMI but knowing that you will need to handle the agent installation. Besides it we need to guarantee that the InstanceProfile has permission to assume arn:aws:iam::aws:policy/AmazonSSMManagedInstanceCore policy role;
IAM User
Create an IAM User with ssm:StartSession, ec2-instance-connect:SendSSHPublicKey and ec2:DescribeInstances permissions. We are going to output the Access and Secret Key value of this user to the SLS Pro Dashboard;
4x VPC Endpoints
As we are dealing with a Private Subnet, we are going to need 4 VPC's endpoints configured to make it work as expected. 3 of this endpoints have the type Interface powered by AWS PrivateLink. Creating Interface endpoints incurs additional costs and you can check the pricing here;
Route Table
The last thing we should have is a exclusive Route Table configured for this service, associated to the same Private Subnet that we have the database running.
How it works
We are going to generate a temporary SSH key and inject it to the Bastion instance with the help of Amazon EC2 Instance Connect. And then for connecting the instance, we'll use AWS Systems Session Manager configuring SSH client with a specific proxy command.

If you want more information about it you should check these links:
- New Session Manager
- Getting Started with SSH Connections
- Introducing Amazon EC2 Instance Connect
- EC2 Instance Connect Methods
- SSH Proxy Command
Let's do this
You can get all the files used to get it done right here.
Requirements
- You need to have AWS CLI already installed in your machine;
- You need to have AWS Credentials already configured in your machine;
- You need to have AWS Session Manager Plugin already installed in your machine; Docs
On Mac:
 curl "https://s3.amazonaws.com/session-manager-downloads/plugin/latest/mac/sessionmanager-bundle.zip" -o "sessionmanager-bundle.zip"
  unzip sessionmanager-bundle.zip
  sudo ./sessionmanager-bundle/install -i /usr/local/sessionmanagerplugin -b /usr/local/bin/session-manager-plugin
Verify:
session-manager-plugin
Update your ~/.ssh/config:
If you are using Windows and have git installed, the path is probably c:\\Program Files\\Git\\etc\\ssh\\ssh_config. Follow the instructions below.
 # SSH over Session Manager
	host i-* mi-*
ProxyCommand sh -c "aws ssm start-session --target %h --document-name AWS-StartSSHSession --parameters 'portNumber=%p'"Setup Variables in Serverless Pro Dashboard:
  AWS_REGION
  SSM_BASTION_VPC_ID
  SSM_BASTION_CIDR_IP
  SSM_BASTION_SUBNET_ID_1
Deploy The Bastion
serverless deploy --stage <slsprostage> -vBastion Connection Script
You are going to need to have one tab of your terminal opened exclusively for this execution.
serverless loginThis will make sure that your terminal is authenticated with the Serverless Pro Dashboard.
Next we need to make a connection to the RDS database.
sh connect.sh
    --localport 2345
    --rdsurl xxxxxxxxxxx.xxxxxxxxxxxx.us-east-2.rds.amazonaws.com
    --rdsport 3306
    --slsorg xxxxxxxxxxxxx
    --slsapp xxxxxxxxxx
    --slsservice xxxxxxxxxx
    --slsstage xxxxxxxxxx
There are a series of command line arguments being passed in. Below is a description about each one.
Parameters:
- --localport [ Your tunnel local port ]
- --rdsurl [ The RDS Endpoint, located at AWS Console -> RDS -> Databases -> Your Database -> Connectivity & security ]
- --rdsport [ The RDS Port, located at AWS Console -> RDS -> Databases -> Your Database -> Connectivity & security ]
- --slsorg [ Your Serverless Dashboard Pro Org name ]
- --slsapp [ Your Serverless Dashboard Pro App name ]
- --slsservice [ Your Serverless Dashboard Pro Service name ]
- --slsstage [ Your Serverless Dashboard Pro Org stage ]
If we pass the proper values, we should see the following result in our terminal.

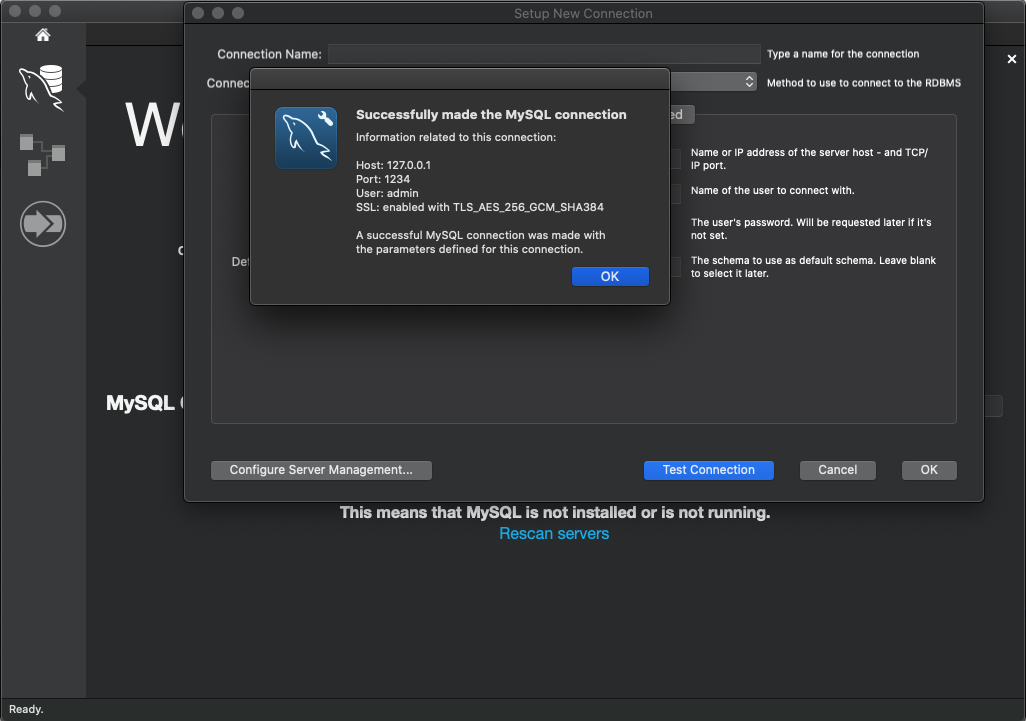
RDS Connection
To connect to the database you should use localhost as the Host name.
For the port, you should use the same port as you use set for the connect.sh script.
The credentials equal what you've configured for your RDS database in the IAC.

Conclusion
It's much safer and easier to share a connection script with your team and grant them access to your database instance via IAM credentials versus managing SSH keys. Besides the simplicity, you are also going to have all the EC2 instance connections logged to AWS CloudTrail so that you can audit them easily.
A common security issue in the past occurred when a .pem file was accidentally leaked. This allowed anyone with access to SSH into the EC2 instance that had connection with your private database.
All though the SSH Tunnel approach was more secure than the alternative public database, it still had issues.
With this pattern and this article you should no longer face these kind of issues and have peace of mind that you're connecting to RDS in a secure way.


%20(1).svg)

.svg)


.webp)