%20(1).svg)

.webp)
.svg)


Looking for Senior AWS Serverless Architects & Engineers?
Let's TalkIntroduction
In the dynamic landscape of modern software development, real-time communication is not just a luxury—it's a necessity. As applications become more interactive, users increasingly demand seamless and instantaneous updates. This is where WebSockets, a powerful communication protocol, has emerged as a game-changer. From chat applications to collaborative editing tools, and from live streaming to online gaming, WebSockets have become the backbone of many cutting-edge technologies. Unlike traditional HTTP communication, which relies on a request-response model, WebSockets establish a persistent, bidirectional connection between the client and server, allowing for efficient, low-latency communication.
The surge in the popularity of WebSockets can be attributed to their ability to provide real-time, event-driven communication. This paradigm shift has not only enhanced user experiences but has also opened doors to a wide array of applications that were once deemed impractical.
In this article, we delve into the fundamentals of WebSockets and guide you through setting up an entry-level WebSocket API Gateway on AWS. Whether you are a seasoned developer exploring new avenues or an entry-level enthusiast eager to grasp the potential of real-time communication, this guide aims to demystify WebSockets and empower you to integrate them seamlessly into your Serverless architecture.
Let's embark on a journey into the world of real-time communication, where WebSockets reign supreme and API Gateways pave the way for scalable, efficient, and engaging applications.
💡 If you’d like to dive straight into the practical aspects of this article, you can go straight to the Hands-On section
What are WebSockets?
WebSockets represent a communication protocol that facilitates real-time, bidirectional data exchange between clients and servers over a single, long-lived connection. Unlike traditional HTTP, which relies on a request-response model where each client request triggers a separate server response, WebSockets enable continuous communication, allowing data to be pushed from the server to the client and vice versa.
Here's a detailed breakdown of the key characteristics of WebSockets:
1. Persistent Connection:
- WebSockets establish a persistent connection between the client and server, eliminating the need to repeatedly open and close connections for each interaction.
- This persistent connection remains open as long as the application is active, facilitating instantaneous communication without the overhead of connection establishment for each message.
2. Bidirectional Communication:
- WebSockets support bidirectional communication, meaning data can flow in both directions—both from the server to the client and from the client to the server.
- This bidirectional flow is crucial for real-time applications, such as live chats, online gaming, financial trading platforms, and collaborative tools.
3. Efficiency and Low Latency:
- Due to the persistent connection, WebSockets significantly reduce latency compared to traditional HTTP. The server can instantly push updates to the client without waiting for a request.
- This low-latency communication is especially vital for applications where timely information delivery is critical, such as stock market updates, live sports scores, or instant messaging.
4. Reduced Overhead:
- WebSockets have minimal overhead compared to HTTP, as they don't require the repetitive header information present in each HTTP request.
- The reduced overhead enhances efficiency, making WebSockets an ideal choice for scenarios where rapid, frequent communication is necessary.
Comparison with HTTP:
1. Request-Response vs. Persistent Connection:
- HTTP relies on a request-response model, where a client sends a request to the server, which responds with the requested data. Each request involves opening a new connection.
- WebSockets establish a persistent connection, allowing data to be pushed from either the client or server at any time without the need for a specific request.
2. Latency:
- HTTP introduces latency due to the overhead associated with establishing a new connection for each request.
- WebSockets offer low-latency communication, making them suitable for applications requiring rapid updates and real-time interaction.
3. Use Cases:
- HTTP is well-suited for traditional web applications, where periodic updates or user-initiated requests are acceptable.
- WebSockets shine in applications demanding real-time updates, such as live notifications, collaborative editing, online gaming, and financial trading platforms.
Now that we’ve gotten a good grasp of WebSockets and how they are used in modern software development, let’s dive into a practical implementation of a WebSockets API using a combination of AWS Services - Amazon API Gateway and AWS Lambda.
Hands-On
Architecture Diagram
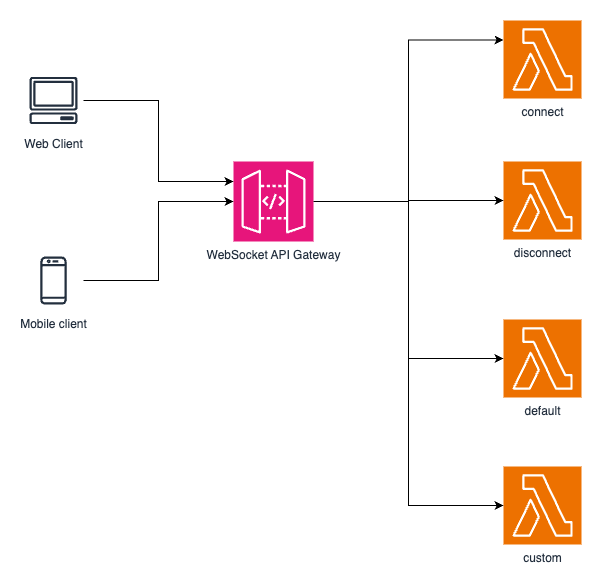
We’ll be building a simple API Gateway WebSocket API. A connection can be initiated from any client that supports the WebSocket protocol such as a web or mobile app. We’ll also be implementing the four routes supported by API Gateway WebSocket APIs namely:
- $connect: API Gateway calls the $connect route when a persistent connection between the client and a WebSocket API is being initiated.
- $disconnect: API Gateway calls the $disconnect route when the client or server disconnects from the API.
- $default: API Gateway calls the $default route if the route selection expression cannot be evaluated against the message or if no matching route is found.
- custom: API Gateway calls a custom route after the route selection expression is evaluated against the message if a matching route is found. Route selection expressions usually follow the format ${request.body.action} and during evaluation, the action property is used to determine the route to forward the messages to.
The four routes defined above will each be backed by a Lambda function that will act on the messages being received in the appropriate manner. One thing to note is that API Gateway has a maximum integration timeout of 29 seconds and what this means is that if your Lambda function requires more than 29 seconds to process the message from API Gateway, you would have to decouple your logic using an asynchronous approach.
Pre-requisites
Before we begin, you would need to ensure that you have all of the following:
- An AWS Account. To sign up for an AWS account click here.
- The AWS CLI. To learn how to install and configure the AWS CLI on your local device, click here.
- Serverless Framework. We’ll be using the Serverless Framework as our Infrastructure-As-Code tool that will facilitate the process of building our Serverless API. To learn how to install and configure Serverless Framework on your device, click here.
Congratulations! If you’ve gotten to this point, you’re all set up to start building your first WebSocket API on AWS. Ready to start?
Step 1: Setup a new Serverless Framework project
To start building, open the terminal and navigate to an appropriate folder on your device then run the following command:
'serverless'
You should be presented with an interactive menu similar to the one below prompting you to select a starter project.
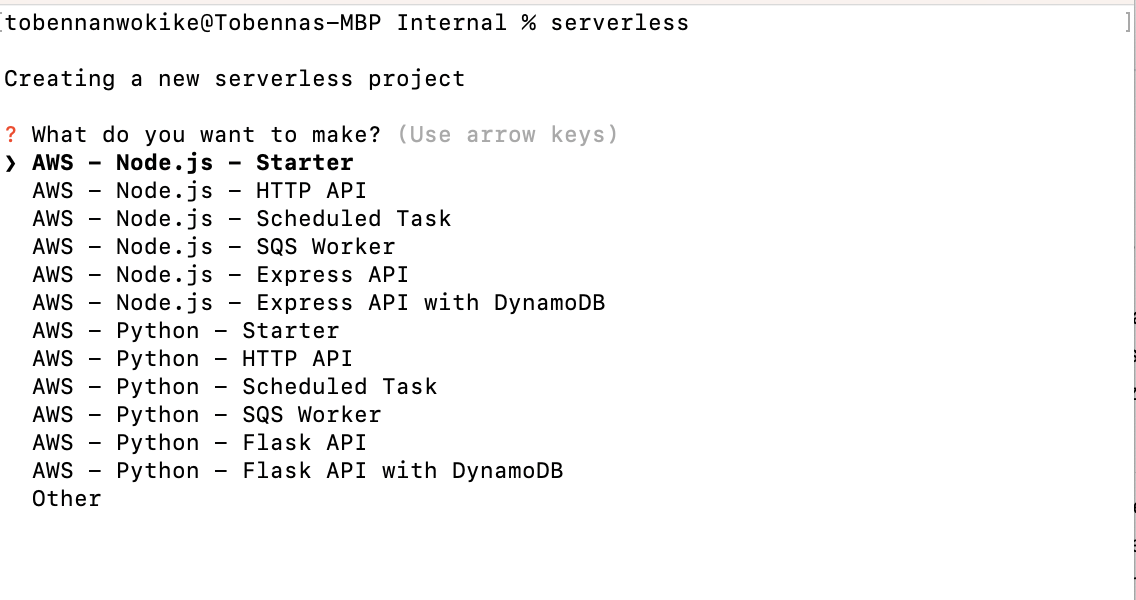
For this tutorial, we will be using the Node.js starter project. Go through the ensuing steps and navigate to the project folder.
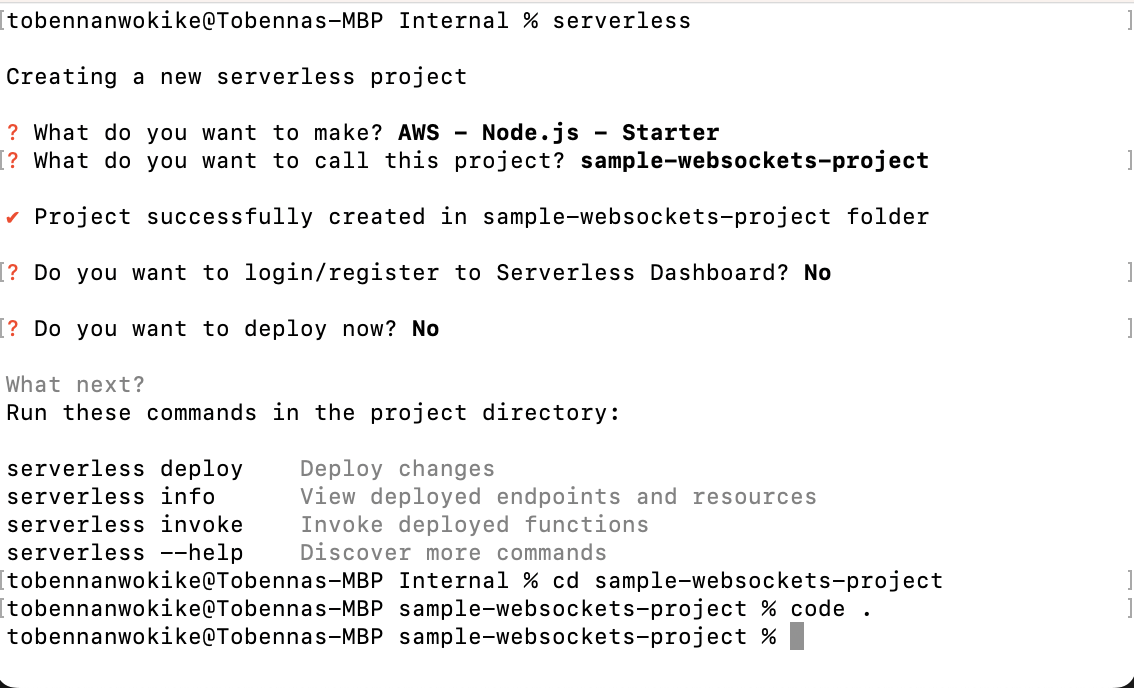
Open the project in your favorite code editor (VSCode, Atom, etc) and you should be presented with a project structure like the one below.

Step 2: Add the $connect route
Next, we’ll be creating our first route for the WebSockets API and in order to do this, we’ll be defining our resources in the 'serverless.yml' file in the root folder. Copy the code below and replace the current starter code in your 'serverless.yml' file with it:
The 'serverless.yml' file above contains the service name and Serverless Framework version. It also contains provider-related information in the 'provider' section which also contains metadata for the WebSockets API Gateway. Within the 'custom' section, we define the default stage for the WebSockets API Gateway and finally, we define the AWS Lambda function in the 'functions' section of the .yml file.
We’ll now proceed to add the handler for the connect Lambda function which we have just defined. To do so, we’ll be getting rid of the 'index.js' file which was generated with the starter code, and then create a new folder called 'src' which will house the Lambda function for each route. Create a new file with the name 'connect.js' inside the 'src' folder, paste the code below in the file, and save it.
For this walkthrough, the handler function just logs the event and context objects from the Websocket API Gateway to CloudWatch. In a real world scenario, details of the connection would most probably be persisted in a database such as DynamoDB and then used subsequently to send messages back and forth between the client and server. It is important to note that the lambda functions must always end with this line 'return { statusCode: 200 };' for the requests to the WebSockets API to be processed successfully. We’ll also be doing a little extra setup to ensure that we are able to deploy successfully. As can be seen from the function above, we are using ES6 syntax and as such we’d need to create a package.json file in the root folder and paste the following code in it:
We are now ready to deploy our Websockets API with the first route on AWS and to get this done, simply run the following command in the terminal: 'serverless deploy --aws-profile <your-profile-name>'
You would need to replace <your-profile-name> with the name of the AWS profile that you created while setting up the AWS CLI on your machine. If the deployment was successful, your terminal should look similar to the screenshot below.
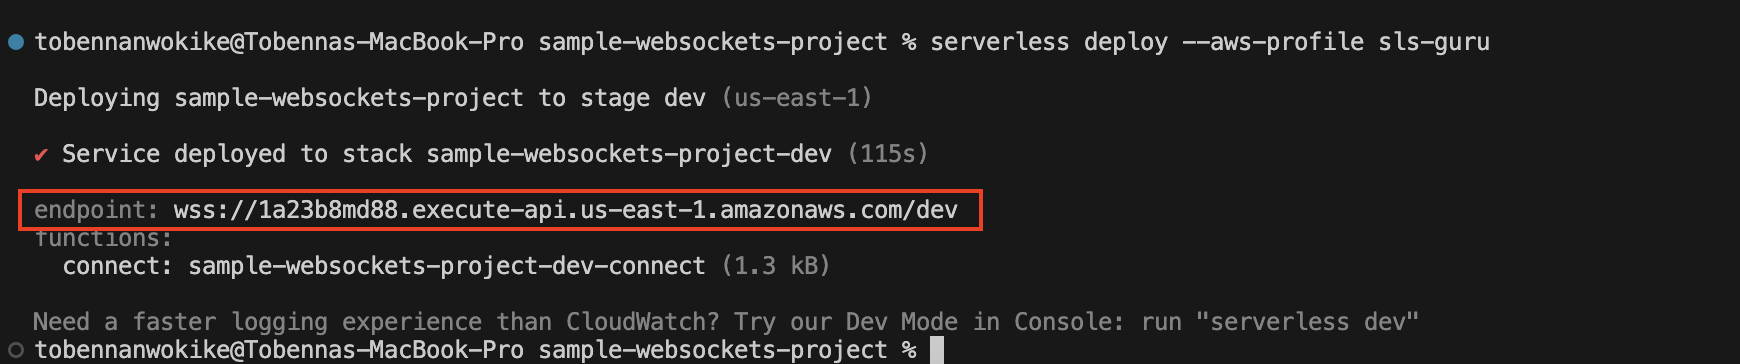
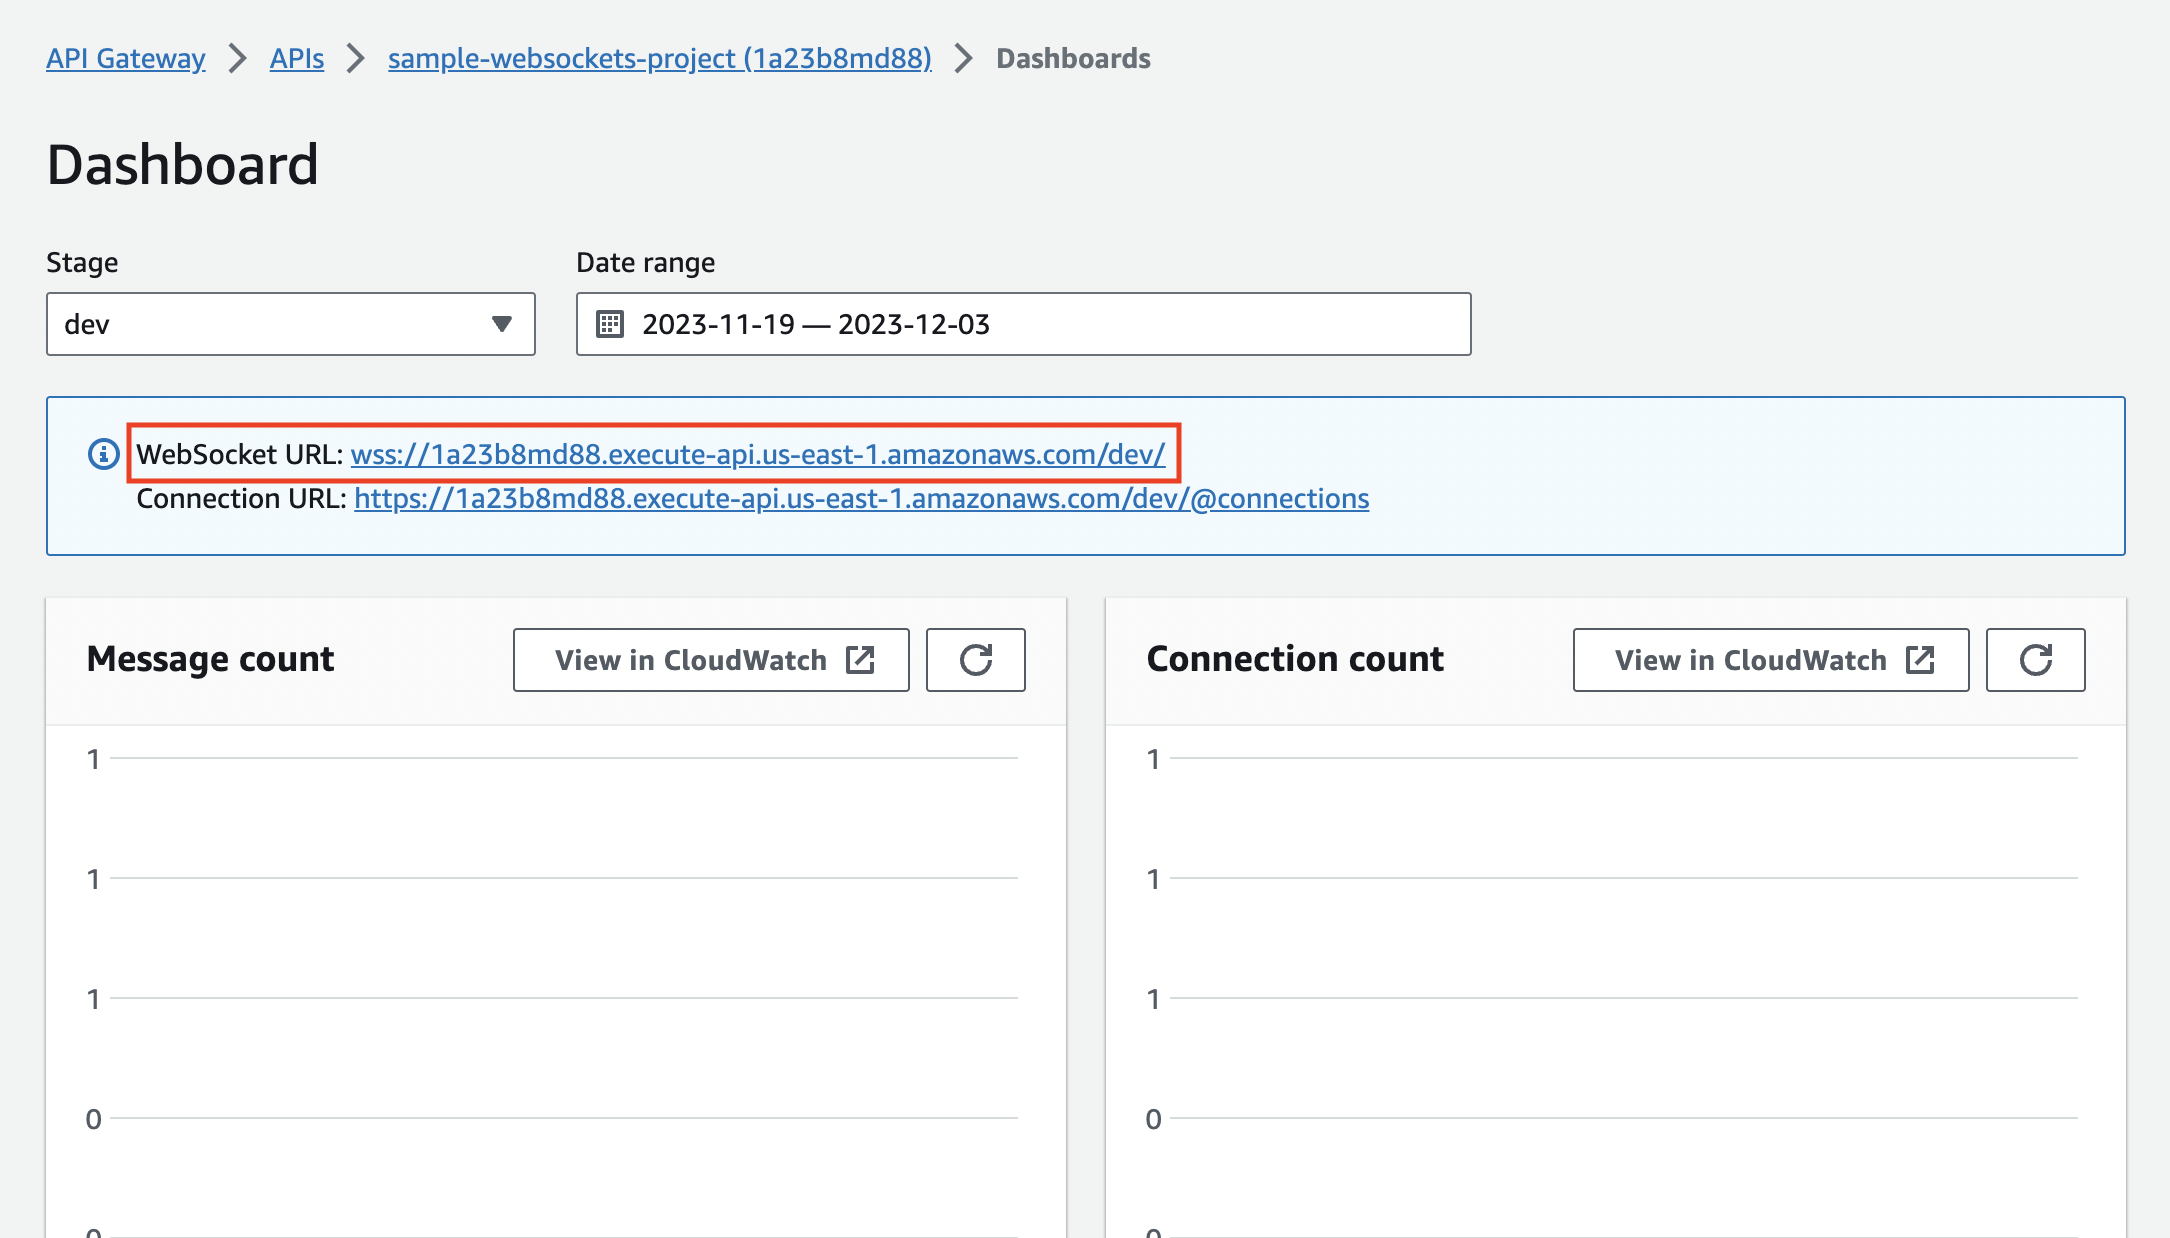
You would need to use the endpoint marked in the screenshot to connect to the Websocket API which we have just created. It can also be retrieved from the AWS console by navigating to the API Gateway service, selecting your Websocket API, and clicking on Dashboard on the Menu.
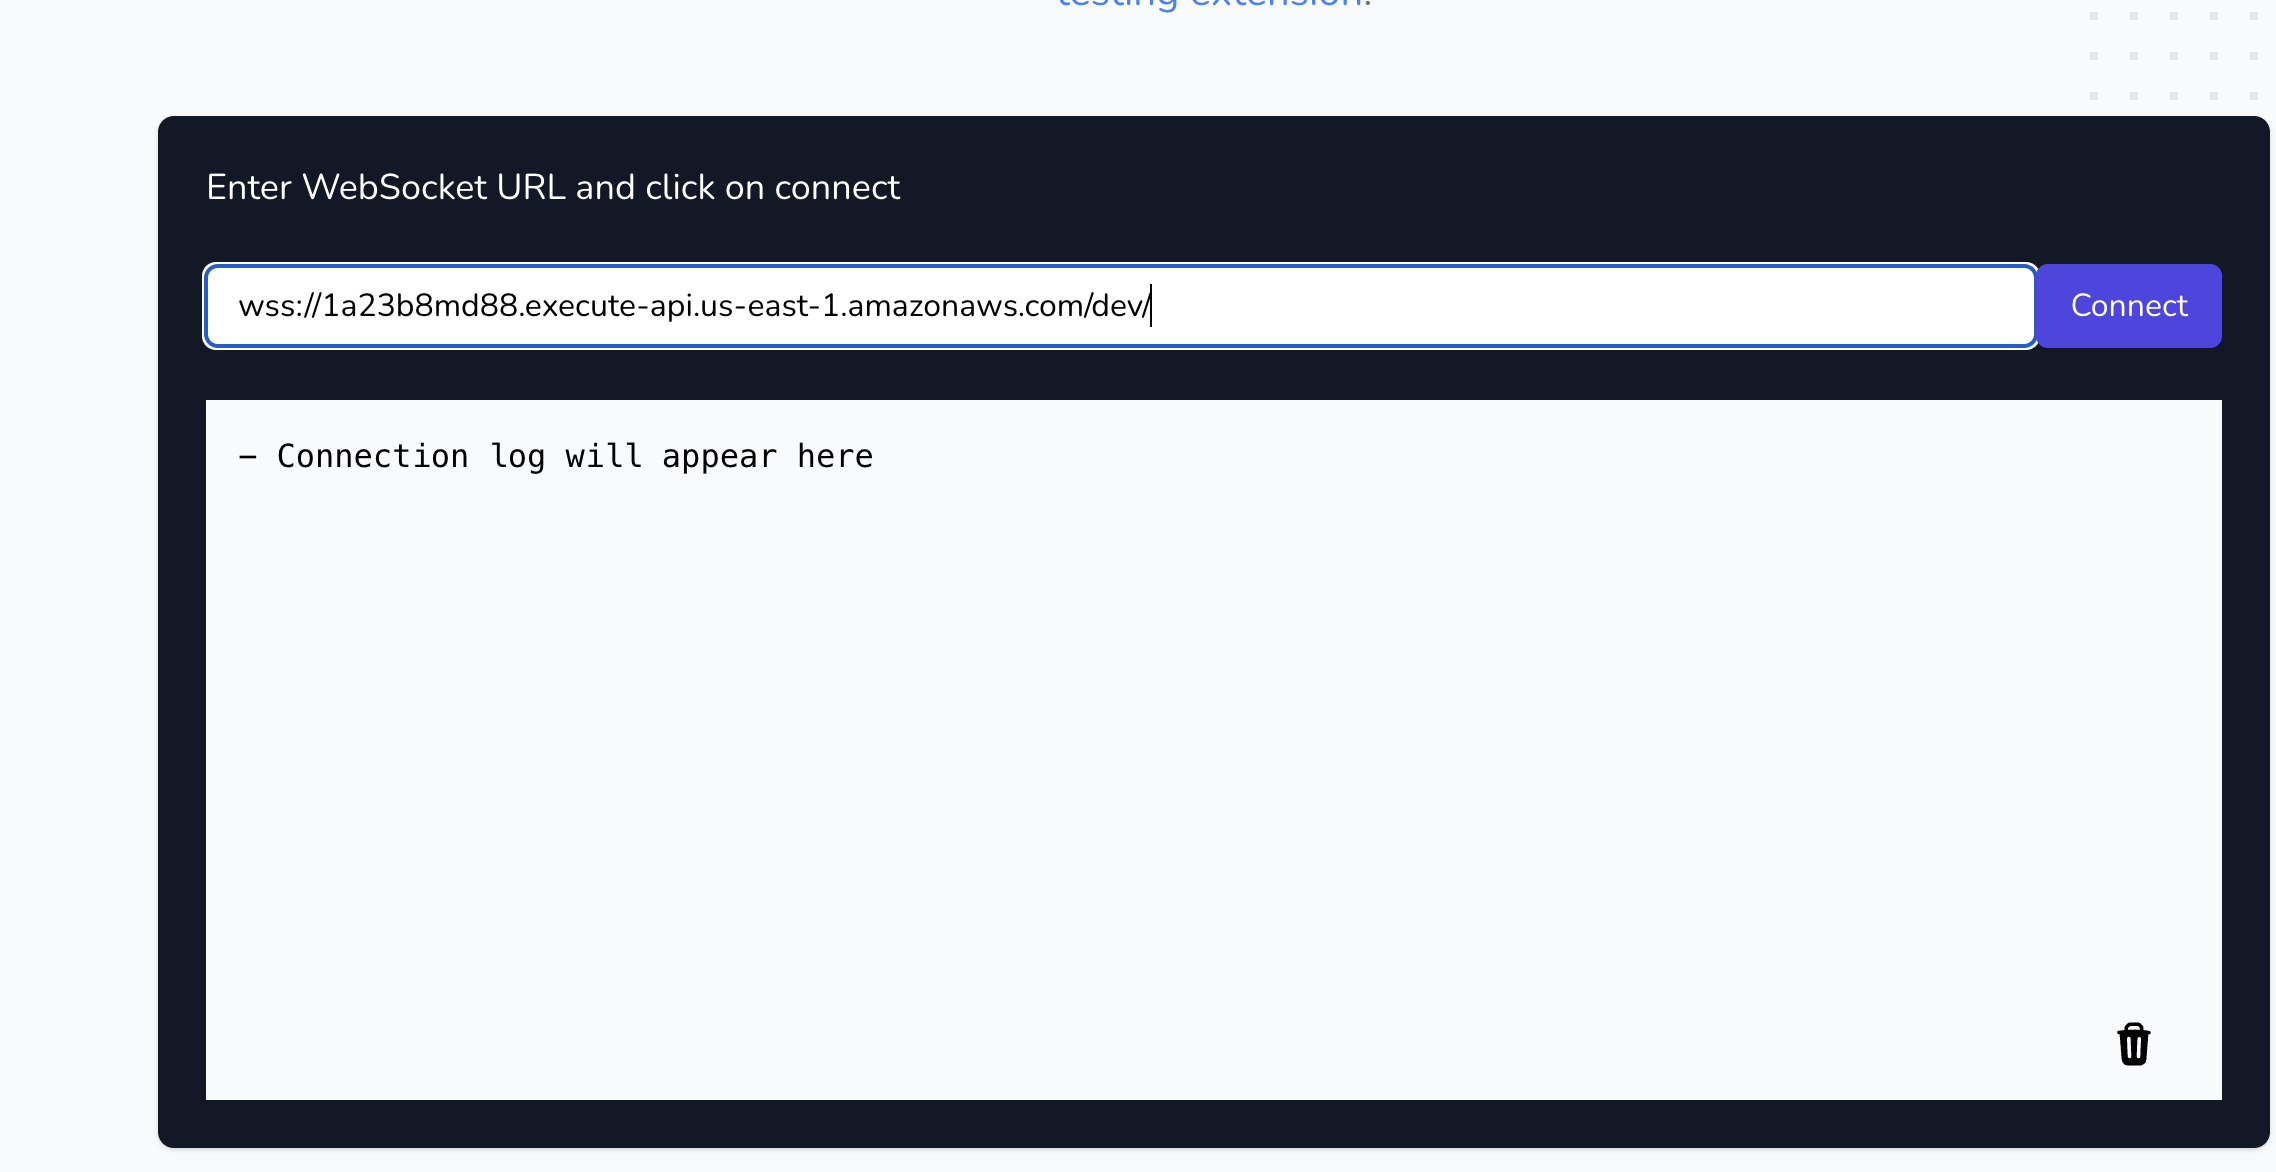
To connect to our Websocket API, we’ll be making use of an online service called PieSocket (https://www.piesocket.com/websocket-tester). To test the API, you just need to paste the URL in the input box and click on Connect. If the connection is successful, then you will receive a “Connection Established” message.
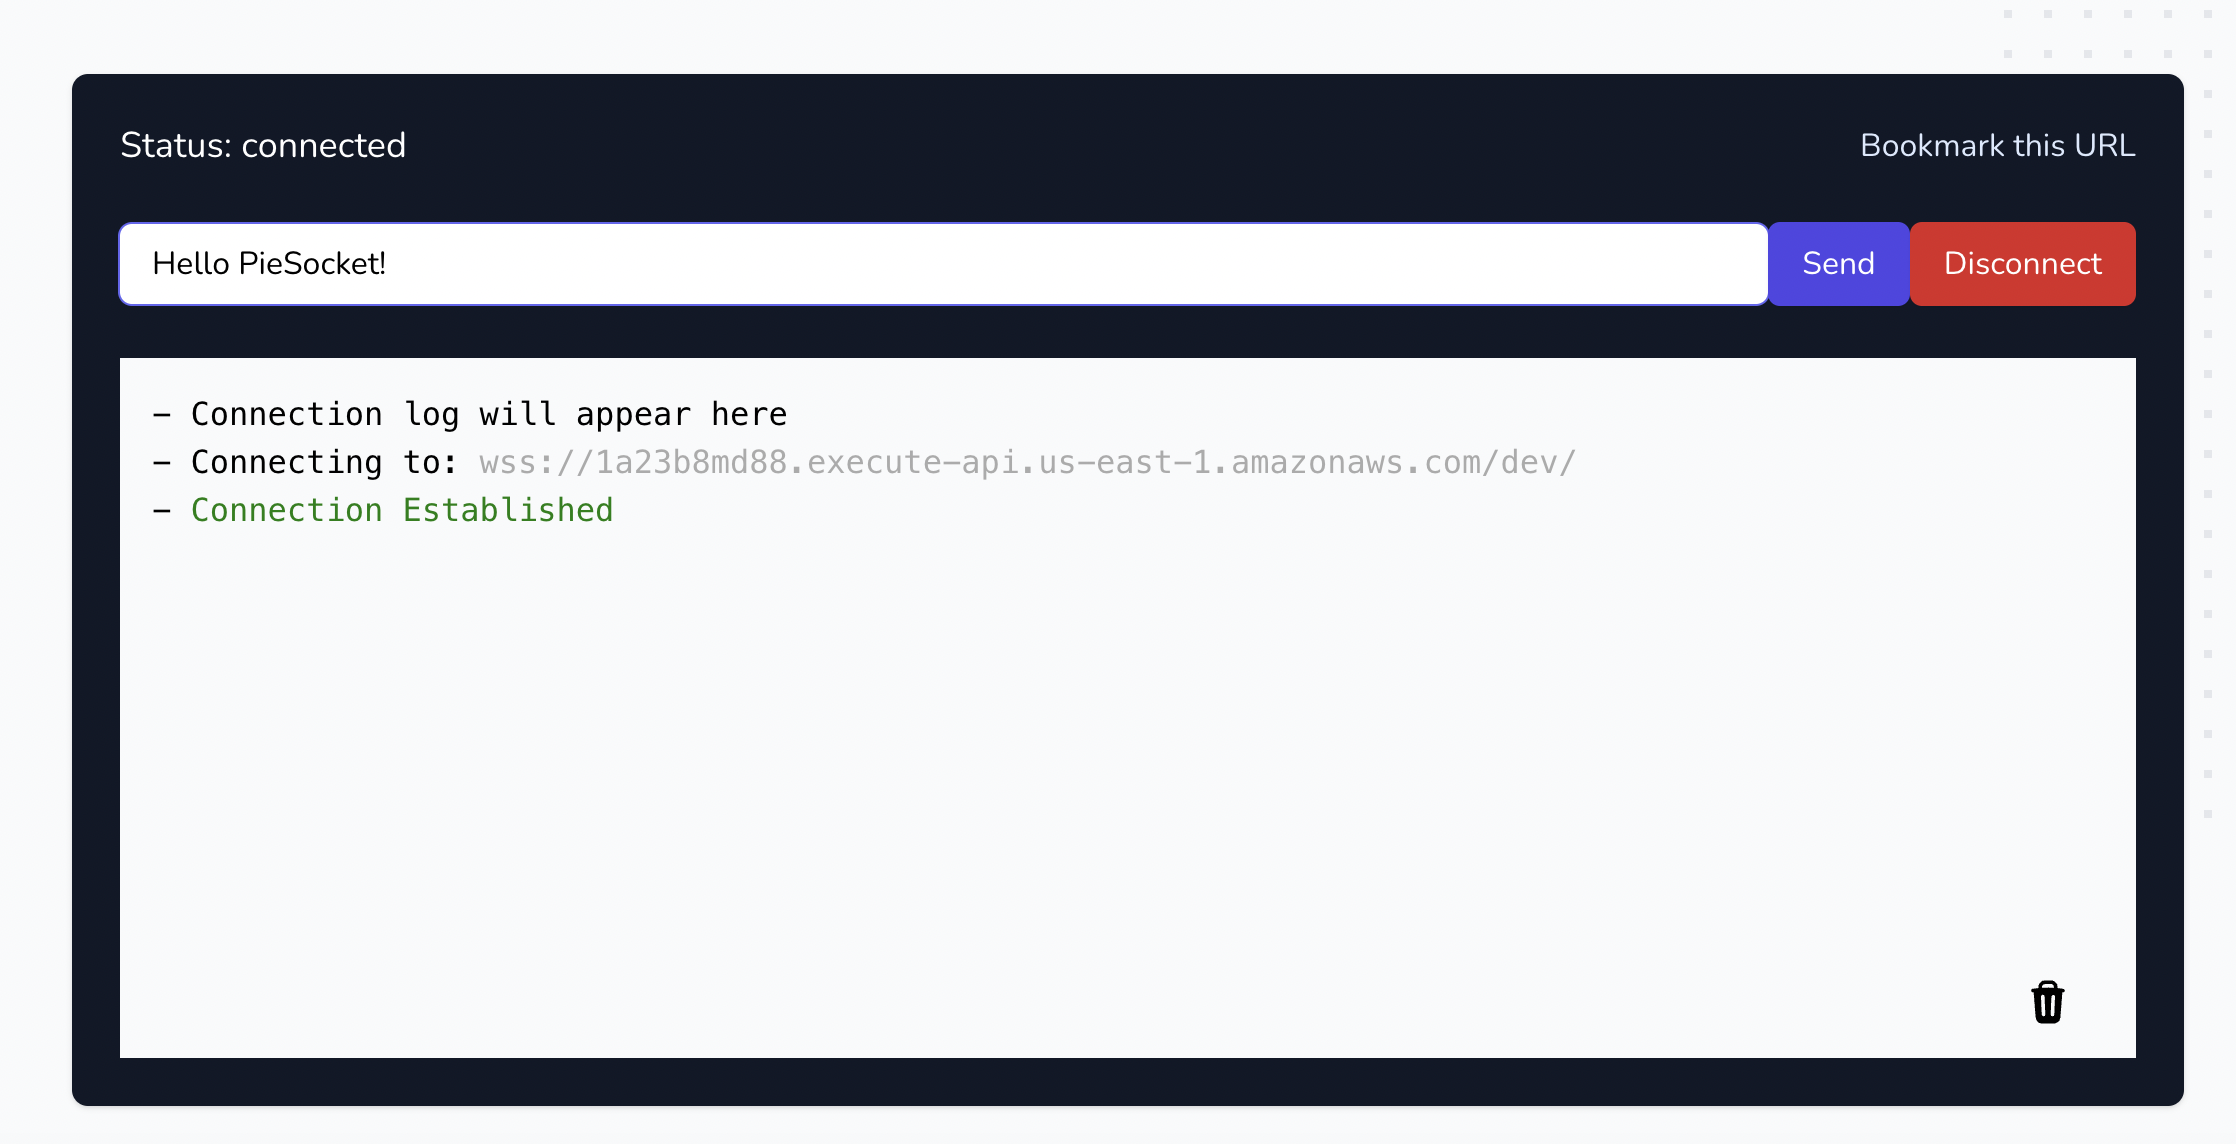
We can also verify that the connection was established correctly by viewing the logs in CloudWatch. Remember that the handler function logs the event in CloudWatch.
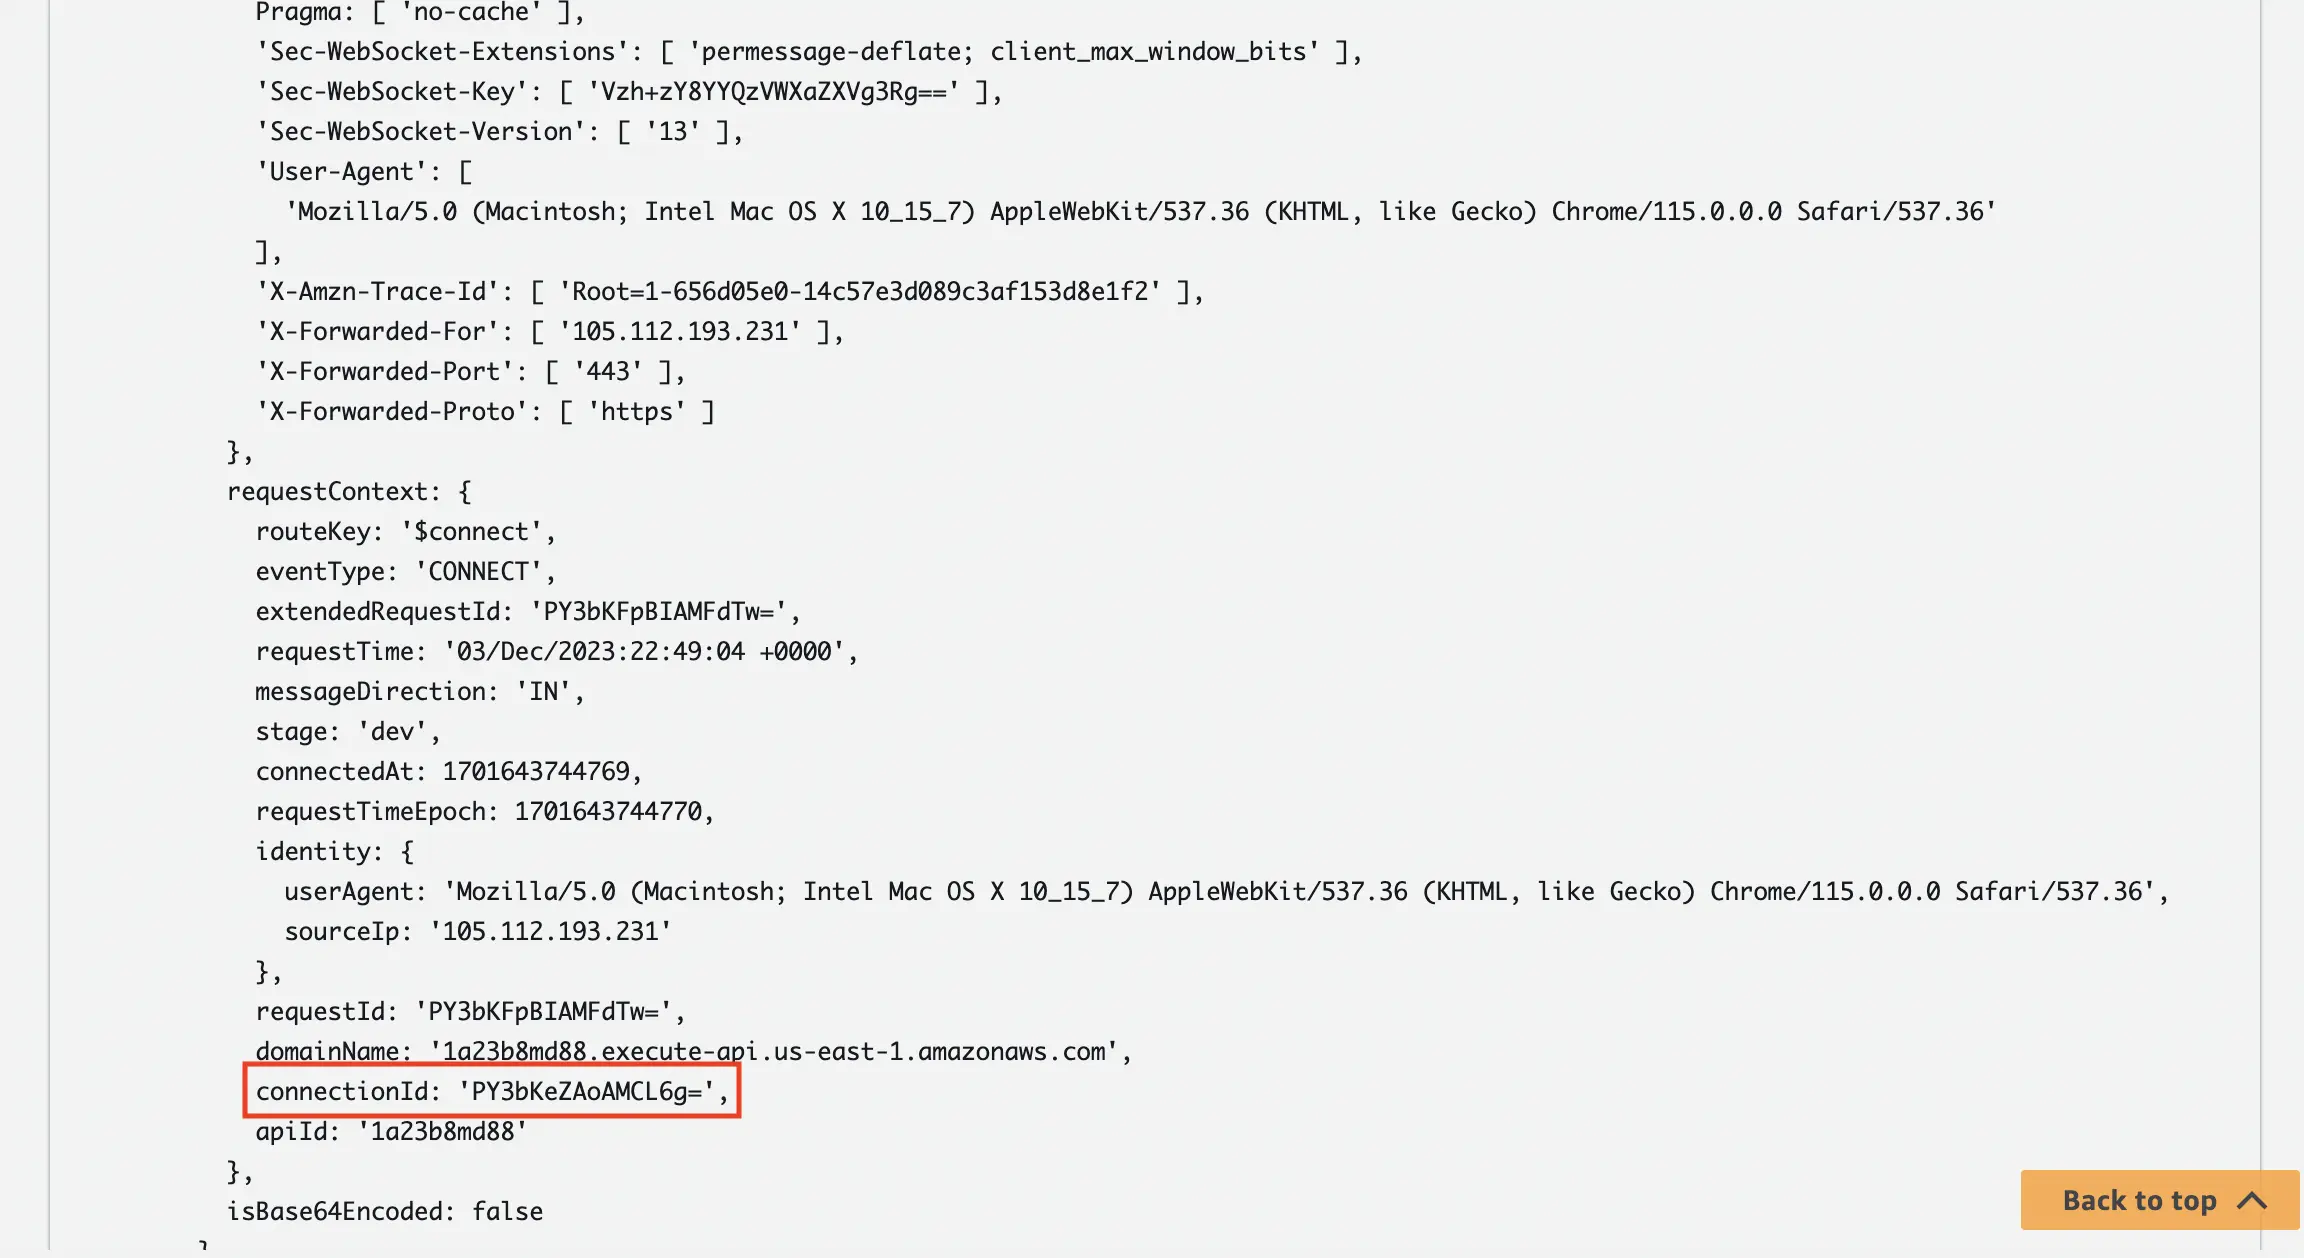
Take note of the 'connectionId' in the screenshot above as we will be using it in the sections that follow to send messages between the client and the server.
Hurray! We have just created our first Websocket API and tested the connection successfully.
Step 3: Add the $disconnect route
We’ll now be adding the $disconnect route which will be called when the client or server disconnects from the API. To do this, we’ll first need to modify the 'functions' section of 'serverless.yml' file. The modified section should look like the code below:
Similar to what we did for the $connect route, we will be creating the handler function for the $disconnect route. To do this, we’ll create a new file called 'disconnect.js' in the 'src' folder with the code below:
We are also logging the event in the disconnect handler function but in a real-world scenario, we’d probably remove the connection details from the database here. We’d just need to run the same deploy command as in the previous step and our second route should be deployed successfully.

As mentioned previously, the 'disconnect' lambda function will be called whenever the client or server disconnects from the API.
Step 4: Add the $default route
The $default route as the name implies is called whenever there is no matching route to which the message should be sent. In our case, if we do not explicitly state that the message should be sent via a specific route then it is sent to the $default route. To define the $default route, we’ll first add the route in our 'serverless.yml' file. See the code below:
We’d also need to add some environment variables in the provider section of our 'serverless.yml' file. We’ll be using these variables in our handler function.
We are using CloudFormation Intrinsic functions 'Fn::Join' and 'Ref' to get the WebSocket API Gateway endpoint and to also get the AWS region in which our application is located.
As done previously for the existing endpoints, we’ll need to create a new file 'default.js' under the src folder. The file should contain the code below:
In the handler function, we are first importing the relevant operations from the AWS SDK that will enable us to send a message back to the client when a message is sent to the $default route. We then extract the message ('body') and 'connectionId' from the API Gateway event and then initiate the 'ApiGatewayManagementApiClient' using the environment variables that we have defined previously. Lastly, we are then sending a message back to the client letting it know that the message has been received and throwing an error if the message fails to be sent to the client.
Before we can test this, we’d need to install the imported AWS package by running the command below in our terminal from within the project root:
'npm install @aws-sdk/client-apigatewaymanagementapi'
Once this is done, we can then deploy and test that it works using PieSocket.
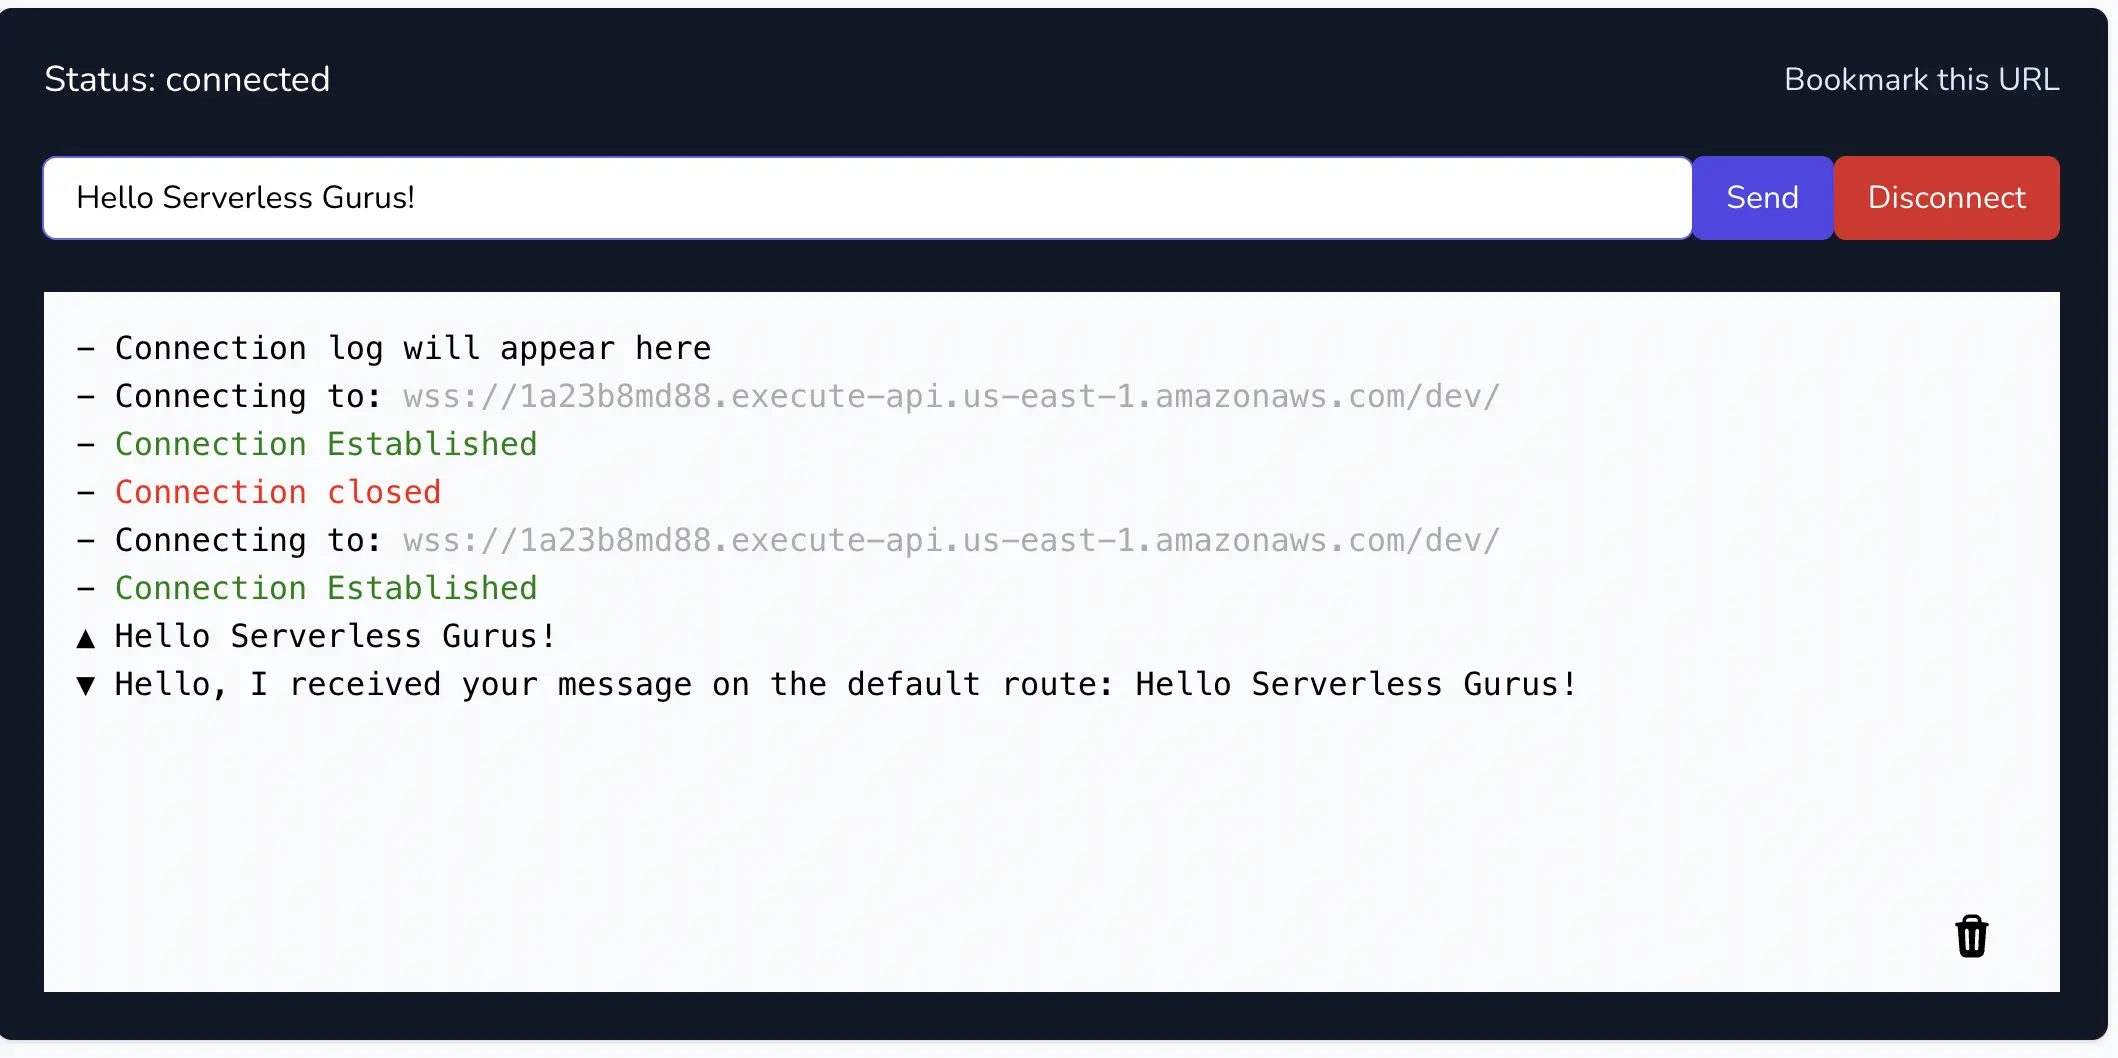
You should receive a response back from the server as presented in the screenshot above if your deployment was successful.
Alternatively, you could also set up the $default route to respond to messages without having to install and import the AWS SDK as described above. In order to do so you’d have to make the following changes to the code
serverless.yml
default.js
It all depends on your preference but for this article, we’ll be using the AWS SDK.
Step 5: Add the custom route
Finally, we will be implementing the custom route in order to send messages via a user-defined route. In order to do this, we’ll first modify the functions section of our 'serverless.yml' file to include the definition for this route.
You’ll notice that, unlike the previous routes, the custom route does not have a '$' sign in the route definition. Custom routes are user-defined and as a result, do not need to include the '$' sign.
Next, we’ll create the 'custom.js' file in the 'src' folder with the code below contained in it.
This is very similar to the 'default.js' handler function with the only difference being that we are extracting the message that was sent from the body because the messages sent to custom routes are sent in JSON format as will be seen when we test it out. If we can recall, when defining our 'serverless.yml' file we had written a line in the 'provider' section - 'websocketsApiRouteSelectionExpression: $request.body.action'. Adding this line means that in order to send a message to a custom route, we’d need to send JSON which would contain an 'action' key with a value that matches the name of the route which in our case is 'custom'.
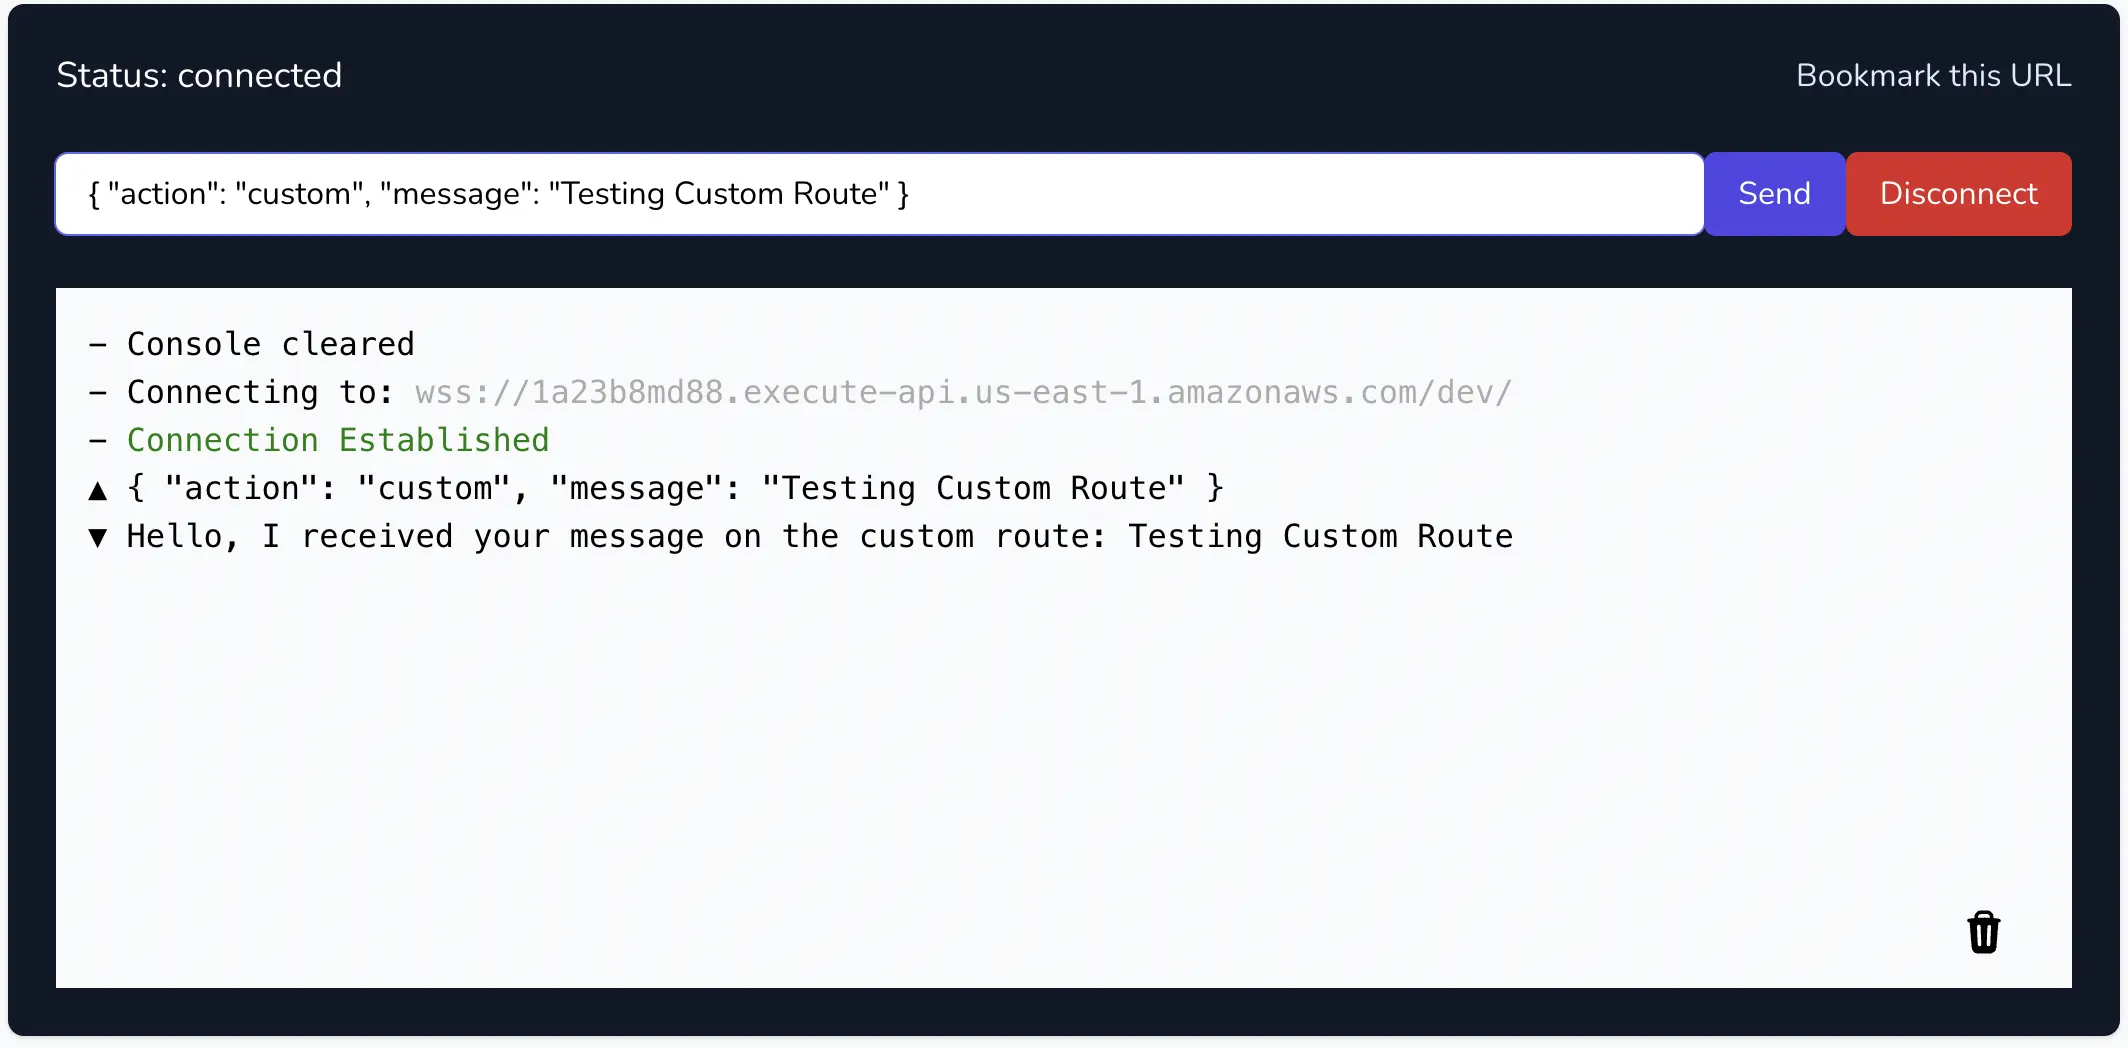
We can test this out using PieSocket. Make sure to deploy first and then enter the following JSON in the input field
We should receive a message back from the custom route as shown in the screenshot below:
If you’ve made it this far, WELL DONE!!!.
You have successfully created your first WebSocket API Gateway with four routes and you can build on this to create some really powerful WebSockets in the near future.
Now that you’ve completed the walkthrough, you might also want to remove all the created resources to avoid unexpected costs. To do so, run the following command in your terminal: 'sls remove'
Thank you very much for following along and I hope that you enjoyed reading the article and following along.
Conclusion
In this comprehensive guide, we've navigated through the fundamentals of WebSockets, shedding light on their key attributes such as persistent connections, bidirectional communication, low latency, and reduced overhead. Drawing a sharp contrast with HTTP, we've explored how WebSockets revolutionize the way data is exchanged between clients and servers.
We embarked on a hands-on journey to implement an entry-level WebSocket API Gateway on AWS, using Amazon API Gateway and AWS Lambda. The step-by-step process covered setting up the project, defining routes such as $connect, $disconnect, $default, and a custom route. We explored the architecture, prerequisites, and delved into practical implementation, accompanied by detailed code snippets.
As you've successfully reached the end of this tutorial, you're now equipped with the knowledge to integrate WebSockets seamlessly into your serverless architecture. This guide aimed to demystify WebSockets and empower you for your next ventures in the dynamic realm of modern software development.
Thank you for accompanying us on this journey into the world of real-time communication. Happy coding!
You can get the entire source code for the project here.
References